
As the holiday season approaches, finding creative ways to present small Christmas gifts becomes both a challenge and an opportunity. A floating shelf display offers an elegant, space-efficient solution—especially in homes with limited floor or table space. Unlike traditional gift tables that can clutter living areas, a wall-mounted display turns presents into part of your seasonal décor. With clean lines, minimalist hardware, and strategic placement, floating shelves elevate small gifts from afterthoughts to centerpieces.
This guide walks through the entire process: planning dimensions, selecting materials, securing the structure safely, styling for visual impact, and maintaining stability during high-traffic gatherings. Whether you're preparing for a cozy family gathering or hosting guests in a studio apartment, this project combines practicality with festive charm.
Design Considerations for Holiday Floating Shelves
The success of a floating shelf display lies not just in construction but in thoughtful design. Before picking up tools, assess the room where the shelf will be installed. Consider traffic flow, wall composition, and proximity to other decorations. The goal is visibility without obstruction.
Most small holiday gifts—stocking stuffers, mini ornaments, wrapped chocolates, or personalized trinkets—weigh less than two pounds each. This makes them ideal for floating shelves, which rely on hidden brackets or solid wood supports embedded into wall studs. However, cumulative weight matters. A 36-inch shelf holding ten gifts could carry 15–20 pounds, plus the shelf’s own weight.
Height placement is crucial. Mount the shelf at eye level when standing or slightly lower if viewed from a seated position near a couch or fireplace. For households with children, consider placing it higher or using lightweight, non-breakable items as gifts.
Aesthetic cohesion also plays a role. Choose a wood finish that complements existing furniture or trim—walnut for warmth, white oak for modern minimalism, or painted pine for a cottage feel. If the shelf doubles as year-round storage, opt for neutral tones; for seasonal flair, stain or paint it in deep red, forest green, or metallic silver.
Materials and Tools You’ll Need
Gathering the right supplies ensures a smooth build. While some floating shelves use complex internal bracing systems, a simple cantilevered design works perfectly for light loads like holiday gifts.
“Floating shelves should always anchor into structural framing. Drywall anchors alone won’t support even moderate weight over time.” — Marcus Tran, Residential Carpenter & DIY Educator
Essential Materials
- Hardwood board (1x6 or 1x8 inch, 24–48 inches long)
- Steel L-bracket or wooden cleat (for support)
- Wood screws (2.5-inch for stud attachment, 1.25-inch for face fixing)
- Wall anchors (only if bracket spans between studs)
- Sandpaper (120 and 220 grit)
- Wood stain or paint (optional)
- Clear polyurethane sealant (recommended for durability)
Required Tools
- Tape measure
- Level
- Stud finder
- Drill/driver
- Screwdriver
- Clamps
- Saw (circular, miter, or hand saw)
- Pencil and masking tape
Select kiln-dried hardwood over soft pine if possible—it resists sagging better under load. Reclaimed barn wood adds character but must be inspected for warping or insect damage.
Step-by-Step Installation Guide
Building a secure floating shelf takes about 2–3 hours, including prep and finishing. Follow these steps carefully for a professional result.
- Measure and cut the shelf board. Decide on length based on available wall space and number of gifts. Standard lengths are 24\", 36\", or 48\". Cut cleanly with a miter saw for square edges.
- Sand thoroughly. Begin with 120-grit paper to remove imperfections, then finish with 220-grit for smoothness. Wipe away dust with a tack cloth.
- Apply finish (optional). Stain or paint the board and allow full drying—overnight is best. Seal with polyurethane for scratch resistance, especially important during busy holidays.
- Locate wall studs. Use a stud finder to identify at least two studs within your shelf span. Mark their centers with pencil. Most walls have studs spaced 16 inches apart.
- Prepare the support system. For heavy-duty strength, install a wooden cleat: cut a 1x4 board to match shelf length minus 1 inch. Alternatively, use a steel L-bracket rated for at least 50 lbs.
- Mount the cleat or bracket. Position it horizontally so the top edge aligns with your desired shelf height. Secure it to each stud using two 2.5-inch screws per stud. Ensure it's perfectly level.
- Attach the shelf. Slide the finished board onto the cleat or bracket. From underneath or through pre-drilled holes, fasten upward-facing screws through the cleat into the shelf. Conceal screw heads with wood filler if desired.
- Test stability. Press down firmly along the front edge. There should be no wobbling or shifting. Add corner braces or additional anchors if needed.
Do’s and Don’ts: Building a Safe and Stylish Shelf
A poorly secured shelf risks collapse, damaging gifts and potentially injuring someone. Avoid common mistakes by following this comparison table.
| Do | Don’t |
|---|---|
| Anchor directly into wall studs | Rely solely on drywall anchors for primary support |
| Limit shelf overhang to no more than 6 inches beyond support | Extend shelf too far forward without rear reinforcement |
| Distribute gifts evenly across the surface | Stack multiple heavy items at one end |
| Use felt pads under gifts to prevent scratches | Place abrasive or damp objects directly on wood |
| Inspect monthly for loose screws or sagging | Forget maintenance after initial installation |
Styling Your Gift Display for Maximum Impact
Once built, the shelf becomes a curated gallery of holiday cheer. Thoughtful arrangement enhances visual appeal and invites interaction.
Begin by grouping gifts by color, size, or recipient. Alternate taller boxes with flat ones to create rhythm. Incorporate natural elements—mini evergreen sprigs, cinnamon sticks tied with twine, or dried orange slices—for organic texture. Battery-powered fairy lights strung behind or beneath the shelf add subtle glow without heat risk.
For families with young children, place labeled tags visibly on each package. Use calligraphy-style cards clipped to ribbon loops rather than adhesive stickers that might mar finishes.
“A well-styled shelf tells a story. Let the arrangement reflect personality—playful, elegant, rustic—just like the gifts inside.” — Lena Patel, Interior Stylist & Seasonal Décor Consultant
If reusing the shelf post-holidays, swap out gifts for books, framed photos, or potted succulents. The same craftsmanship serves year-round utility.
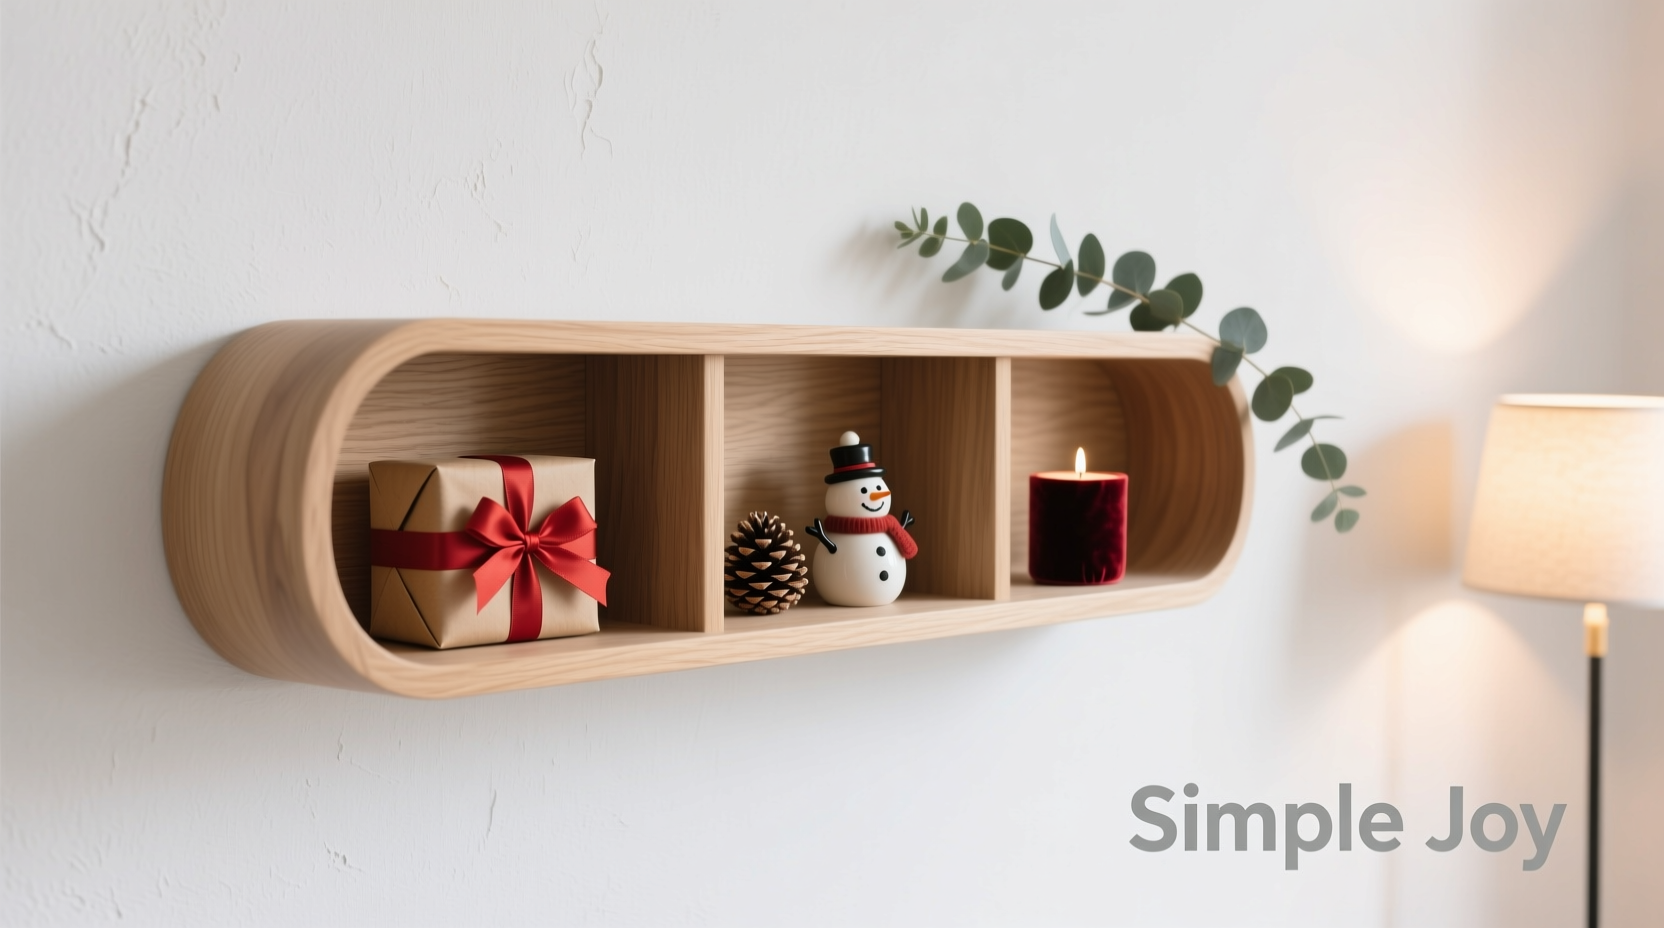
Mini Case Study: A Studio Apartment Holiday Solution
Jessica R., a graphic designer in Seattle, lives in a 450-square-foot studio where floor space is precious. Last year, she transformed a blank wall beside her entryway into a festive focal point using a custom floating shelf.
She measured 36 inches between two studs and cut a walnut board to fit. After staining it dark brown and sealing with matte varnish, she mounted a hidden steel bracket system. On the shelf, she arranged 12 small gifts wrapped in kraft paper with red velvet bows. She added three tea lights in flameless lanterns and draped eucalyptus garland behind.
The result? Guests noticed the display immediately upon entering. “It felt intentional, not cluttered,” Jessica said. “And I didn’t lose any seating or walking room.” The shelf remained in place after Christmas, now displaying art supplies and travel souvenirs.
Frequently Asked Questions
Can I install a floating shelf on a plaster wall?
Yes, but extra care is needed. Plaster is brittle and prone to cracking. Use a stud finder designed for dense walls, and drill slowly with a masonry bit if hitting lathe behind. Always anchor into studs. If unavoidable, use toggle bolts rated for plaster applications.
How much weight can a floating shelf hold?
It depends on construction. A 36-inch shelf anchored into two studs with a solid cleat can safely support 30–50 pounds. For lighter setups using only brackets between studs, stay under 15 pounds. Always factor in dynamic load—someone accidentally leaning on it during a party.
Is it safe to mount a shelf above a radiator or fireplace?
No. Heat exposure weakens adhesives, dries out wood, and increases fire risk with nearby décor. Install at least 12 inches above any heat source, preferably on a cooler adjacent wall.
Checklist: Build Your Floating Shelf in One Weekend
- ☐ Measure wall space and choose shelf length
- ☐ Purchase hardwood board and cut to size (or have it cut at store)
- ☐ Sand and finish the wood; allow full drying
- ☐ Locate wall studs with a reliable stud finder
- ☐ Cut and mount support cleat or bracket securely into studs
- ☐ Attach shelf to support and confirm level alignment
- ☐ Test load capacity with books before adding gifts
- ☐ Style with wrapped presents, greenery, and ambient lighting
- ☐ Inspect monthly for stability and touch up finish if needed
Conclusion: Turn Space Constraints into Creative Opportunities
Building a floating shelf display for small Christmas gifts isn’t just about saving floor space—it’s about reimagining how we celebrate. By integrating gifting into architecture, you create moments of delight tucked into everyday walls. The project demands precision and patience, but rewards with lasting functionality and seasonal joy.


 浙公网安备
33010002000092号
浙公网安备
33010002000092号 浙B2-20120091-4
Comments
No comments yet. Why don't you start the discussion?