
For many renters, the holiday season comes with a familiar dilemma: how to celebrate with festive decor when nails, screws, and permanent installations are off-limits. Traditional Christmas trees require floor space, risk tipping over, and often leave sticky residue from adhesives or scratches from stands. But there’s a smarter, more elegant solution—one that’s gaining popularity among urban dwellers, minimalist decorators, and sustainability-minded hosts.
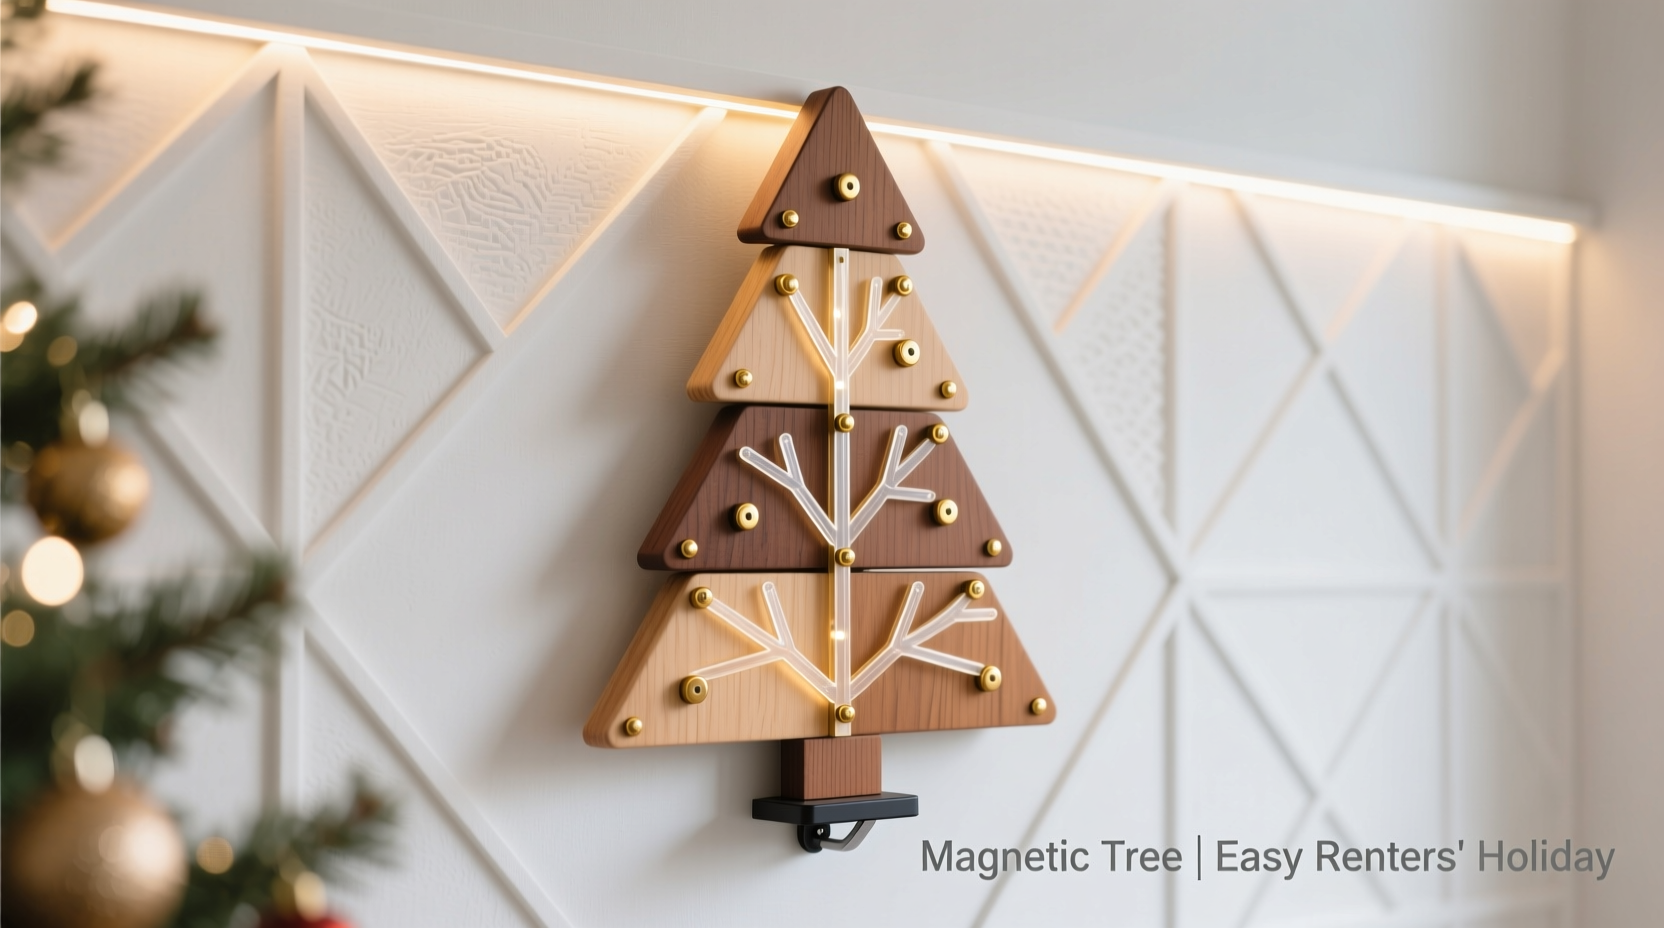
A magnetic modular Christmas tree offers all the charm of a real or artificial tree without compromising your rental agreement. Built from lightweight panels or segments that connect via embedded magnets, this DIY-friendly design can be mounted on walls, freestanding frames, or even temporary partitions. It assembles in minutes, disassembles just as quickly, and stores flat—making it ideal for small apartments, seasonal rentals, or anyone who values flexibility and aesthetics.
Beyond convenience, this approach encourages creativity. You control the shape, size, color scheme, and even lighting integration. Whether you prefer a sleek Scandinavian silhouette, a whimsical asymmetrical design, or a full wall-spanning evergreen cascade, a magnetic modular tree adapts to your vision—and your lease terms.
Why Renters Need a New Approach to Holiday Decor
Renters face unique constraints during the holidays. Landlords often prohibit alterations to walls, flooring, or fixtures. Even seemingly harmless actions like using command strips near painted surfaces can result in deductions from security deposits if residue or micro-tears are left behind. Traditional potted trees take up valuable floor space and pose tripping hazards in compact living areas. Pre-lit artificial trees come with tangled wires, bulky storage needs, and limited reconfiguration options.
Magnetic modular trees solve these problems by shifting the center of attention from the floor to the wall—or another vertical surface—where decoration becomes artful rather than obstructive. Because no drilling is required and components attach securely through magnetic force, they’re reversible, renter-safe, and surprisingly stable.
“Modular design isn’t just about efficiency—it’s about empowering people to personalize their spaces within limits.” — Lena Torres, Sustainable Interior Designer & Co-founder of UrbanHoliday Co.
Materials and Tools You’ll Need
Building your own magnetic modular tree requires accessible materials and basic crafting skills. Most components can be sourced locally or online, and total cost typically ranges between $60–$150 depending on size and finish preferences.
| Material/Tool | Purpose | Recommended Type |
|---|---|---|
| Base Panels | Form each segment of the tree | Foam core, MDF, or recycled cardboard sheets (1/4” thick) |
| Neodymium Magnets | Connect modules securely | Disk-shaped, 10–15mm diameter, N35 grade or higher |
| Adhesive | Attach magnets to panels | Epoxy resin or high-bond double-sided tape |
| Craft Knife / Saw | Cut shapes accurately | X-Acto knife (for foam), jigsaw (for wood) |
| Hot Glue Gun | Reinforce connections and add texture | Low-temp for delicate surfaces |
| Green Spray Paint / Fabric Wrap | Finish appearance | Matt finish acrylic paint or felt covering |
| LED String Lights (optional) | Add illumination | Battery-powered, warm white, with adhesive clips |
Optional upgrades include adding pockets for tiny gifts, incorporating scented pine essential oil pads, or embedding small shelves for ornaments. The key is designing with modularity in mind—each piece should align easily and snap into place without tools.
Step-by-Step Assembly Guide
Follow this timeline to build and install your magnetic modular Christmas tree over a weekend. Total active work time: approximately 4–6 hours.
- Day 1 – Design & Cut Panels (2 hours)
Create a template for your tree segments. A classic triangular taper works best: start with a wide base triangle (e.g., 24” wide x 18” tall), then reduce width incrementally for upper levels (e.g., 20”, 16”, 12”). Draw outlines on your chosen material and cut carefully using appropriate tools. - Label Each Segment
Mark front/back and top/bottom. Number them sequentially (e.g., “Base,” “Tier 2”) to simplify reassembly next year. - Embed Magnets (1.5 hours)
On the back edge of each panel’s top and bottom, glue two neodymium magnets per side—four total per connection point. Ensure polarity matches across pieces so they attract, not repel. Let cure overnight. - Apply Finish (1 hour + drying time)
Spray paint all panels with matte green or wrap in fabric. For a modern look, use black, gold, or white. Allow at least 4 hours to dry completely before handling. - Day 2 – Mount and Assemble (1–2 hours)
Begin at eye level on a sturdy wall. Attach the base panel using removable adhesive wall hooks rated for the panel’s weight (check manufacturer specs). Stack subsequent tiers by aligning magnets until desired height is reached—typically 4 to 6 feet. - Add Lighting and Decor (30 mins)
Weave battery-powered LED string lights around edges using clear adhesive clips. Hang lightweight ornaments with ribbon loops—avoid anything heavier than 3 oz per hook.
Design Variations and Creative Ideas
The beauty of a modular system lies in its adaptability. Unlike fixed trees, yours can evolve with your space and mood.
- Wall Tree Spiral: Arrange smaller diamond-shaped modules in a spiral ascending pattern—ideal for narrow hallways or studio corners.
- Family Name Tree: Shape the outline to spell out a surname or holiday greeting (“JOY,” “NOEL”) while filling the interior with green modules.
- Mini Satellite Clusters: Create three small triangular units placed across different walls to form a “distributed” tree effect—great for open-concept lofts.
- Natural Texture Upgrade: Cover panels with preserved moss, eucalyptus sheets, or thin birch veneer for an organic feel.
- Interactive Version: Add Velcro patches where guests can pin handwritten wishes or mini drawings.
One Brooklyn-based designer, Maya Lin, transformed her studio apartment with a dual-purpose tree: during the day, it functioned as a clothes hanger for scarves and hats; by night, lit-up LEDs turned it into a glowing centerpiece. “It saved floor space and became a conversation starter,” she said. “My landlord didn’t even know it wasn’t permanent.”
“A holiday display shouldn’t mean choosing between joy and responsibility. This kind of innovation respects both.” — Carlos Mendez, Renter Advocacy Coordinator at CityHabitat Alliance
Storage, Reuse, and Long-Term Value
At season’s end, disassemble the tree in reverse order. Remove wall hooks and clean any residue with rubbing alcohol on a cotton pad. Store panels flat in labeled boxes under beds or inside closets. Magnets retain their charge for decades, so proper storage ensures reuse for years.
Over five holiday seasons, the average household spends $175 annually on disposable trees and decor replacements. A well-built magnetic modular tree pays for itself in under three uses. Plus, it reduces waste—over 95% of artificial trees end up in landfills due to poor recyclability.
Do’s and Don’ts of Maintenance
| Action | Recommendation |
|---|---|
| Do wipe down panels after use | Use dry microfiber cloth to remove dust |
| Don’t store in humid areas | Basements or bathrooms may warp foam or wood |
| Do inspect magnets yearly | Ensure none have loosened or corroded |
| Don’t overload with heavy ornaments | Stick to items under 3 oz; use fishing line for hanging |
| Do update lighting batteries early | Prevent corrosion inside battery compartments |
FAQ: Common Questions Answered
Can I use this on any type of wall?
Yes, but success depends on the mounting method. For drywall, use removable adhesive hooks designed for medium weights (up to 5 lbs). Avoid glossy or freshly painted walls unless tested first. Brick or concrete walls allow for stronger magnetic backing but may require professional anchors—which aren’t renter-friendly. Always patch test in an inconspicuous area.
Will the magnets affect electronics or pacemakers?
Standard neodymium magnets used in craft projects pose minimal risk when mounted on walls. However, maintain at least 12 inches of distance between the tree and sensitive devices like laptops, hard drives, or medical implants. If concerned, opt for weaker ceramic magnets or place shielding material (like thin steel sheet) behind the wall-facing side.
Is it safe around children and pets?
Yes—with precautions. Secure all loose cords and ensure small magnets are fully encapsulated and cannot be pried loose. If swallowed, powerful magnets can cause serious internal injury. Supervise young children and curious pets during initial interactions.
Final Checklist Before Launching Your Project
- Measure available wall space and choose a proportional design
- Purchase materials based on durability and removability
- Sketch a full-size mock-up on paper before cutting
- Test magnet alignment and polarity on scrap pieces
- Confirm lease terms allow non-damaging wall attachments
- Plan storage location ahead of disassembly
- Take photos during assembly for easier rebuild next year
Conclusion: Celebrate Freely, Live Responsibly
The holidays shouldn’t demand compromise. With a magnetic modular Christmas tree, renters gain the freedom to decorate boldly while honoring their agreements and protecting their deposits. This isn’t just a workaround—it’s a reimagining of what holiday tradition can be in modern living environments.
By investing a few hours in thoughtful design, you create more than a tree. You build a ritual object that returns year after year, lighter to store, easier to assemble, and uniquely yours. It reflects care—not just for your home, but for the way you inhabit it temporarily yet meaningfully.


 浙公网安备
33010002000092号
浙公网安备
33010002000092号 浙B2-20120091-4
Comments
No comments yet. Why don't you start the discussion?