
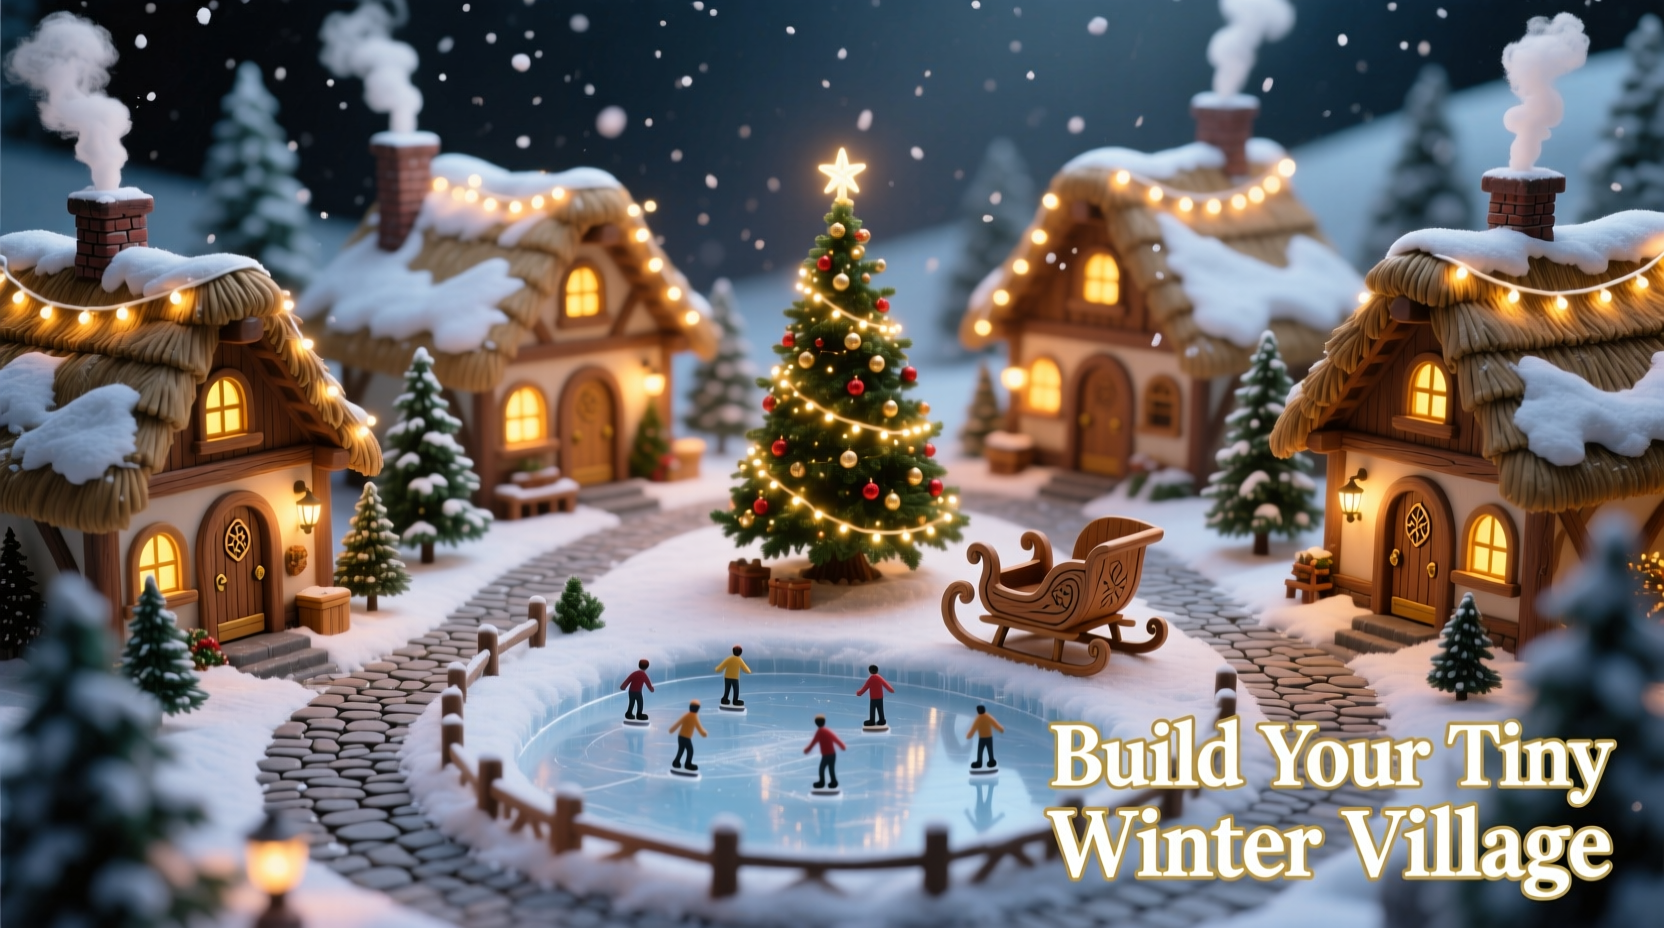
There’s a quiet magic in the space beneath a Christmas tree—the hushed, shadowed world where gifts rest and light filters down like starlight through pine boughs. Transforming that often-overlooked zone into a living, glowing miniature village doesn’t require advanced craftsmanship or expensive kits. It demands intention, attention to scale, and respect for both aesthetics and safety. This isn’t about cramming in ornaments—it’s about storytelling in miniature: snow-dusted rooftops, warm windows aglow, winding paths traced by copper wire, and the soft hum of low-voltage light that makes children pause mid-sentence and whisper, “Is it real?” Done thoughtfully, a tree-base village becomes the emotional anchor of your holiday display—cozy, nostalgic, and deeply personal.
Why Scale and Safety Are Non-Negotiable Foundations
Most failed miniature villages collapse—not literally, but perceptually—under inconsistencies in scale or compromised electrical safety. A 1:144 scale (1 inch = 12 feet) cottage next to a 1:64 scale train car breaks immersion instantly. Worse, using non-UL-listed LED strings or daisy-chaining too many micro-lights can overheat wiring hidden beneath fabric, carpet, or faux snow—especially when enclosed by tree skirts or dense branches.
Professional miniature landscaper and holiday display consultant Lena Torres emphasizes this balance:
“The most enchanting villages aren’t the most elaborate—they’re the most coherent. Every element must obey the same scale rule, and every light must be powered at 5V or 12V DC with built-in current regulation. If you can’t trace the power path from outlet to bulb without guessing, pause and redesign.” — Lena Torres, Founder of Evergreen Miniatures & Certified Lighting Safety Instructor
Start not with buildings, but with boundaries: measure the diameter of your tree’s base clearance (typically 36–48 inches for standard 7–9 ft trees), then commit to one scale. For beginners, 1:100 is ideal—large enough for easy handling, small enough to fit 12–15 structures comfortably. All lighting must be battery-operated or USB-powered with a UL-certified AC adapter rated for indoor use. Never plug standard 120V mini-lights under a tree unless they’re specifically labeled “for enclosed or confined spaces.”
Curating Your Village: Materials That Feel Authentic
A convincing miniature village thrives on tactile authenticity—not perfection. Realism emerges from layered textures: rough-hewn wood grain on a barn, pebbled stucco on a café wall, or the subtle warp of aged shingles. Avoid plastic-looking kits. Instead, prioritize natural, repurposed, and handmade elements:
- Structures: Laser-cut birch plywood kits (1:100 scale) from reputable brands like Lemax or Department 56 offer clean lines and pre-drilled light holes—but sand all edges lightly to soften factory sharpness. For DIY builds, use basswood strips (1/16” thick) glued with PVA wood glue; stain with diluted walnut ink for depth.
- Ground Cover: Skip glittery “snow” that melts under warmth. Use a blend: 60% fine white model railroad ballast (No. 5), 25% crushed eggshell (baked at 200°F for 10 minutes to sterilize), and 15% static-cling fake snow fiber. The eggshell adds organic irregularity; the ballast provides weight and drainage.
- Pathways & Details: Copper tape (0.1mm thick) cut into 1/8” strips mimics cobblestone joints. Thin twigs from willow or dogwood (harvested in late fall, dried for 4 weeks) become fences or arched bridges. Tiny dried lavender buds double as winter shrubs; cinnamon stick shards become rustic benches.
The Step-by-Step Build Timeline (90 Minutes Total)
Build in phases—not all at once. Rushing leads to misaligned wiring or crushed details. Follow this timed sequence:
- Prep & Layout (15 min): Clear the floor area. Lay down a 1/4” thick closed-cell foam mat (not rubber—it off-gasses near heat). Tape a grid overlay (1” squares) onto the mat using painter’s tape. Place your largest structure first—usually the church or town hall—at the visual center (slightly off true center for asymmetry).
- Wiring First (25 min): Before gluing anything, lay all LED wires *loose* along planned paths. Use 5V USB-powered warm-white micro-LEDs (2mm diffused bulbs, 20–30 lumens each). Route wires under structures—not over—to hide them. Secure with removable blue-tack, not tape. Test every bulb individually with its power source before proceeding.
- Structure Anchoring (20 min): Glue bases using hot glue *only* at four corner points (not full perimeter)—this allows future repositioning if wiring shifts. Let glue cool fully (2 min) before touching.
- Ground Layering (15 min): Apply ground cover in three passes: coarse layer (ballast) first, then medium (eggshell), then fine (snow fiber). Use a dry makeup brush to stipple fibers upward for wind-blown texture. Mist lightly with diluted white glue spray (1:10 glue/water) only where snow needs to cling to roofs or fences—never saturate.
- Final Detailing (15 min): Add people (1:100 scale resin figures), tiny lanterns (cut 3mm brass tubing, insert micro-LEDs), and “steam” from chimneys (a dab of white puff paint mixed with iridescent mica powder). Step back. Turn off room lights. Observe glow distribution. Adjust any bulb angle using needle-nose pliers.
Lighting Design Principles That Elevate Realism
Light isn’t just illumination—it’s narrative. A village lit uniformly feels flat and artificial. Real towns have hierarchy: bright storefronts, softer home windows, dim alleyways, and ambient sky glow. Apply these principles:
| Light Type | Color Temp (K) | Placement Strategy | Real-World Reference |
|---|---|---|---|
| Warm White (2700K) | 2700 | Interior windows, streetlamps, café signs | Incandescent bulbs in older neighborhoods |
| Neutral White (4000K) | 4000 | Gas station canopies, train station platforms | Modern LED security lighting |
| Cool White (6500K) | 6500 | Distant hilltops, moonlit snow reflections | Winter twilight sky after sunset |
| Amber Accent (1800K) | 1800 | Fireplace embers, candlelight in windows | Vintage oil lamps or beeswax candles |
Use a programmable USB controller (like the Wemos D1 Mini with FastLED firmware) to cycle subtle brightness changes—windows dimming at “midnight,” streetlamps flickering gently. Avoid blinking or chasing modes; they break the stillness essential to winter village charm. For wiring, run all cables through flexible black corrugated loom tubing (3mm diameter)—it hides wires, prevents kinking, and resists compression under tree skirts.
Mini Case Study: The Maple Street Village (Portland, OR)
In 2022, Sarah Chen, a pediatric occupational therapist and lifelong model railroader, built her first tree-base village after her daughter asked, “Where do the elves live when they’re not wrapping?” With no prior experience, Sarah used only materials from her craft drawer and local hardware store. She chose 1:120 scale to match her existing Thomas & Friends trains. Her breakthrough came from repurposing a discarded circuit board: she soldered 12 micro-LEDs to its copper traces, creating a self-contained “town square” light panel with built-in resistors. She embedded it beneath a clear acrylic “frozen pond,” using blue-tinted resin to mimic ice. The pond reflected light upward, making nearby cottages appear warmly lit from within. Her biggest lesson? “I spent two hours arranging houses, then realized the lights were all pointing the wrong way. I unplugged everything, rotated each bulb 180 degrees, and the whole village went from ‘cute’ to ‘alive.’ Directionality matters more than quantity.” Today, her Maple Street Village appears annually on her neighborhood’s Holiday Lights Tour—and inspires three local school STEM clubs to host miniature lighting workshops.
Frequently Asked Questions
Can I use battery-operated tea lights instead of wired LEDs?
Yes—but with caveats. Standard flameless tea lights emit 30–40 lumens and cast broad, unfocused light that bleaches detail. Opt instead for “micro-candle” LEDs (e.g., BriteStar NanoLights) with directional 15° beams and replaceable CR2032 batteries. Always remove batteries between uses to prevent leakage, and check voltage specs: some tea lights output 3.3V, which may dim LEDs designed for 5V.
How do I keep pets and toddlers from disturbing the village?
Install a subtle barrier: a 4”-high ring of unfinished cedar rounds (sanded smooth, no splinters) placed just outside the village perimeter. The natural scent deters cats; the height discourages toddlers without blocking sightlines. For high-risk homes, add a lightweight, transparent acrylic dome (12” diameter, vented top) secured with museum putty—not glue. Never use glass or heavy materials.
What’s the safest way to store the village between seasons?
Disassemble completely. Store structures in acid-free archival boxes lined with unbleached cotton muslin. Wrap LED wires separately in anti-static bubble wrap (not regular bubble wrap—static attracts dust). Keep ground cover in airtight mason jars with silica gel packs. Label every component: “Church – Window LEDs: 5V Warm White, 22mA.” Reassembly time drops from 90 minutes to 35 when inventory is precise.
Conclusion: Your Village Is Ready When It Makes You Pause
A miniature village beneath your Christmas tree succeeds not when it wins awards, but when it invites presence. When your partner lingers to adjust a tiny lamppost’s angle. When your child names the baker in the red-brick shop and asks if he delivers cookies to the reindeer stable. When guests instinctively lower their voices, as if stepping into a snow globe world. This project is less about construction and more about cultivating wonder through deliberate, tactile choices—scale that honors proportion, light that whispers rather than shouts, and materials that carry the quiet dignity of real things. You don’t need perfection. You need patience, a steady hand, and the willingness to see magic in millimeters. Gather your supplies this weekend. Measure your tree’s footprint. Sketch one building—not the whole village, just one. Then plug in a single light. Watch how that tiny point of warmth changes the air around it. That’s where your village begins.


 浙公网安备
33010002000092号
浙公网安备
33010002000092号 浙B2-20120091-4
Comments
No comments yet. Why don't you start the discussion?