
Minimalist holiday design isn’t about subtraction—it’s about intention. In a season saturated with ornament overload and disposable decor, a geometric Christmas tree offers quiet sophistication, structural clarity, and enduring appeal. Unlike traditional evergreens draped in tinsel and baubles, this approach treats the tree as architectural sculpture: a three-dimensional form defined by clean lines, precise angles, and controlled light. Built from lightweight metal or wood frames and illuminated with flexible, energy-efficient LED strips, it delivers festive warmth without visual clutter. More than an aesthetic choice, it reflects a growing shift toward mindful consumption—reusable, repairable, and designed for longevity. This guide details exactly how to conceive, construct, and illuminate a geometric tree that balances craftsmanship with accessibility—even for those with modest workshop experience.
Why Geometric Minimalism Works for Modern Holiday Design
Traditional Christmas trees carry cultural weight—but they also present practical challenges: water maintenance, needle drop, fire risk, storage bulk, and environmental cost. A 2023 study by the University of Manchester found that the average real tree contributes 16 kg CO₂-equivalent over its lifecycle (including transport and disposal), while most artificial trees require 5–7 years of reuse to break even environmentally. A geometric tree sidesteps both issues. Constructed from recyclable aluminum, powder-coated steel, or sustainably sourced plywood, it can last two decades with minimal upkeep. Its open structure eliminates fire hazards associated with dense foliage near heat sources, and its modular design allows for flat-pack storage—reducing annual footprint by over 90% compared to standard trees.
Crucially, geometric minimalism aligns with contemporary interior sensibilities. Interior architect Lena Torres observes:
“Clients no longer want decor that shouts ‘Christmas.’ They want seasonal presence—something that feels intentional, grounded, and harmonious with their year-round space. A triangular frame lit with warm-white LEDs reads as celebration *and* calm. It doesn’t compete with architecture; it completes it.”
This isn’t decoration as afterthought—it’s spatial punctuation. Whether mounted on a wall as a floating isosceles triangle or freestanding as a tiered tetrahedron, the form invites interaction with light, shadow, and negative space. And because it’s built—not bought—it becomes a personal artifact: a tactile record of time, attention, and care.
Core Materials & Smart Sourcing Guidelines
Selecting materials determines durability, safety, and long-term usability. Prioritize function over flash. Below is a comparative overview of frame and lighting options:
| Component | Recommended Options | Key Considerations | Avoid |
|---|---|---|---|
| Frame Material | • 1/4\" anodized aluminum square tubing (12–20 gauge) • 3/4\" FSC-certified birch plywood (laser-cut) |
Aluminum resists corrosion and holds precise angles; plywood offers warmth and easy mounting for wall versions. | Untreated MDF (swells with humidity), PVC pipe (UV degradation, poor rigidity), or thin-gauge steel without powder coating (rust risk) |
| LED Strips | • IP65-rated 12V DC warm-white (2700K) strips • 60 LEDs/m density, silicone-coated, with 3M adhesive backing |
IP65 ensures dust/moisture resistance for indoor use; warm-white mimics candlelight without glare. Avoid RGB unless you plan dynamic programming—static color reinforces minimalism. | Non-waterproof strips (short circuit risk), high-color-temp LEDs (>4000K), or non-dimmable strips without compatible controller |
| Power & Control | • UL-listed 12V DC power supply (20–30W capacity) • Simple PWM dimmer switch or wall-mounted touch dimmer |
Overspecify power by 25% to prevent voltage drop across long runs. Dimming is essential—minimalism thrives on modulation, not maximum intensity. | Unregulated wall adapters, daisy-chained non-dimmable controllers, or USB-powered strips (insufficient wattage) |
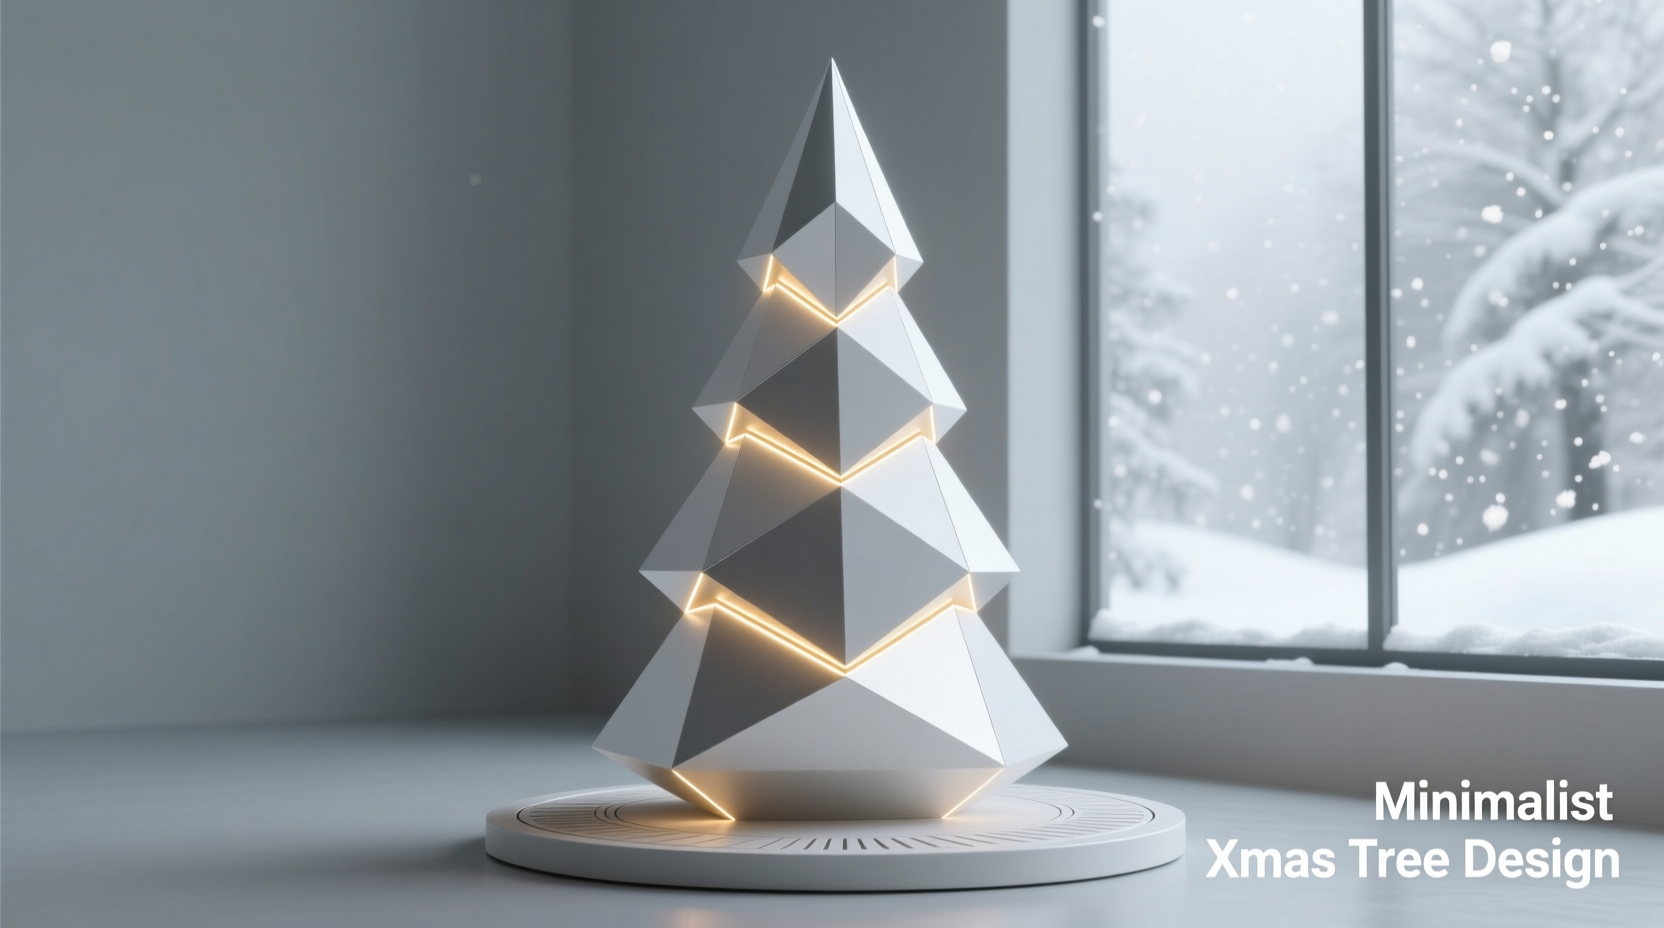
Design Principles: Choosing Your Geometry
Not all shapes serve minimalism equally. The goal is visual stability, legibility at a glance, and efficient material use. Three proven configurations dominate professional minimalist installations:
- The Isosceles Triangle (Wall-Mounted): Base width 36–48\", height 48–72\". Most accessible for beginners—requires only two identical side members and a base bar. Projects zero depth, ideal for apartments or narrow hallways.
- The Tetrahedron (Freestanding): Four equilateral triangles forming a pyramid. Base edge 24–30\", height 30–36\". Self-supporting, inherently stable, and casts dramatic radial shadows. Requires precise 60° miter cuts.
- The Tiered Cone (Hybrid): Three concentric rings (diameters 18\", 24\", 30\") aligned vertically on a central mast. Suggests organic growth while maintaining strict geometry. Best for those wanting subtle vertical rhythm without sharp angles.
Regardless of shape, adhere to these non-negotiables:
- Proportion Rule: Height-to-base ratio should be ≥ 1.5:1 for visual balance. A squat triangle feels unresolved; an overly tall tetrahedron appears precarious.
- Line Weight Consistency: All frame members must share identical cross-sections (e.g., all 1/4\" x 1/4\" tubing). Mixing thicknesses introduces visual noise.
- Negative Space Ratio: At least 60% of the form’s bounding box should remain unoccupied by material—this is where light breathes.
Step-by-Step Assembly: From Sketch to Illuminated Form
This timeline assumes moderate DIY skill (measuring, drilling, basic wiring). Total build time: 6–8 hours across two sessions.
- Design & Template (1 hour): Sketch your chosen geometry full-scale on graph paper or use free CAD tools like Tinkercad. Label all angles, lengths, and connection points. Print life-size templates for plywood or trace tubing outlines onto cardboard for dry-fit testing.
- Cut & Prep Frame (2 hours): For metal: Use a miter saw with abrasive blade (not wood-cutting); deburr edges with fine-grit sandpaper. For plywood: Laser-cut preferred, but a jigsaw with a fine-tooth blade works—sand cut edges smooth. Drill 1/8\" pilot holes at connection points.
- Assemble Frame (1.5 hours): Join corners with stainless steel machine screws (e.g., 6-32 x 3/8\") and nylon-insert lock nuts. Avoid glue-only joints—thermal expansion of metal or humidity shifts in wood demand mechanical flexibility. Tighten just enough to eliminate wobble; overtightening warps thin sections.
- Mount LED Strips (1 hour): Clean frame surfaces with isopropyl alcohol. Peel strip backing and apply starting 2\" from a corner, pressing firmly along entire length. Route wires discreetly through pre-drilled 1/8\" conduit holes or behind frame flanges. Do not stretch or compress strips—they’re engineered for specific bend radii.
- Wire & Test (0.5 hour): Connect strips in parallel (not series) to power supply using 22-gauge stranded wire. Verify polarity (+ to +, – to –) before powering. Test with dimmer at 30% brightness first—observe for dark spots or flickering, which indicate poor contact or voltage drop.
- Final Mounting (0.5 hour): Wall version: Secure with two heavy-duty toggle bolts into studs. Freestanding version: Anchor base to a weighted plinth (e.g., 12\" x 12\" x 2\" concrete slab painted matte black) using recessed screws. Conceal all hardware.
Real-World Application: The Oslo Apartment Project
In late 2022, designer Arvid Nilsen collaborated with a young couple in Oslo’s Grünerløkka district to replace their 7-foot plastic tree—a source of annual frustration due to storage constraints and visual dissonance with their Scandi-modern apartment. Their brief: “Something that feels like winter light, not Santa’s workshop.”
Nilsen proposed a wall-mounted isosceles triangle: 42\" wide, 60\" tall, fabricated from brushed aluminum tubing. Instead of wrapping LEDs around the perimeter, he embedded them within a 3/8\"-deep channel routed along the inner face of each tube—creating a soft, halo-like glow with zero visible wiring. The couple chose a single, programmable dimmer switch integrated into their existing Lutron Caseta system, allowing gradual ramp-up from dusk to midnight. Installation took one Saturday morning. Over the next three weeks, neighbors photographed it from the street; two requested replicas. Crucially, post-holiday disassembly required only unscrewing four bolts—the entire structure stored flat beneath their bed. As Nilsen notes:
“The magic wasn’t in complexity. It was in eliminating everything that didn’t serve light, line, or silence.”
FAQ
Can I use battery-powered LED strips for true portability?
Yes—but with caveats. High-output battery packs (e.g., 12V 10,000mAh) power warm-white strips for ~12–18 hours at 50% brightness. However, battery voltage drops over time, causing dimming and color shift. For permanent installations, hardwired power remains superior for consistency and zero maintenance.
How do I clean the frame without damaging finishes or LEDs?
Use a microfiber cloth dampened with distilled water only. Never spray liquids directly onto the frame—moisture ingress near LED solder points causes corrosion. For aluminum, wipe with diluted white vinegar (1:10) annually to restore luster; rinse immediately with dry cloth. Avoid ammonia, bleach, or abrasive cleaners.
Is this safe around children and pets?
Absolutely—when built correctly. All electrical connections must be enclosed in junction boxes or heat-shrink tubing. Frame edges must be fully deburred and rounded. Unlike traditional trees, there are no small detachable parts, no water reservoir, and no toxic pine oils. The surface temperature of properly rated LED strips stays below 35°C (95°F) even after 24 hours of operation.
Conclusion: Light, Line, and Lasting Intention
A geometric Christmas tree is more than decor—it’s a declaration of values made manifest in brass, birch, and photons. It asks us to slow down: to measure twice, cut once, and illuminate with restraint. It replaces abundance with articulation, noise with nuance, and disposability with devotion to craft. You don’t need a workshop to begin. Start with a simple triangle drawn on kraft paper, test LED brightness against your wall’s paint tone, and feel the quiet satisfaction of building something that honors both the season and your space. Every angle you cut, every wire you route, every dimmer setting you refine—is a small act of resistance against the throwaway culture of holiday excess. Your home deserves beauty that endures. Not just until New Year’s Day—but for winters to come.


 浙公网安备
33010002000092号
浙公网安备
33010002000092号 浙B2-20120091-4
Comments
No comments yet. Why don't you start the discussion?