
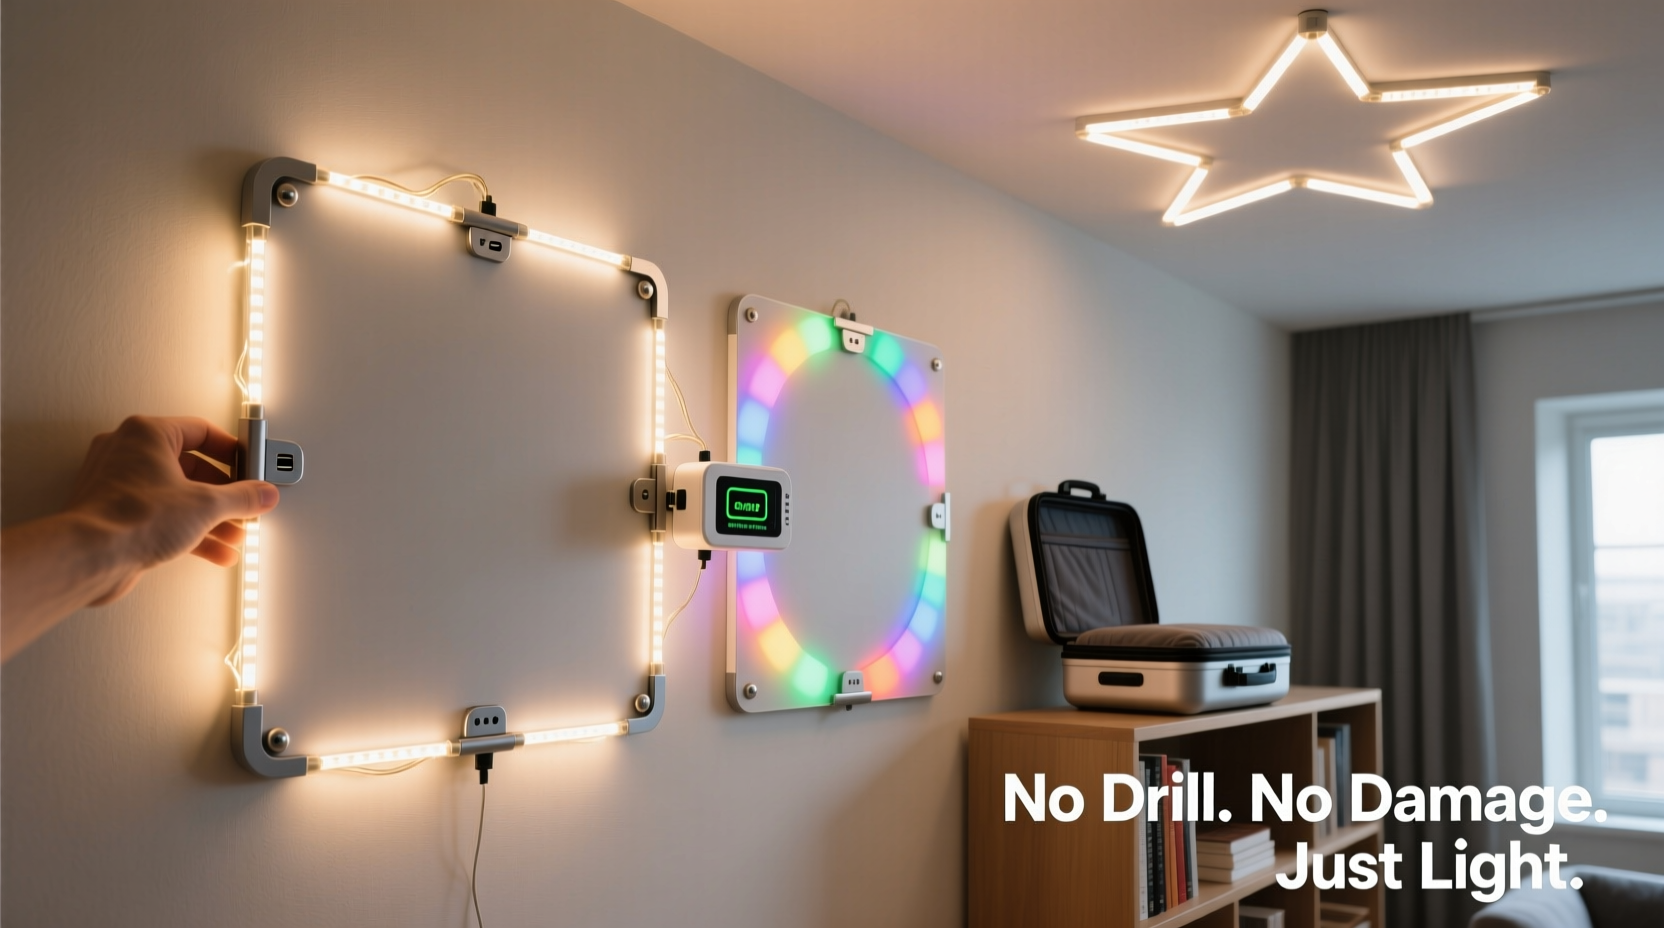
For seasonal decorators who rent and move often, holiday lighting presents a unique challenge. Traditional methods like stapling lights into gutters or drilling into fascia boards are off-limits—landlords frown on permanent modifications. Yet the desire for festive cheer remains strong. The solution? A modular Christmas light panel system: a portable, reusable, and customizable lighting framework that installs quickly, causes no damage, and packs down neatly for relocation.
This approach combines lightweight materials, magnetic or adhesive mounting, and smart wiring to create a professional-looking display that can be adapted to any rental property. Whether you're moving every year or simply want to avoid the hassle of restringing hundreds of bulbs each season, this guide walks through how to design, build, and maintain a modular lighting system that travels with you—year after year.
Why a modular system works for renters
Renters face real limitations when it comes to exterior decorations. Most leases prohibit alterations to siding, roofs, or trim. Even indoor displays can be problematic if they require wall penetration or leave residue. But holiday lighting is one of the few traditions where visual impact matters most—and compromise shouldn’t mean dimming your spirit.
A modular panel system bypasses these restrictions by treating lights as removable fixtures rather than permanent installations. Instead of threading strings across eaves, you mount flat panels—pre-wired with LEDs—that attach temporarily using magnets, clips, or peel-and-stick hardware. These panels can be stored flat in closets or under beds and reassembled in minutes at your next home.
The modularity also allows flexibility. Panels can be rearranged based on window placement, balcony size, or HOA rules. If one unit gets damaged, only that section needs repair—not the entire display.
“Portable lighting systems are becoming essential for urban renters who value tradition but lack permanent spaces.” — Jordan Lee, Sustainable Holiday Design Consultant
Materials and tools needed
Building a durable yet transportable system requires careful material selection. Focus on lightweight durability, weather resistance (for outdoor use), and compatibility with standard Christmas light voltages.
| Material/Tool | Purpose | Recommended Specs |
|---|---|---|
| 1/4-inch plywood or PVC board | Panel base | 36” x 12” per panel; cuttable with hand saw |
| LED mini string lights (warm white or multicolor) | Illumination | Pre-lit with spacing, end-to-end connectable |
| Outdoor-rated zip ties or adhesive clips | Securing lights to panel | UV-resistant; reusable if possible |
| Magnetic strips or VELCRO® Outdoor Tape | Mounting method | Strong hold, removable, weatherproof |
| Power extension cords (outdoor-rated) | Energy supply | With GFCI protection if near moisture |
| Silicone sealant or edge tape | Weatherproofing | For sealing cut edges and connections |
| Drill, screwdriver, scissors, measuring tape | Assembly tools | Basic toolkit sufficient |
Choose LED lights not just for energy efficiency but because they generate less heat, reducing fire risk when mounted close to surfaces. Look for strings labeled “connectable up to 10 sets” to minimize outlet use. For power distribution, consider a low-voltage splitter hub that plugs into one outlet but powers multiple panels independently.
Step-by-step assembly process
Follow this sequence to construct a reliable, reusable panel system ready for annual deployment.
- Design your layout: Sketch the target installation area—balcony rail, window frame, porch column—and decide how many panels you’ll need. Standard sizes (like 3’x1’) simplify storage and adaptability.
- Cut and finish panels: Use a utility knife or saw to cut boards to size. Sand edges smooth and apply waterproof sealant around all sides, especially if used outdoors.
- Map light placement: Lay out your string lights on the panel in waves, zigzags, or grids. Aim for even coverage without overlapping wires excessively.
- Secure lights: Fasten each bulb node using small zip ties or adhesive clips. Do not staple or nail. Leave 6–12 inches of lead wire free at both ends for connection.
- Test before finalizing: Plug in the string to ensure all bulbs work and positioning looks balanced from viewing distance.
- Seal and protect: Apply silicone sealant over wire junctions and clip bases to prevent water ingress. Let dry fully.
- Add mounting hardware: Attach magnetic strips to the back of each panel if mounting to metal surfaces (e.g., HVAC units, metal railings). For non-magnetic areas, use heavy-duty outdoor VELCRO® tape—hook side on panel, loop side on wall.
- Create a storage plan: Wrap cords neatly, place panels between foam sheets, and store upright in a labeled bin. Avoid stacking heavy items on top.
For multi-panel setups, ensure adjacent units align visually. You can stagger heights slightly for dynamic effect, but keep alignment consistent along shared edges. Consider painting the back of panels black or dark gray to reduce visibility if mounted against siding.
Installation and removal best practices
The true advantage of a modular system lies in its ease of deployment. Done right, installation should take under 30 minutes—even for a three-panel display.
- Clean the mounting surface thoroughly before applying adhesive strips. Dust and grease drastically reduce grip.
- Use a level to align the first panel; others will follow its lead.
- Route cords along safe paths—avoid trip hazards and exposure to snow melt or sprinklers.
- Never overload outlets. Use a single power strip with surge protection for all panels.
- Remove panels within two weeks after the holidays to prolong lifespan and avoid weather damage.
When removing, gently peel off adhesive-backed mounts. Most high-quality tapes release cleanly if warmed slightly with a hairdryer. Store leftover mounting strips in sealed bags for reuse.
Real-world example: Sarah’s city apartment transformation
Sarah, a graphic designer in Seattle, moved apartments four times in six years. Each winter, she dreaded untangling old lights and finding new ways to decorate without violating lease terms. After one landlord charged her $75 for nail holes in stucco, she decided to change tactics.
She built three 36”x12” PVC panels painted white on the front, lined with warm-white LEDs in tight zigzags. Using outdoor VELCRO®, she mounted them vertically beside her sliding glass door, creating a \"light frame.\" Magnets held a fifth panel across her metal railing. All components fit into a single tote.
Last season, she had the display up in 20 minutes at her new ground-floor unit. Neighbors complimented the clean look, and her landlord didn’t object—nothing was drilled, taped, or nailed. “It feels more intentional than tangled strings ever did,” she said. “And I’m not starting from scratch every December.”
Maintenance and longevity tips
To keep your system functional for five years or more, treat it like seasonal equipment—not disposable decor.
- Inspect wires annually for fraying or cracked insulation.
- Replace individual dead bulbs with spare LEDs if possible.
- Store panels in climate-controlled space; avoid attics or damp basements.
- Keep connectors dry by wrapping in silica gel packets inside sealed bags.
- Update older incandescent strings to LED equivalents when replacing.
If a panel warps due to moisture, replace it with a new PVC sheet. They cost under $10 at hardware stores. Never attempt to bend a warped board back into shape—it stresses the lights and risks breakage.
“A well-built modular system pays for itself in time saved and stress avoided by year three.” — Mark Tran, Urban Lighting Installer
Frequently asked questions
Can I use this system indoors too?
Absolutely. The same panels can enhance living room walls, bedroom headboards, or kitchen backsplashes during the holidays. Swap outdoor adhesives for removable wall hooks or tension rods.
What if my building has strict decoration rules?
Modular panels often fall into a gray area since they’re temporary and non-invasive. Present them to management as “removable light art” rather than traditional holiday lights. Many HOAs permit such displays if installed neatly and removed promptly.
Are magnetic mounts safe for all surfaces?
Magnets are safe for metal surfaces but should not be used on electronics, pacemaker zones, or certain painted finishes where pull force might cause chipping. Always test in an inconspicuous spot first.
Checklist: Building your modular light system
- ☐ Measure intended display area and sketch panel layout
- ☐ Purchase lightweight boards (PVC or thin plywood)
- ☐ Buy connectable LED string lights (preferably 50+ bulbs per string)
- ☐ Obtain UV-resistant zip ties or adhesive clips
- ☐ Select mounting method: VELCRO®, magnets, or removable hooks
- ☐ Assemble and test each panel before final sealing
- ☐ Label panels and cords for future identification
- ☐ Pack storage container with padding and moisture control
- ☐ Document setup with notes or photos
- ☐ Schedule annual inspection and maintenance date
Conclusion: Light up your holidays—without the long-term commitment
Holiday joy shouldn’t depend on homeownership. With a modular Christmas light panel system, renters can enjoy dazzling, personalized displays that respect their living situation and mobility. By investing a few hours upfront, you gain years of effortless setup, reduced clutter, and peace of mind knowing your decor won’t cost you a security deposit.
The system grows with you—adapt it for patios, dorm windows, or even office desks. Share designs with fellow renters, swap tips online, or start a tradition of gifting custom panels. This isn’t just about lights; it’s about bringing continuity and creativity into transient lives.


 浙公网安备
33010002000092号
浙公网安备
33010002000092号 浙B2-20120091-4
Comments
No comments yet. Why don't you start the discussion?