
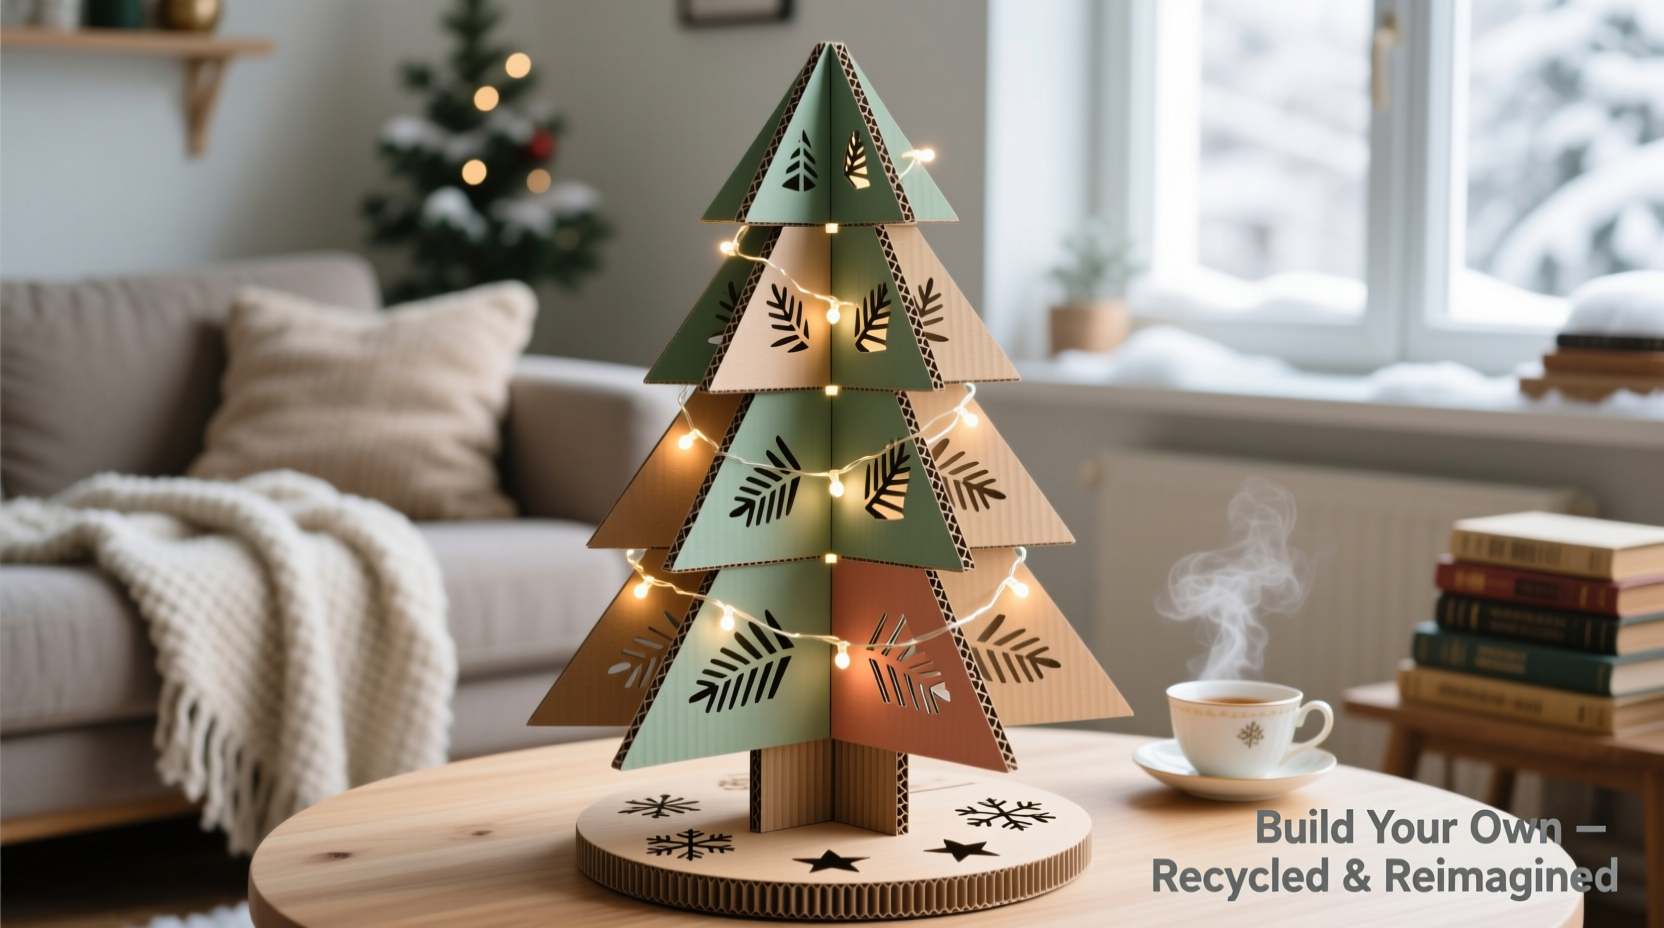
In an era where sustainability meets creativity, the traditional Christmas tree is getting a bold, eco-conscious upgrade. Instead of felling a fir or assembling a plastic alternative, more families and designers are turning to recycled materials to craft festive centerpieces that tell a story. One standout innovation: the modular Christmas tree made entirely from repurposed cardboard panels. Not only is this project environmentally responsible, but it also offers unmatched flexibility in design, portability, and reuse. Whether you're an urban dweller with limited space or a parent looking for a fun DIY holiday activity, building a cardboard Christmas tree is a rewarding endeavor that blends craftsmanship with conscience.
Why choose a cardboard Christmas tree?
The appeal of a cardboard-based holiday tree goes beyond novelty. It represents a shift toward mindful consumption during one of the most resource-intensive times of the year. According to the Environmental Protection Agency, over 30 million real trees are sold annually in the U.S., many of which end up in landfills. Artificial trees, while reusable, are typically made from non-recyclable plastics and can take centuries to decompose.
A recycled cardboard tree sidesteps these issues. Cardboard is widely available, biodegradable, and often discarded in large quantities during the holiday season. By reclaiming used boxes—shipping containers, appliance packaging, or even old moving crates—you transform waste into wonder. Moreover, because the structure is modular, components can be flattened and stored easily, then reassembled or redesigned each year.
“Sustainable design isn’t about sacrifice—it’s about reimagining what’s already around us. A cardboard Christmas tree proves that beauty and responsibility can coexist.” — Lena Torres, Sustainable Product Designer at GreenHaus Studio
Materials and tools needed
Building a durable, attractive modular tree requires minimal supplies, most of which can be sourced for free or at low cost. The key is selecting sturdy cardboard and reinforcing the structure appropriately.
| Material/Tool | Purpose | Notes |
|---|---|---|
| Corrugated cardboard (double-wall preferred) | Main structural panels | Look for undamaged, clean boxes from electronics or furniture deliveries |
| Utility knife or box cutter | Cutting panels | Use with a metal ruler and cutting mat for precision |
| Hot glue gun + high-temp glue sticks | Bonding joints and seams | Stronger than white glue; dries quickly |
| Wooden dowels or bamboo skewers (6–8 mm) | Internal support rods | Insert vertically through trunk layers for stability |
| Ruler, compass, pencil | Measuring and drawing templates | Essential for consistent cone shapes |
| Acrylic paint or non-toxic spray paint | Finishing and decoration | White, green, silver, or custom colors |
| Clear matte sealant (optional) | Protective coating | Increases durability and dust resistance |
Step-by-step construction guide
Creating a modular tree means designing interlocking sections that assemble without permanent fasteners. This allows for easy storage, customization, and repair. Follow this timeline to complete your tree in under 10 hours over two days.
- Day 1 – Design and Cutting (2–3 hours)
Decide on the final height and base diameter. A standard living room centerpiece might be 5–6 feet tall with a 24-inch base. Sketch concentric circles on cardboard representing each tier—typically 5 to 7 layers, decreasing by 4 inches in diameter per level. Use a string-and-pencil compass method for accuracy. Cut out all rings using a sharp utility knife, scoring twice for clean edges. - Create triangular side panels
For each tier, measure the outer and inner circumference. Divide each into equal segments—six works well for symmetry. Cut long rectangular strips of cardboard to serve as vertical side panels. Each strip should match the height of the tier (e.g., 8–10 inches) and have trapezoidal ends that conform to the curvature. Attach these between the top and bottom rings of each tier using hot glue, forming hexagonal prism-like sections. - Build the central support column
Cut a narrow cylinder from dense cardboard or stack and glue rolled tubes to form a rigid core. This will run through the center of each tier. Drill or punch a snug hole in the center of every base ring so tiers can slide onto the column like beads. Reinforce with wooden dowels inserted radially at connection points. - Day 2 – Assembly and Finishing (4–5 hours)
Begin stacking tiers from largest to smallest. Ensure alignment by marking reference points on the central column. Temporarily secure with tape while testing balance. Once stable, apply additional glue at contact zones and allow 2 hours to set. Sand rough edges lightly and wipe clean before painting. - Decorate and seal
Paint the entire structure with acrylics in desired color—evergreen, snow-white, or metallic hues. Allow full drying (minimum 4 hours), then apply 1–2 coats of clear matte sealant if intended for multi-year use. Avoid glossy finishes, which can make cardboard appear cheap.
Design variations and creative enhancements
The modularity of this tree invites experimentation. Unlike a static plastic model, each component can be altered, replaced, or themed differently year after year.
- Geometric styles: Replace circular tiers with hexagons or stars for a modern look.
- Open-lattice patterns: Use a craft knife to cut snowflakes, stars, or Nordic motifs directly into the panels before assembly. When lit from within, these cast dramatic shadows.
- Illumination: Place LED string lights inside the hollow trunk or weave them through cut-out sections. Battery-powered fairy lights are safest and require no wiring.
- Interactive elements: Hang small hooks or slots on each tier to hold handwritten notes, family photos, or mini gifts.
Mini Case Study: The Berlin Apartment Tree
In a compact Berlin loft, designer Anika Müller faced a recurring problem: no balcony, no storage, and a strong aversion to artificial trees. During the 2022 holiday season, she challenged herself to create a festive focal point using only materials from her recycling bin. Over a weekend, she collected double-walled cardboard from local delivery services, designed a five-tier modular tree with laser-cut star patterns, and assembled it using reclaimed wood glue.
The result was a 1.8-meter-tall silver-painted centerpiece that doubled as a light sculpture when illuminated with warm LEDs. After the holidays, she disassembled it into flat panels, stored them under the bed, and reused 80% of the material the following year with updated cutouts. “It wasn’t just practical,” she said. “It became part of our tradition—designing something new together as a family.”
Best practices and common pitfalls
While cardboard is accessible, it demands thoughtful handling to ensure longevity and visual appeal. Below is a comparison of recommended actions versus mistakes to avoid.
| Do’s | Don’ts |
|---|---|
| Use double- or triple-wall corrugated board for load-bearing parts | Use single-layer cardboard for base or middle tiers |
| Reinforce joints with extra glue and internal braces | Assume glued edges will hold under weight without support |
| Allow 24 hours drying time before decorating or moving | Rush assembly and hang heavy ornaments immediately |
| Store flat in a dry place, away from rodents | Leave assembled in humid basements or garages |
| Seal painted surfaces to resist wear and dust | Expose unfinished cardboard to frequent touching |
“Cardboard has surprising structural integrity when engineered correctly. Think of it like paper architecture—precision matters more than material thickness.” — Dr. Rafael Kim, Material Scientist, ETH Zurich
FAQ
Can a cardboard Christmas tree support ornaments?
Yes, but with limitations. Use lightweight decorations such as paper stars, felt balls, or small fabric pouches. Attach them with ribbon loops glued to the surface rather than hooks that could tear the material. Avoid glass or metal ornaments exceeding 100 grams.
How long does a cardboard tree last?
With proper care, a well-constructed tree can be reused for 3–5 years. Store it disassembled in a dry environment, and inspect for wear before reassembly. Touch up paint and reinforce weakened joints as needed.
Is this safe around children and pets?
Yes, provided all edges are sanded smooth and the structure is stable. Secure the base with discreet weights if necessary. Use non-toxic paints and adhesives, especially if young children will interact with the tree.
Checklist: Building Your Modular Cardboard Tree
- ☑ Collect at least 6 large sheets of corrugated cardboard
- ☑ Measure and sketch tier dimensions (base to tip)
- ☑ Cut out top and bottom rings for each tier
- ☑ Prepare vertical side panels with angled ends
- ☑ Assemble each tier into a hollow frustum shape
- ☑ Build and test-fit the central support column
- ☑ Stack and align tiers securely
- ☑ Sand, prime, and paint the structure
- ☑ Apply protective sealant (optional)
- ☑ Add lighting and lightweight decorations
- ☑ Disassemble and label parts for storage
Conclusion
Building a modular Christmas tree from recycled cardboard panels is more than a craft project—it’s a statement of values. It embraces impermanence without sacrificing beauty, prioritizes reuse over consumption, and turns environmental constraints into creative opportunities. What begins as discarded packaging becomes a symbol of renewal, both for the season and for sustainable design thinking.
This holiday, consider stepping off the conveyor belt of mass-produced decor. Gather your tools, raid the recycling bin, and design a tree that reflects your ingenuity. When January comes, you won’t just pack away decorations—you’ll archive a piece of your creativity, ready to evolve again next year.


 浙公网安备
33010002000092号
浙公网安备
33010002000092号 浙B2-20120091-4
Comments
No comments yet. Why don't you start the discussion?