
A well-designed Christmas village transforms seasonal decor from decorative clutter into an immersive, evolving tradition. Unlike static displays that gather dust until December, modular villages grow organically—year after year—through intentional planning, structural cohesion, and thoughtful interoperability. The key lies not in the charm of individual houses alone, but in how they connect: physically, visually, and experientially. Interlocking bases provide the invisible architecture that enables seamless expansion, consistent scale, reliable leveling on uneven surfaces, and effortless reconfiguration. This isn’t about gluing pieces together—it’s about designing for flexibility, durability, and shared intentionality across every structure in your collection.
Why Interlocking Bases Are the Foundation of a Cohesive Village
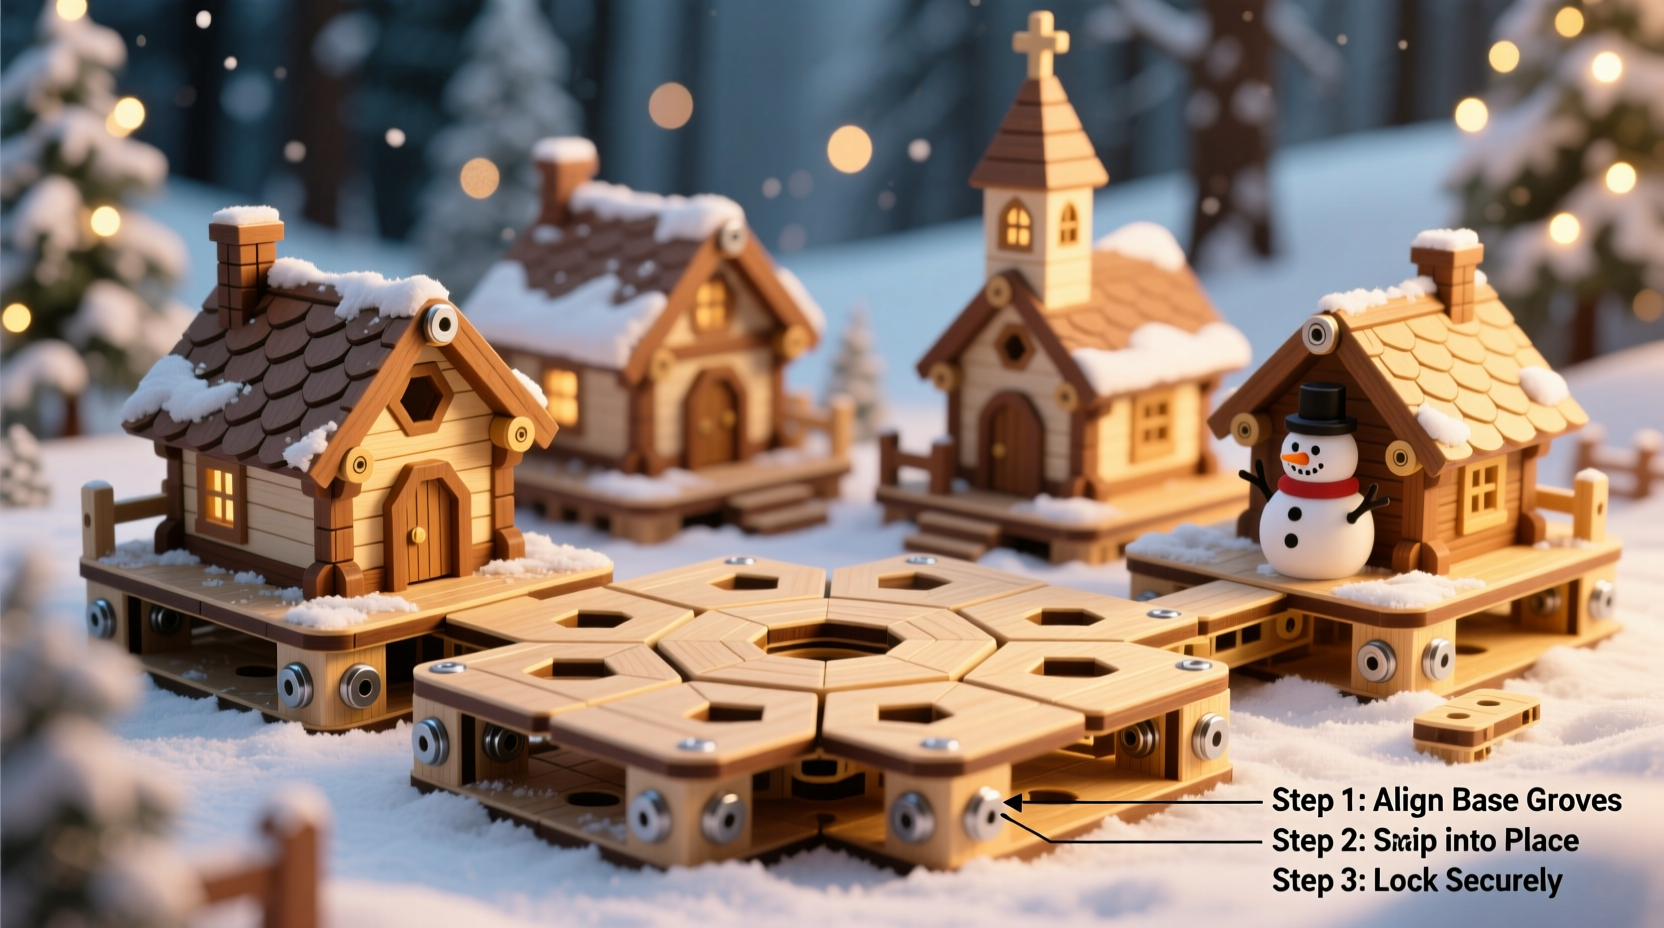
Most holiday villages fail not from lack of charm, but from structural incoherence. Houses wobble on mantels, snow-draped roofs sag under weight, miniature trees tilt at odd angles, and new additions never quite “fit” with older ones—either visually or physically. Interlocking bases solve these problems at the root. They standardize height, depth, and connection points across all structures, allowing you to snap, slide, or nest components without adhesives or trial-and-error adjustments.
Architecturally, interlocking bases mimic real-world urban planning principles: consistent sidewalk elevation, aligned street grids, and shared infrastructure (like buried wiring for lighting). When each house rests on a base with standardized edge profiles—such as ¼-inch male dovetails on two opposing sides and matching female channels on the others—you gain precision alignment and mechanical stability. More importantly, you unlock scalability: adding a new bakery doesn’t require rebuilding the entire streetscape. It simply clicks into place beside the post office.
Selecting & Preparing Materials for Precision Interlocking
Material choice directly impacts longevity, ease of assembly, and visual authenticity. Not all woods or plastics behave the same under seasonal humidity swings or repeated handling. Basswood remains the gold standard for hand-built villages: lightweight yet rigid, fine-grained enough for crisp detail carving, and stable across temperature shifts. Plywood (½-inch birch or poplar) works well for larger commercial-style bases—but only if edges are precisely milled and sealed against moisture absorption.
For DIY builders, avoid particleboard or MDF unless fully encapsulated in polyurethane and reinforced with hardwood edging strips. These composites swell when exposed to humid indoor air or accidental spills—causing interlock joints to bind or loosen unpredictably over time.
| Material | Best For | Critical Prep Steps | Interlock Longevity |
|---|---|---|---|
| Basswood (¼\"–⅜\") | Hand-carved houses, custom builds | Sand edges to 220+ grit; seal with matte acrylic spray before cutting joinery | 10+ years with proper storage |
| Birch Plywood (½\") | Modular base platforms, multi-level layouts | Router-edge all mating surfaces; apply wood glue + dowel reinforcement at joint corners | 8–12 years if kept dry |
| 3D-Printed PLA (with annealing) | Prototyping, complex geometries, LED-integrated bases | Anneal at 105°C for 30 min; sand mating faces flat with granite surface plate | 5–7 years (avoid direct sunlight) |
| Acrylic (¼\", cast) | Modern minimalist villages, light-diffusing bases | Laser-cut with 0.002\" kerf compensation; polish edges with flame or acrylic polish | 15+ years, UV-stable variants only |
Always cut interlocking features *after* sealing or finishing the base material—not before. Unsealed wood absorbs finish unevenly along cut edges, causing subtle swelling that throws off millimeter-precise fits. Let finishes cure fully (72 hours minimum for water-based acrylics) before final dimension checks.
The Step-by-Step Interlock Assembly Process
Building a functional interlocking system requires disciplined sequencing—not just craftsmanship. Follow this verified workflow whether you’re assembling pre-made kits or fabricating from scratch:
- Verify Base Dimensions: Measure all four sides of each base with digital calipers. Tolerances must hold within ±0.005\". Discard or re-mill any base exceeding this.
- Mark Joinery Quadrants: Use a fine-point drafting pencil to label North/South (male dovetail) and East/West (female channel) edges on each base bottom. Never assume symmetry—test-fit orientation first.
- Cut Male Features First: Rout or mill ¼\" × ¼\" dovetail tongues on designated edges using a dedicated dovetail bit and fence guide. Remove shavings between passes for clean shoulders.
- Test-Fit Tongues Into Channels: Before cutting female channels, insert each tongue into a sacrificial test block. Adjust bit depth until insertion requires firm thumb pressure—not hammer force nor loose wiggle.
- Mill Female Channels: Using the same bit and zero-clearance jig, rout matching ¼\" × ¼\" slots on opposite edges. Depth must be exactly tongue length + 0.010\" for compression seating.
- Final Dry-Assembly: Assemble all bases in intended configuration. No glue. Check for levelness with a machinist’s level (0.001\" resolution). Shim only with 0.002\" brass foil—not paper or tape.
- Secure Permanently (Optional): If desired, apply one drop of cyanoacrylate gel adhesive into the *bottom 1/8\"* of each channel before final insertion. Capillary action draws it upward without seeping into visible seams.
This process eliminates cumulative error—the silent killer of modular systems. Skipping verification or rushing the test-fit stage guarantees misalignment by the fifth house, turning joyful assembly into frustrating recalibration.
Real-World Application: The Maplewood Village Expansion Project
In 2022, Sarah Lin, a high school art teacher in Vermont, inherited her grandmother’s 12-piece ceramic village—beautiful, but unstable on her stone fireplace mantel. Houses tipped during drafts, wiring tangled beneath mismatched wooden platforms, and adding her newly purchased lighthouse felt like an act of defiance against gravity. She decided to rebuild the entire foundation—not replacing the ceramics, but integrating them into a unified interlocking system.
Sarah measured each ceramic base, then designed custom basswood cradles with recessed silicone pads to grip glazed bottoms securely. She routed identical dovetail interfaces into every cradle, then built a central “town square” platform with six radial interlock points. Within three weekends, she’d stabilized all originals and added four new structures—including a working watermill with magnetic gear coupling that rotates only when clicked into its designated slot. By Thanksgiving, neighbors were stopping by to photograph the seamless transitions between old and new, and Sarah began teaching a winter workshop on modular base design at the local community center.
Her insight? “The houses tell the story—but the bases hold the memory. Once they speak the same language, everything else falls into place.”
Design Principles for Visual Harmony & Functional Expansion
Interlocking solves mechanics—but aesthetics require deliberate curation. A technically perfect grid of mismatched architectural styles feels chaotic, not charming. Apply these five non-negotiable principles:
- Scale Consistency: All structures must share the same scale ratio (e.g., 1:64 or 1:100). Mixing scales—even subtly—breaks immersion. Verify window heights, door proportions, and roof pitches match reference blueprints.
- Roofline Hierarchy: Design dominant structures (church steeple, town hall dome) to rise 1.5× higher than residential roofs. Use graduated base thicknesses (⅜\" for cottages, ½\" for civic buildings) to reinforce vertical rhythm without altering footprint.
- Material Echoing: Repeat textures intentionally—e.g., if your bakery has brick siding, echo brick patterns in base edging or pathway inlays. This creates subconscious continuity across separate pieces.
- Lighting Integration: Route low-voltage wiring (12V DC, 22-gauge stranded) through hollow core channels inside bases *before* final assembly. Use micro-LEDs with solderless push-in connectors for field repairs.
- Expansion Readiness: Reserve at least 20% of your layout area as “neutral zone”—unbuilt space with interlock-ready edges. This allows future additions without dismantling existing work.
“Modularity without intention is just fragmentation. True interlocking design anticipates growth, honors legacy pieces, and respects the viewer’s eye as the final arbiter of harmony.” — Daniel Reyes, Architect & Holiday Display Consultant, author of *Seasonal Spatial Design*
Frequently Asked Questions
Can I retrofit interlocking bases onto existing village pieces?
Yes—with caveats. Ceramic or resin houses require custom cradle mounts (not direct base attachment) to avoid stress fractures. Measure the original base footprint, then build a basswood or acrylic cradle with integrated interlock features and non-slip silicone pads. Allow ⅛\" clearance around all sides for thermal expansion. Never drill into vintage ceramic.
What’s the best way to hide wiring between interlocked bases?
Mill ⅛\"-wide × ⅛\"-deep grooves along the *bottom* edges of all bases, aligned with interlock channels. Feed 22-gauge wire through these grooves before assembly—the joint itself conceals the entry point. Use color-matched wire (ivory for wood, gray for stone) and secure with micro-cable ties anchored in pre-drilled 1mm holes.
How do I prevent warping in humid climates?
Seal all wood bases with two coats of water-resistant acrylic matte medium (not polyurethane), applied evenly with a foam brush. Then add a third coat mixed 50/50 with acrylic flow improver to penetrate grain. Store assembled villages in climate-controlled spaces (ideally 40–50% RH) inside archival corrugated boxes lined with unbleached cotton muslin—not plastic bins.
Conclusion: Build Legacy, Not Just Decor
A modular Christmas village with interlocking bases transcends seasonal decoration. It becomes a tactile archive of intention—each house a milestone, each connection a decision made with care. It teaches patience in precision, respect for materials, and the quiet satisfaction of systems that work because they were designed to endure. You’re not merely arranging figurines; you’re curating spatial relationships that invite return visits, spark conversation, and evolve alongside your own story.
Start today—not with grand plans, but with one precisely milled base. Cut the dovetail. Test the fit. Feel the satisfying resistance of wood meeting wood, engineered to last. Then add another. And another. Watch coherence emerge not from repetition, but from intelligent connection. Your village won’t just look unified—it will be unified, down to the last millimeter.


 浙公网安备
33010002000092号
浙公网安备
33010002000092号 浙B2-20120091-4
Comments
No comments yet. Why don't you start the discussion?