
Christmas lights aren’t just for rooftops and mantels anymore. At college football tailgates, craft fairs, music festivals, and community markets, portable light displays have become signature conversation starters—drawing crowds, boosting vendor visibility, and adding festive warmth to chilly outdoor evenings. But most off-the-shelf “portable” light kits fall short: they’re flimsy, underpowered, poorly organized, or rely on unreliable extension cords that vanish when outlets are scarce. The solution isn’t buying more—it’s building smarter. This guide walks through designing, wiring, powering, and deploying a rugged, self-contained Christmas light display built for mobility, durability, and real-world conditions. No soldering iron required—but yes, you’ll need a multimeter, a drill, and the discipline to plan before plugging in.
Why Portability Demands More Than Just “Lightweight”
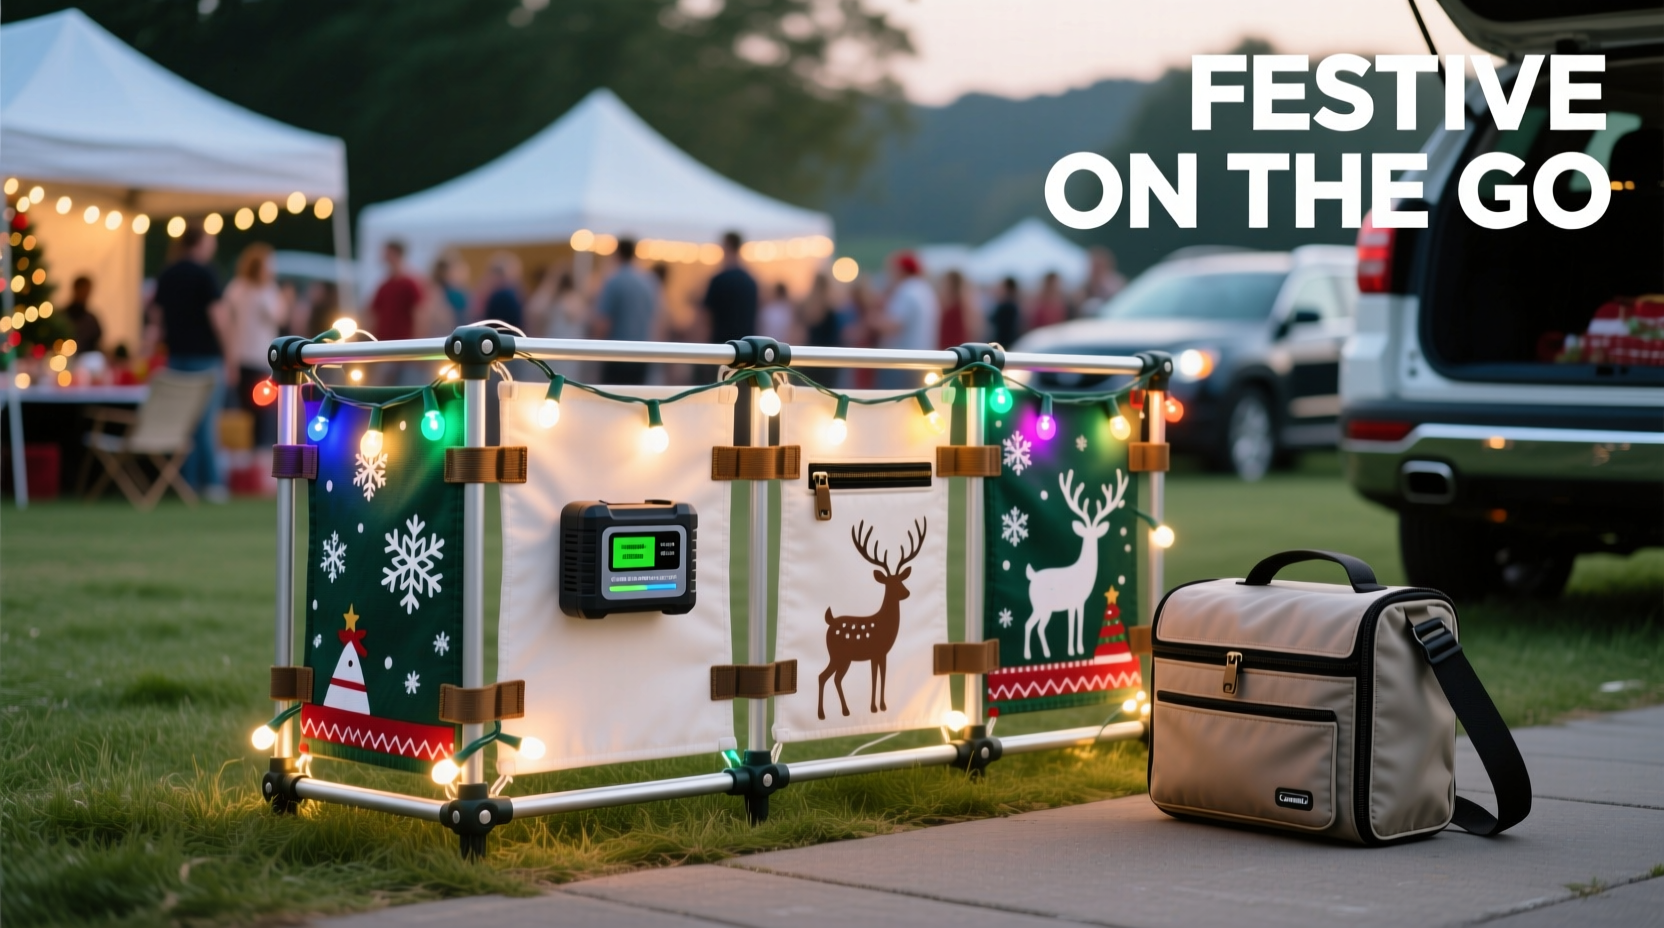
A truly portable light display must succeed across three non-negotiable criteria: power autonomy, structural integrity, and rapid deployment. A string of battery-operated mini-lights taped to a folding chair might weigh 2 pounds—but it flickers after 90 minutes, tangles in wind, and collapses if someone leans against it. Real portability means engineered resilience: lights that stay bright for 6+ hours on a single charge; frames that lock into place without tools; and wiring that survives repeated coiling, jostling, and temperature swings from 20°F to 85°F. It also means respecting physics: every extra foot of wire adds resistance; every unsecured connection invites voltage drop; every exposed splice risks moisture ingress. That’s why this approach starts not with bulbs—but with load calculations, enclosure specs, and mechanical anchoring strategy.
Core Components: What You Actually Need (and What You Don’t)
Forget “everything-in-one” kits. They overpromise and underdeliver on durability and scalability. Build instead from proven, modular parts—each selected for function, not flash. Below is the exact component list used by festival vendors who deploy weekly across 12+ states:
| Component | Specification | Why This Matters |
|---|---|---|
| LED Light Strings | UL-listed, 12V DC, 50–100 bulbs per string, warm white (2700K), IP65-rated | AC strings risk shock near damp grass; 12V DC is safer, more efficient, and easier to regulate. IP65 resists rain, dust, and spray—critical for parking lots and fields. |
| Power Source | LiFePO₄ battery (12V, 20Ah minimum) with low-voltage cutoff & USB/DC outputs | Lithium iron phosphate batteries deliver stable voltage longer than lead-acid, weigh half as much, and tolerate 2,000+ cycles. A 20Ah unit powers 5 strings (60W total) for 4+ hours. |
| Frame System | Aluminum square tubing (¾\" x ¾\", 0.065\" wall), bolt-together corner brackets, rubber feet | Aluminum won’t rust, won’t warp, and handles vibration better than PVC or wood. Bolted corners survive transport; rubber feet prevent scratches and slippage. |
| Mounting Hardware | Stainless steel zip ties (12\" industrial grade), silicone-coated cable clamps, UV-stabilized Velcro straps | Standard plastic ties become brittle in cold; stainless steel lasts seasons. Silicone clamps grip without crushing wires. UV Velcro won’t degrade in sun exposure. |
| Control & Protection | 12V PWM dimmer switch, 15A automotive fuse block, marine-grade heat-shrink butt connectors | PWM dimming preserves color consistency and extends LED life. Fused distribution prevents fire risk during surges. Heat-shrink seals out moisture far better than tape or glue. |
What’s notably absent? AC adapters, cheap lithium-ion power banks, PVC pipe frames, and adhesive-backed LED strips. These fail under sustained load, temperature fluctuation, or repeated setup—costing more in replacements than a proper build saves upfront.
Step-by-Step Build: From Frame to First Glow (Under 4 Hours)
- Design & Measure (30 min): Sketch your frame footprint (e.g., 4' wide × 6' tall rectangle). Calculate total linear light length needed (e.g., 40 ft perimeter + 20 ft internal crisscross = 60 ft). Multiply by bulb density (e.g., 25 bulbs/ft = 1,500 bulbs). Confirm total wattage: 1,500 bulbs × 0.04W each = 60W.
- Build the Frame (60 min): Cut aluminum tubing to size using a miter saw. Deburr edges. Assemble with corner brackets and stainless bolts. Attach rubber feet to base corners. Drill ¼\" holes every 12\" along top and side rails for light mounting.
- Wire Distribution (45 min): Mount fuse block inside lower frame crossbar. Run 12-gauge stranded copper wire from battery terminals to fuse block. Use ring terminals and star washers for secure connections. Label each fuse output (e.g., “Top Row,” “Left Side”).
- String Integration (60 min): Secure light strings using stainless zip ties through frame holes—no tension on bulbs or wires. Connect each string to its labeled fuse output using marine heat-shrink butt connectors. Seal all connections with dielectric grease.
- Power & Test (30 min): Connect LiFePO₄ battery. Turn on dimmer switch. Verify all strings illuminate uniformly. Use multimeter to check voltage at farthest string: should be ≥11.4V. If below, shorten runs or upgrade wire gauge. Charge battery fully before first event.
This sequence prioritizes safety and verification at each stage—not speed alone. Skipping the voltage check at step five is the #1 cause of mid-event dimming or failure.
Real-World Deployment: How “The Jingle Van” Scaled to 3 Festivals Weekly
In 2022, Sarah Lin, a small-batch hot cocoa vendor in Colorado, built her first portable light frame to stand out at the Fort Collins Music Festival. Her initial version—a repurposed pop-up canopy draped with AC-powered lights—failed twice: once when a gust tore wires loose, once when an outlet tripped and killed her entire display mid-crowd. She rebuilt using this method: a 4’×6’ aluminum frame with 80 ft of IP65 12V LED strings, powered by a 24Ah LiFePO₄ battery mounted in a Pelican 1510 case with integrated charger and fuse panel. She added reflective tape to frame corners for nighttime visibility and a collapsible flagpole for hanging a custom “Jingle Van” banner.
The result? Her booth drew 3x more foot traffic—and she deployed it at three different festivals in one weekend, driving between locations with the frame folded flat in her SUV cargo area. “People don’t just stop for cocoa—they stop to take photos *with* the lights,” she says. “That display paid for itself in two events.” Her secret wasn’t brightness—it was reliability. No flickering. No cord management chaos. No last-minute battery swaps. Just consistent, warm, professional-grade ambiance that worked rain or shine.
“Portable lighting isn’t about convenience—it’s about credibility. When your display stays flawless while others struggle with tangled wires and dead batteries, customers subconsciously trust your entire operation.” — Marcus Bell, Event Production Director, Roadshow Festivals LLC
Power Management Mastery: The Math Behind All-Night Operation
Every watt matters. Miscalculate, and your display fades by 8 p.m. Here’s how to get it right:
- Total Load (Watts): Count bulbs × wattage per bulb. Most quality 12V LEDs use 0.03–0.05W each. Example: 1,200 bulbs × 0.04W = 48W.
- Battery Capacity (Watt-hours): Battery voltage × amp-hours. A 12V 20Ah battery = 240Wh.
- Real-World Runtime: Divide Wh by total watts, then multiply by 0.85 (efficiency factor). 240Wh ÷ 48W = 5 × 0.85 = 4.25 hours.
- Voltage Drop Check: For runs >10 ft, use the formula: VD = (2 × K × L × I) / CM, where K = 12.9 (copper), L = one-way length (ft), I = current (amps), CM = circular mils of wire. For 48W @ 12V, current = 4A. Using 12-gauge wire (6,530 CM) over 15 ft: VD = (2 × 12.9 × 15 × 4) / 6,530 ≈ 0.24V — well within safe range (≤0.5V).
Pro tip: Add 25% headroom to your calculated wattage. Lights age, cold reduces battery efficiency, and dimmers draw minor overhead. If your math says 48W, design for 60W capacity.
Do’s and Don’ts: Hard-Won Field Lessons
| Action | Do | Don’t |
|---|---|---|
| Storage | Coil strings loosely around 12\" cardboard spools; store frame disassembled in labeled bins | Wrap tightly around small pipes or stuff into trash bags—causes kinks and insulation cracks |
| Cold Weather | Keep battery insulated in a neoprene sleeve; warm to room temp before use below 32°F | Charge or discharge below 20°F—permanently damages LiFePO₄ cells |
| Setup | Anchor frame with sandbags or tent stakes in open fields; level with bubble vial | Rely solely on weight—wind gusts >15 mph can topple unanchored frames |
| Maintenance | Inspect all connections monthly; replace any heat-shrink showing micro-cracks | Ignore discoloration on wires or connectors—early signs of arcing or corrosion |
FAQ
Can I use my car’s 12V socket instead of a battery?
Yes—but only for short setups (<30W total) and brief durations. Car alternators aren’t designed for sustained 12V DC loads beyond accessories. Drawing >5A continuously risks draining your starter battery or overheating the cigarette lighter circuit. A dedicated LiFePO₄ battery is safer, more reliable, and doesn’t tie up your vehicle.
How do I protect against theft at crowded festivals?
Use security cables: loop stainless steel aircraft cable (⅛\" diameter) through frame legs and attach to a heavy, immovable object like a concrete barrier or anchored signpost. Pair with a keyed padlock rated for outdoor use. Also, engrave your business name and phone number on the battery case and frame corners—deters casual theft and aids recovery.
Are solar chargers worth adding for multi-day events?
Only if you have consistent, unobstructed sun exposure for 6+ hours daily. A 60W foldable solar panel can recharge a 20Ah battery in ~5 hours—but cloud cover, angle, and dust cut output by 40–70%. For reliability, bring a dual-input charger (AC + solar) and prioritize battery capacity over solar dependency.
Conclusion
A portable Christmas light display isn’t decoration—it’s infrastructure. It’s the difference between blending into the background and becoming the landmark that draws people in, sparks joy, and builds your brand’s presence long after the season ends. This isn’t about holiday cheer alone; it’s about engineering intentionality into every connection, calculating every watt, and choosing materials that respect the reality of wind, weather, and wear. You don’t need a workshop or electrical license—just attention to detail, respect for physics, and the willingness to build once, well. Your next tailgate, festival, or pop-up market awaits a display that doesn’t just glow—but endures, adapts, and performs.


 浙公网安备
33010002000092号
浙公网安备
33010002000092号 浙B2-20120091-4
Comments
No comments yet. Why don't you start the discussion?