
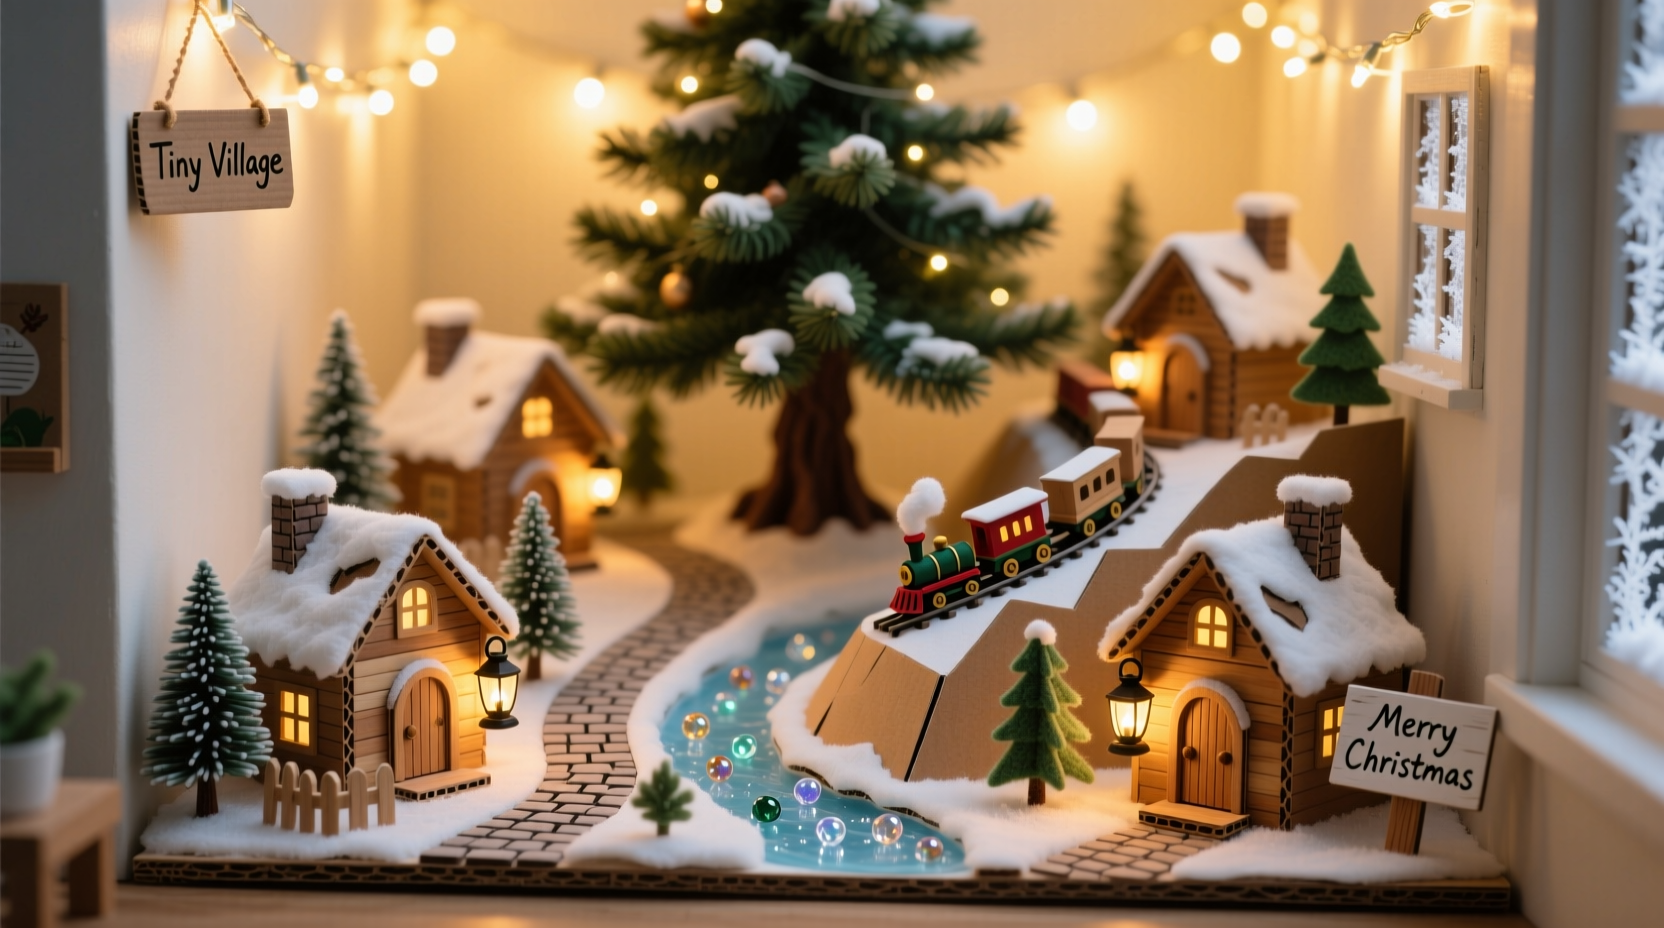
When holiday decor feels limited by square footage, the space beneath the Christmas tree becomes a hidden canvas for creativity. Rather than letting it go to waste, transforming this often-overlooked zone into a miniature Christmas village adds whimsy, warmth, and festive storytelling to your home. The best part? You don’t need a large living room or expansive floor plan. With thoughtful planning and clever design choices, even the tiniest homes can host a magical winter scene nestled under the branches.
A micro-scale village under the tree emphasizes charm over size. It invites guests to lean in, notice details, and reconnect with the nostalgic joy of model towns and toy trains from childhood Christmases. This approach is ideal for apartments, condos, or households where clutter is a concern but holiday spirit isn’t negotiable.
Plan Your Layout with Precision
The foundation of any successful under-tree village is strategic layout planning. Unlike traditional displays that sprawl across tables or mantels, this version must work within tight spatial constraints—typically no more than 3 to 4 feet in diameter and less than 18 inches in height. Begin by measuring the clear space beneath your tree, noting any obstructions like presents, stands, or low-hanging ornaments.
Sketch a rough circle or oval on paper to represent the footprint. Divide it into zones: one for a central feature (like a church or town square), smaller clusters for homes and shops, and narrow pathways for visual flow. Avoid symmetry; an organic, haphazard arrangement mimics real villages and feels more inviting.
Consider verticality. While horizontal space is limited, you can gain visual depth by incorporating tiered platforms made from overturned ceramic pots, wooden risers, or stacked books covered in faux snow. Elevating certain buildings draws the eye upward and creates dimension without spreading outward.
Select Compact, Proportionate Decorations
Choosing the right scale is non-negotiable. Standard Christmas village sets are often too large for under-tree use. Instead, seek out “mini” or “micro” scale items—typically between 1:144 and 1:220 scale. These models stand just 1 to 3 inches tall, allowing you to fit six to ten structures comfortably within a small radius.
Look beyond traditional kits. Craft stores carry individual miniature houses, tiny lampposts, and sleds designed for model railroads or dollhouses. Even craft foam, popsicle sticks, and cardboard can be used to hand-build custom cottages that match your desired aesthetic. A handmade gingerbread shop or a crooked little post office adds personality and saves money.
For natural elements, use fine-grained white sand, baking soda, or cornstarch as \"snow.\" Sprinkle sparingly to avoid mess. Mini pinecones, preserved moss, and cut twigs serve as scaled-down trees. A dusting of glitter-free faux snow spray adds frost without creating slip hazards.
“Small-scale displays thrive on suggestion rather than realism. One well-placed light can imply an entire glowing street.” — Lila Monroe, Miniature Display Artist
Smart Lighting Without Wires
Lighting brings life to your village, especially when viewed under dimmed room lights. However, tangled cords ruin the illusion and pose tripping risks. Opt for battery-powered solutions: micro LED string lights (with timers), coin-cell lanterns, or flickering tea lights in flameless form.
Place a single warm-white string light inside a central building like a chapel or gazebo—the glow will softly illuminate surrounding areas through translucent windows. Wrap tiny strands around miniature trees or drape them along invisible streets. For safety and simplicity, choose lights with automatic shutoff features (e.g., 6-hour timer).
| Lighting Type | Best For | Power Source | Notes |
|---|---|---|---|
| Micro LED strings | Rooflines, fences, streets | Battery (AAA/CR2032) | Choose warm white for coziness |
| Flickering tea lights | Windows, fireplaces | Battery (button cell) | Safe near fabrics |
| Stick-on spotlights | Highlighting key buildings | Battery | Angleable for dramatic effect |
| Solar path lights (mini) | Outdoor-themed sections | Solar + battery | Rechargeable, eco-friendly |
Step-by-Step Assembly Guide
Follow this sequence to assemble your under-tree village efficiently and beautifully:
- Clear and prep the area: Remove any stored items, sweep the floor, and lay down a neutral base (white felt, linen, or a doily) to define the village boundary.
- Position tallest or largest piece first: Usually a steepled church or clock tower—place it toward the back or center to anchor the scene.
- Add supporting structures: Arrange smaller homes, shops, and sheds around the centerpiece, leaving narrow gaps for “paths.” Rotate buildings slightly for dynamic angles.
- Incorporate terrain elements: Pile faux snow gently at building bases. Place moss clusters for wooded areas and flat stones or tiles for sidewalks.
- Install lighting: Tuck wires behind structures. Turn on lights to check coverage and adjust as needed.
- Add final touches: Insert tiny figures (carolers, shoppers, reindeer), hang mini wreaths, and place a miniature sleigh near the tree trunk.
- Review from multiple angles: Kneel down to view at eye level. Rearrange any piece that blocks sightlines or feels crowded.
Once complete, limit foot traffic around the display. If pets or children are present, consider using decorative ribbon on low posts to cordon off the area subtly.
Real Example: A Village in a Studio Apartment
Maria, a graphic designer in Brooklyn, lives in a 450-square-foot studio where every inch counts. Each December, she transforms the 36-inch diameter space under her slim artificial tree into a Nordic-inspired hamlet called “Frosthaven.” Using thrifted dollhouse furniture, she assembled five buildings: a red-roofed bakery, a frozen pond with skaters, a lighthouse, and two cottages.
She painted small wooden discs to resemble cobblestone paths and embedded micro LEDs into the lighthouse window. A $12 wireless sound module plays soft chimes on motion detection. Her solution? She stores the entire village disassembled in a divided plastic bin labeled by section—pathways, buildings, lights—making setup take under 20 minutes.
“People always duck down to look,” she says. “It’s become a tradition for my neighbors to visit just to see what new detail I’ve added. Last year, I included a tiny bookshelf in the library with microscopic books I printed myself.”
Avoid Common Pitfalls
Even well-intentioned designs can falter without attention to practical details. Below are frequent missteps and how to prevent them:
- Overcrowding: Resist the urge to fill every inch. Empty space reads as snow-covered yards or plazas—give the eye room to rest.
- Poor accessibility: Ensure you can still water the tree (if real) or access storage underneath. Leave a small gap near the trunk.
- Inconsistent scale: Mixing 1:48 and 1:144 items breaks immersion. Stick to one scale throughout.
- Using messy materials: Glitter, loose salt, or dyed snow can stain floors. Always test on a hidden spot first.
- Ignoring theme cohesion: A Victorian train next to a modern gas station confuses the narrative. Choose a time period or region (e.g., Alpine, New England, fantasy).
“Miniature scenes succeed when they tell a story. Ask: Who lives here? What are they celebrating?” — Theo Renz, Architectural Modeler
Checklist: Building Your Tiny Tree-Base Village
- Measure available space under the tree
- Choose a consistent scale (1:144 recommended)
- Select 4–6 miniature buildings or DIY materials
- Gather battery-powered lights and secure batteries
- Prepare a clean base layer (felt, fabric, or tray)
- Collect natural accents: moss, twigs, mini pinecones
- Include 2–3 tiny figures or animals
- Test lighting and placement before final setup
- Create a labeled storage system for off-season
- Photograph your finished village for memory or sharing
Frequently Asked Questions
Can I use real candles in my under-tree village?
No. Open flames are unsafe near dry Christmas trees, fabrics, and enclosed spaces. Always use flameless, battery-operated lights to prevent fire hazards.
How do I keep pets from disturbing the display?
Use scent deterrents like citrus sprays (pet-safe varieties) around the perimeter, or set up a low barrier with decorative fencing. Alternatively, place the village on a shallow tray elevated a few inches using hidden risers.
What if my tree skirt covers the whole area?
Opt for a split or open-center tree skirt, or remove it entirely during the season. You can also drape a lightweight white fabric loosely around the edge of the village, letting it blend into the tree base without blocking views.
Conclusion: Small Space, Big Magic
A tiny Christmas village under your tree proves that holiday enchantment doesn’t require grand gestures or vast rooms. It thrives on intention, ingenuity, and the quiet delight of discovering something unexpected beneath the boughs. Whether you’re crafting a snowy Scandinavian fjord town or a bustling Dickensian market, the act of building this miniature world becomes its own ritual—one of patience, playfulness, and personal expression.
Start small. Use what you have. Refine it each year. Let your under-tree village grow not in size, but in meaning. In doing so, you reclaim overlooked space not just for decoration, but for wonder.


 浙公网安备
33010002000092号
浙公网安备
33010002000092号 浙B2-20120091-4
Comments
No comments yet. Why don't you start the discussion?