
Coordinating multiple light strands with precise timer settings transforms a simple lighting setup into a polished, professional display. Whether you're decorating for the holidays, setting up landscape lighting, or managing indoor ambiance, properly calibrated timers ensure lights turn on and off together, conserve energy, and reduce manual intervention. Yet, many people struggle with mismatched schedules, inconsistent behavior across brands, or devices that drift out of sync over time. The solution lies not in replacing equipment, but in mastering calibration—aligning each strand’s internal clock and timing logic to operate as one cohesive system.
This guide walks through the technical and practical aspects of synchronizing multiple light strands using built-in or external timers. From identifying your timer types to troubleshooting common drift issues, you’ll learn how to achieve reliable, long-term coordination without constant adjustment.
Understanding Timer Types and Compatibility
Before adjusting any settings, it's essential to understand what kind of timers control your light strands. Not all timers function the same way, and mixing incompatible types can lead to erratic behavior. There are three primary categories:
- Mechanical Timers: Dial-based models that use physical gears to activate switches at set intervals. Common in older outdoor outlets and some basic light sets.
- Digital Plug-In Timers: LCD-display units that allow exact hour:minute programming. These often support multiple on/off cycles per day.
- Smart Timers & App-Controlled Systems: Wi-Fi or Bluetooth-enabled devices managed via smartphone apps, voice assistants, or home automation platforms like Alexa or Google Home.
Each type has different calibration needs. Mechanical timers require physical alignment and are prone to inaccuracies due to temperature fluctuations or gear slippage. Digital models rely on internal clocks that may slowly drift if not periodically reset. Smart timers usually sync automatically with network time protocols (NTP), making them the most accurate—but only if connected reliably.
“Even small discrepancies in timer accuracy—just five minutes per week—can throw off an entire lighting sequence when multiple strands are involved.” — Daniel Ruiz, Electrical Systems Technician, SmartHome Lighting Institute
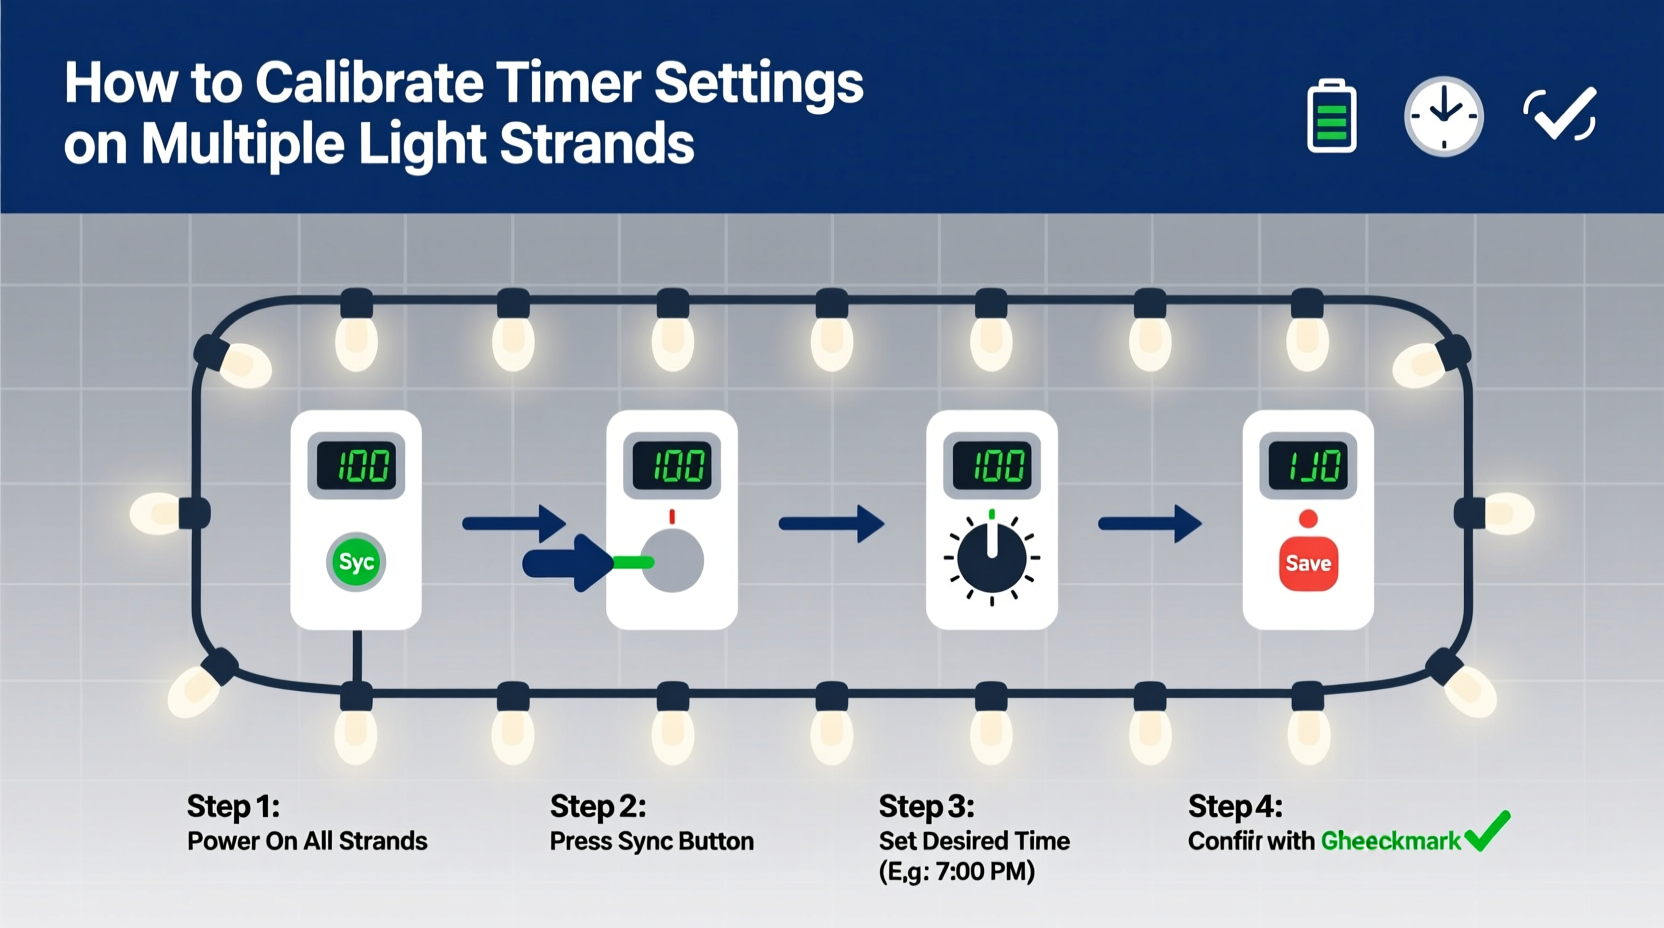
Step-by-Step Guide to Calibrating Multiple Light Strands
Synchronization isn’t just about setting the same time—it’s about ensuring consistency across power sources, environmental conditions, and device responsiveness. Follow this process to align your timers effectively:
- Gather All Equipment: Collect every light strand and its associated timer. Note model numbers and timer types for reference.
- Reset Each Timer to Factory Defaults: This clears old programs that might conflict with new settings. Refer to user manuals for reset procedures—some require holding a button for 10 seconds; others need a paperclip insertion into a reset hole.
- Set Accurate Current Time: Use a synchronized source such as an atomic clock app or official time.gov website. Adjust each digital or mechanical timer to match down to the minute.
- Program On/Off Schedules Uniformly: For example, set all timers to turn on at 5:30 PM and off at 11:00 PM. If using multi-event timers, replicate the same sequence across all units.
- Test Simultaneously: Plug in all strands and observe whether they activate within seconds of each other. Use a stopwatch or video recording to detect delays.
- Adjust for Delay Compensation: Some LED strands have slight startup lags. If one consistently turns on two seconds late, program its timer to trigger earlier by that margin.
- Monitor Over Several Days: Check performance daily, especially after weather changes or power interruptions. Re-calibrate if inconsistencies emerge.
For smart systems, group devices under a single automation scene (e.g., “Front Yard Lights”) so they respond to one command rather than individual triggers. This eliminates timing gaps caused by staggered signal reception.
Do’s and Don’ts When Managing Multiple Timers
Avoid common pitfalls that undermine synchronization efforts. The table below outlines best practices versus frequent mistakes.
| Do | Don’t |
|---|---|
| Use timers from the same brand when possible – firmware and response times are more consistent. | Mix mechanical and digital timers for critical sequences—they rarely stay aligned. |
| Plug high-load strands into dedicated circuits to prevent voltage drops that affect timer operation. | Overload a single outlet or power strip—this can cause brownouts that reset digital timers. |
| Update firmware on smart timers regularly to maintain NTP sync and security patches. | Ignore blinking indicator lights—these often signal loss of time sync or failed connections. |
| Use surge protectors rated for outdoor use to shield sensitive electronics from spikes. | Place timers directly on wet ground or expose them to unshielded rain. |
Real-World Example: Synchronizing Holiday Lights on a Residential Street
In Crestwood Heights, a neighborhood known for its elaborate Christmas displays, residents faced growing frustration as their coordinated light shows began falling out of sync. Five households participated in a nightly synchronized switch-on at dusk, but over two weeks, the effect deteriorated—some homes lit up early, others late, ruining the visual harmony.
The issue was traced to outdated mechanical timers used by two families. While initially set correctly, seasonal temperature shifts caused minor gear expansions, leading to cumulative delays of up to 18 minutes. Meanwhile, neighbors using Wi-Fi-enabled timers stayed perfectly aligned thanks to automatic daylight saving adjustments and NTP syncing.
The group resolved the problem by upgrading all participants to affordable digital plug-in timers with battery backup. They held a calibration session where everyone reset devices simultaneously and programmed identical schedules based on sunset times pulled from a shared weather API. A monthly reminder was added to recheck accuracy. Within days, the unified lighting return became a local attraction again.
Troubleshooting Common Calibration Issues
Even with careful setup, problems can arise. Here’s how to diagnose and fix the most frequent challenges:
- Clock Drift: Digital timers without battery backup lose time during brief power flickers. Solution: Replace batteries annually or install a small UPS for critical circuits.
- Partial Activation: Only some strands turn on despite identical programming. Likely causes include tripped GFCI outlets, blown fuses in light strings, or overloaded circuits. Test each strand independently.
- Inconsistent Sunset Tracking: Photoelectric sensors on solar-powered or sensor-based lights may misread ambient light due to shadows or nearby streetlights. Relocate sensors or switch to time-based control for reliability.
- Wi-Fi Dropouts: Smart timers disconnecting from networks will revert to last-known schedules or default modes. Ensure strong signal coverage near outdoor outlets, or use mesh extenders.
One often-overlooked factor is voltage fluctuation. Long extension cords or daisy-chained strands can reduce effective voltage, causing microprocessors in digital timers to behave erratically. Keep runs under 100 feet and use heavy-gauge cords (16 AWG or lower) for distances over 50 feet.
Checklist: Preparing Your Multi-Strand Timer System
Use this checklist before finalizing your setup to ensure lasting performance:
- ✅ Identify and document all timer models and types
- ✅ Reset each timer to factory defaults
- ✅ Set current time using a trusted reference clock
- ✅ Program matching on/off schedules across all units
- ✅ Test simultaneous activation and adjust for lag
- ✅ Install surge protection and weatherproof enclosures
- ✅ Label each circuit and timer for future maintenance
- ✅ Schedule monthly verification checks
Frequently Asked Questions
Can I connect multiple light strands to one timer?
Yes, provided the total wattage does not exceed the timer’s maximum load rating (typically 1800W for standard 15A outlets). Always calculate combined draw: for example, ten 9-watt LED strands = 90 watts, well within safe limits. Avoid overloading by checking labels on both lights and timers.
Why do my timers go out of sync after a few days?
This usually indicates either a lack of battery backup (leading to resets during power blips), poor quality internal oscillators in low-cost digital units, or reliance on inconsistent photo sensors. Upgrade to higher-grade timers or transition to network-synchronized smart models for better long-term stability.
Should I use manual or automatic (sunrise/sunset) mode?
Automatic mode offers convenience but can vary slightly between devices based on sensor placement. For absolute precision across multiple strands, manual time scheduling is more reliable. However, smart systems with geolocation-based sunset tracking provide excellent balance between ease and accuracy.
Conclusion: Achieve Seamless Lighting Through Precision Timing
Calibrating timer settings across multiple light strands is more than a technical chore—it’s an exercise in attention to detail that elevates ordinary illumination into something memorable. By understanding timer types, applying systematic calibration steps, and maintaining consistency through regular checks, you gain full control over your lighting environment.
The difference between a chaotic flicker and a harmonious glow often comes down to minutes—or even seconds—of careful adjustment. Whether illuminating a backyard patio or coordinating a community holiday display, precise timing ensures your effort shines through reliably, night after night.


 浙公网安备
33010002000092号
浙公网安备
33010002000092号 浙B2-20120091-4
Comments
No comments yet. Why don't you start the discussion?