
Capturing the magic of holiday lighting is one of the most rewarding parts of seasonal photography. But even with the most advanced smartphone cameras, a common frustration emerges: white Christmas lights don’t look white in photos. Instead, they appear tinged with yellow, blue, or an uneven mix of hues. This happens because cameras—especially on automatic settings—struggle with mixed lighting environments and inconsistent color temperatures. The solution isn’t buying new gear; it’s learning how to calibrate your phone camera properly. With the right techniques, you can ensure that crisp, clean white light from your string lights appears exactly as intended in every photo.
Why White Lights Don’t Look White in Phone Photos
The human eye adapts to different lighting conditions almost instantly. Whether you're under warm indoor bulbs or cool outdoor LEDs, your brain automatically corrects what \"white\" looks like. Cameras, however, rely on white balance settings to interpret color temperature, measured in Kelvin (K). Most white LED Christmas lights fall between 4000K and 6500K. If your phone’s white balance defaults to 3000K (typical for indoor lighting), it will overcompensate by adding blue, making true white lights look icy or unnatural. Conversely, if the sensor detects too much ambient daylight, it may render them yellow.
Mixed lighting compounds this issue. Indoors, string lights often compete with incandescent lamps, overhead fluorescents, and natural twilight through windows. These varying sources create conflicting color casts that confuse automatic white balance algorithms. Even high-end smartphones using AI-driven scene detection can misinterpret festive lighting as “warm ambiance” rather than neutral illumination.
“Most consumer cameras default to pleasing color, not accurate color. For true-to-life results, especially with lighting, manual calibration is essential.” — Lena Torres, Mobile Photography Educator at Digital Exposure Lab
Step-by-Step Guide to Calibrating Your Phone Camera
Calibration doesn’t require professional tools or software. You can achieve accurate white light representation using built-in features and simple environmental controls. Follow these steps before photographing your holiday display:
- Choose a controlled environment. Turn off competing light sources—lamps, ceiling fixtures, TVs—to isolate the string lights as the primary illumination.
- Use fresh, high-quality LED strings labeled “pure white” or “daylight white.” Avoid older strands or mixed sets where some bulbs have degraded or shifted color over time.
- Wait until full darkness outside. Natural light bleeding through windows can skew white balance. Shoot after sunset when ambient daylight is negligible.
- Open your phone’s native camera app and switch to Pro or Manual mode. On iPhones, use third-party apps like Halide or Moment; on Android, use the built-in Pro mode (e.g., Samsung Pro, Pixel Manual).
- Set ISO manually between 50 and 200. High ISO amplifies noise and can distort color fidelity. Lower values preserve detail and accuracy.
- Adjust shutter speed to 1/30s or slower if stable. Use a tripod or rest your phone on a surface to prevent blur during longer exposures.
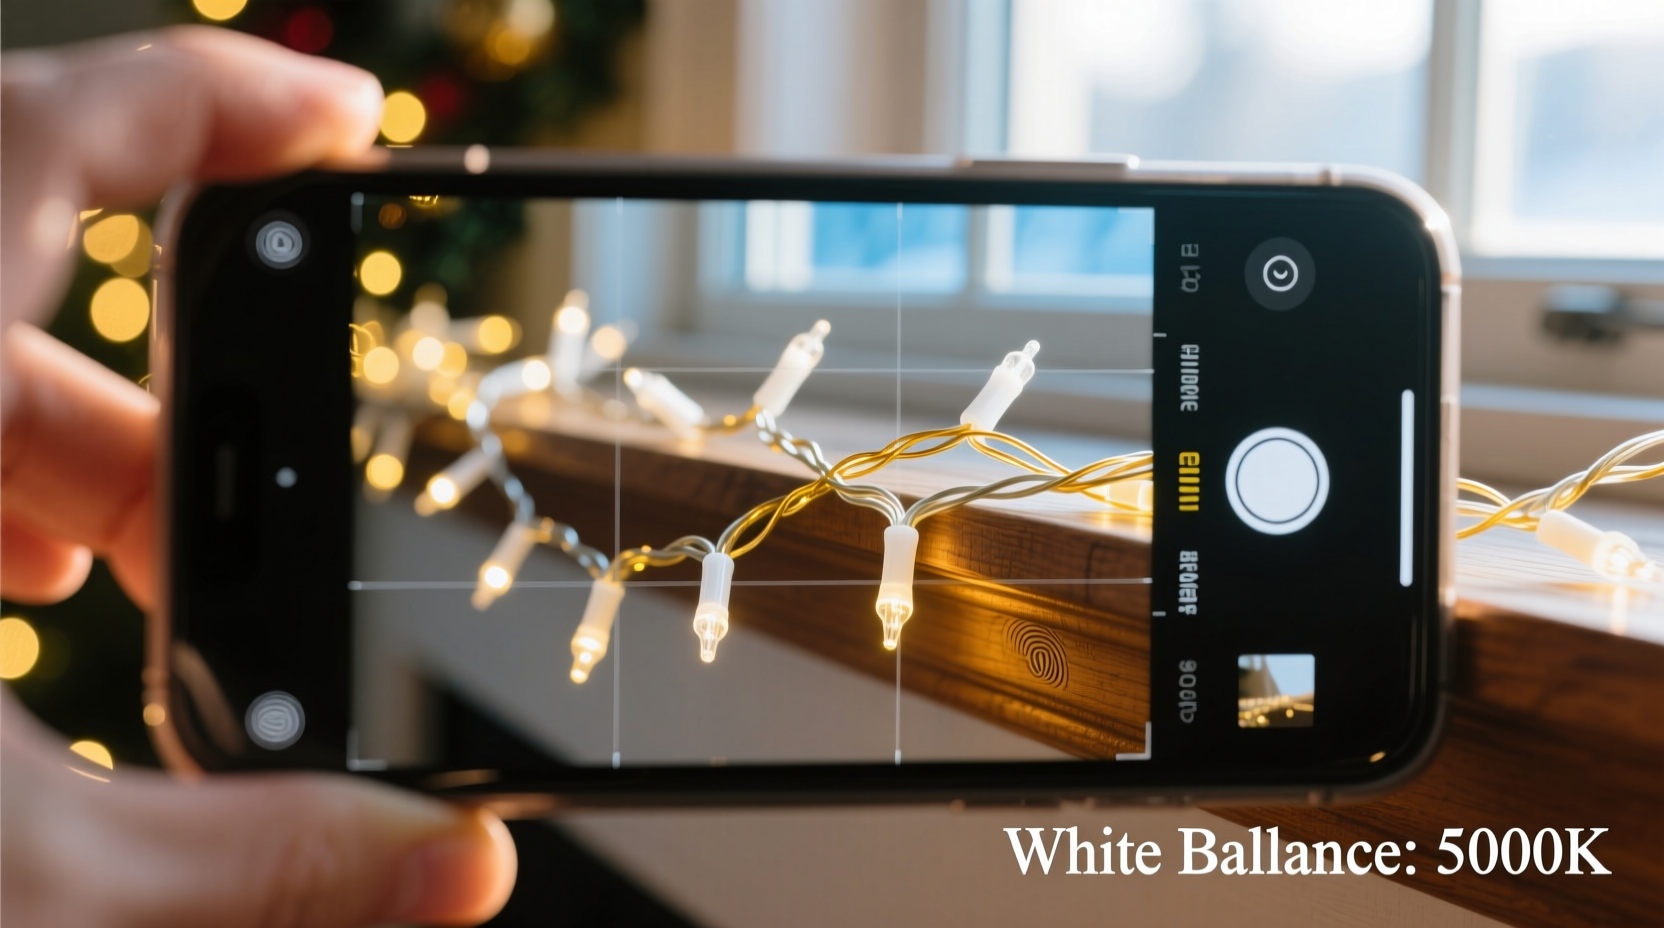
- Manually set white balance. Tap on the screen to bring up focus and exposure controls. Look for a WB (White Balance) option and select a preset close to 5000K–6000K for pure white LEDs. Alternatively, use a gray card or white paper under the lights to set a custom white balance point if your app supports it.
- Take a test shot and review. Zoom in on areas lit directly by the strings. True white should appear neutral—not leaning toward orange or blue.
- Make micro-adjustments. If the result is too cool, lower the Kelvin value slightly. If too warm, increase it. Re-take the photo after each adjustment.
- Lock settings once satisfied. Save the configuration or note the values for consistency across multiple shots.
Do’s and Don’ts When Photographing White String Lights
| Action | Do | Don't |
|---|---|---|
| Light Source | Use consistent, same-batch LED strings labeled 5000K–6000K | Mix old and new strings or combine warm white with daylight white |
| Camera Mode | Shoot in Pro mode with manual white balance | Rely solely on Auto mode or Portrait mode |
| Environment | Eliminate competing light sources; shoot in total darkness | Photograph with room lights or TV glow in the background |
| Focusing | Tap to focus on the brightest bulb cluster; lock focus | Allow the camera to refocus between shots |
| Post-Processing | Make minor white balance tweaks in editing apps like Lightroom Mobile | Overcorrect in post—this can introduce banding or unnatural tones |
Real Example: Fixing a Family Holiday Photo Setup
Sarah, a hobbyist photographer in Portland, struggled for years with her annual tree-lighting photo. Each December, she’d set up her family around the Christmas tree adorned with “white” fairy lights, only to find the next day that all images had a patchy, bluish tint. Some bulbs looked silver, others pale yellow. She assumed it was her aging iPhone camera. After researching mobile white balance, she realized the issue wasn’t hardware—it was calibration.
She began by replacing her decade-old string lights with a new set rated at 5500K. She turned off all other lights in the living room, closed the curtains, and waited until 8 PM to begin. Using the Halide app, she switched to Manual mode, set ISO to 100, shutter speed to 1/15s (with her phone resting on a bookshelf), and manually adjusted white balance to 5500K. She held up a piece of printer paper under the lights, focused on it, and tapped the screen to set a custom white point.
The difference was immediate. Her test shot showed soft, even white illumination—no harsh blue spikes or yellow clusters. When she took the family photo, the lighting enhanced their faces naturally, without the artificial glow she’d seen before. She saved the settings as a preset in Halide and reused them throughout the season for mantel displays, wreaths, and outdoor porch lights.
Essential Tips for Consistent Results
- Buy matching light sets. Even within the “white” category, manufacturers vary. Purchase all strings from the same brand and batch number to avoid subtle differences in hue.
- Avoid HDR mode for pure white light shots. While HDR enhances dynamic range, it can blend multiple exposures with differing white balances, resulting in inconsistent tones.
- Use RAW format when possible. Apps like Adobe Lightroom Mobile allow shooting in DNG (RAW), preserving maximum color data for precise post-processing adjustments.
- Check battery levels. Low battery can cause voltage drops in connected accessories and affect LED color output, especially in long strings powered via USB.
- Warm up the lights first. LED color temperature can shift slightly during the first 5–10 minutes of operation. Let strings run for 10 minutes before photographing.
FAQ: Common Questions About Capturing True White Light
Can I fix incorrect white balance after taking the photo?
Yes, but with limitations. If you shot in JPEG, corrections are possible using apps like Snapseed or VSCO, but extreme adjustments may degrade image quality. For best results, shoot in RAW format, which retains full color data and allows non-destructive white balance tuning.
Why do my white lights look different on various phones?
Different phone models have unique camera sensors, lens coatings, and software processing. One phone might apply aggressive warming to make scenes look “cozy,” while another prioritizes neutrality. This is why calibrated manual settings produce more consistent results across devices.
Is there a way to calibrate without Pro mode?
If your phone lacks manual controls, use a workaround: place a white sheet of paper under the lights, take a photo focused on the paper, then use an editing app to adjust the white balance so the paper appears truly neutral. Apply those same settings to other photos taken in the same setup.
Final Checklist Before Shooting
- ✅ Verified all string lights are labeled “daylight white” or “pure white” (5000K–6000K)
- ✅ Removed mixed lighting sources (lamps, TVs, window light)
- ✅ Set up in complete darkness
- ✅ Mounted phone on a stable surface or tripod
- ✅ Opened Pro camera app and disabled Auto HDR
- ✅ Set ISO between 50 and 200
- ✅ Adjusted shutter speed to 1/15s or slower (as needed)
- ✅ Manually set white balance to 5500K or used a white/gray card for custom calibration
- ✅ Took and reviewed a test shot for neutral tones
- ✅ Saved settings or noted values for reuse
Master the Light, Capture the Moment
Holiday memories deserve to be preserved as they’re experienced—not filtered through inaccurate color interpretation. By understanding and controlling your phone’s white balance, you reclaim creative authority over your photography. No longer must you accept yellow-tinged twinkle lights or icy-blue garlands in your albums. With deliberate setup and calibration, your smartphone becomes a precision tool capable of rendering the quiet brilliance of true white light just as your eyes see it.
This season, take a few extra minutes before snapping that perfect shot. Calibrate, test, refine. Share not just images, but the authentic warmth and clarity of your celebrations. Your future self—and your family—will thank you when those moments shine through, unchanged and timeless.


 浙公网安备
33010002000092号
浙公网安备
33010002000092号 浙B2-20120091-4
Comments
No comments yet. Why don't you start the discussion?