
Changing the color of an image doesn’t require advanced design skills or expensive software. Whether you’re editing a photo for social media, adjusting branding elements, or simply experimenting creatively, knowing how to modify colors accurately and efficiently is a valuable skill. This guide walks through practical, beginner-friendly methods using accessible tools—both online and desktop-based—to help you achieve professional-looking results without confusion.
Why Change Image Colors?
There are many reasons to alter an image’s color. You might want to correct white balance in a photograph, match brand colors in marketing materials, or create visual variations for product mockups. For artists and designers, recoloring allows quick exploration of different aesthetics without starting from scratch. Even casual users benefit when updating old photos or preparing images for presentations.
The key is understanding which method suits your needs: full-tone adjustments, selective color changes, or complete recoloring of objects. Each approach serves different purposes and requires specific tools.
Essential Tools for Changing Image Color
You don’t need Photoshop expertise to recolor images. Several user-friendly platforms offer intuitive interfaces and powerful features at no cost—or minimal expense. Here are the most reliable options:
- GIMP – A free, open-source alternative to Photoshop with robust color adjustment tools.
- Photopea – A browser-based editor that mimics Photoshop’s layout and supports PSD files.
- Canva – Ideal for quick edits, especially overlays and transparency-based recoloring.
- Figma – Great for UI/UX assets and vector-based image adjustments.
- Microsoft Paint (with limitations) – Basic hue shifting possible via color replacement tool.
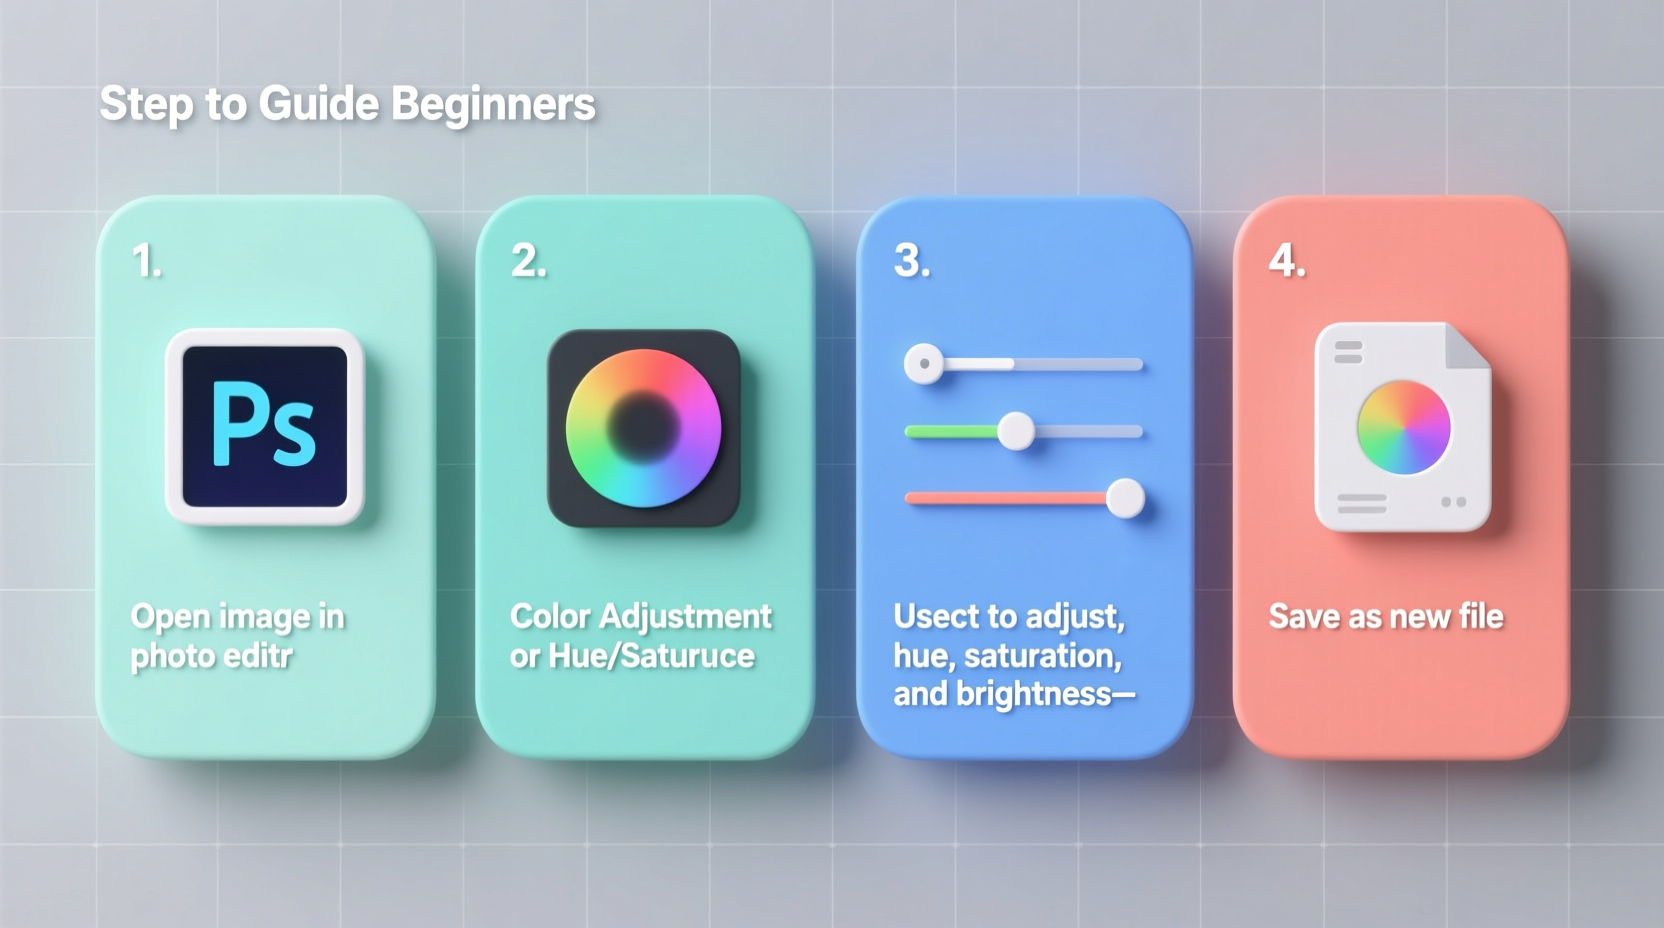
Step-by-Step Guide: How to Change Image Color in Photopea (Free & Easy)
Photopea is one of the most beginner-accessible tools for precise color editing. It runs directly in your browser and handles layers, masks, and adjustment settings similar to premium software. Follow these steps to change an image's color effectively:
- Open Photopea at photopea.com and click “Open a File” to upload your image.
- Navigate to Image > Adjustments > Hue/Saturation or press Ctrl+U.
- In the pop-up window, use the Hue slider to shift the overall color tone. Moving left or right changes the base color (e.g., red to blue).
- Adjust Saturation to make colors more vivid or muted. Lower values create pastel or grayscale effects.
- Modify Lightness if needed to brighten or darken the result.
- To target specific colors (like only changing green leaves), select them from the dropdown menu labeled “Master” (e.g., choose “Greens”).
- Click OK when satisfied, then go to File > Export As > PNG/JPG to save your edited image.
This method works well for global color shifts and minor corrections. For more control over individual parts of an image, layer masking and selection tools come into play.
Selective Recoloring: Change Only Part of an Image
Sometimes, you only want to alter a portion of an image—such as turning a black shirt blue or making flowers pink. This requires isolating the area before applying color changes.
How to Selectively Recolor Using GIMP
- Launch GIMP and open your image.
- Select the Free Select Tool (Lasso) or Fuzzy Select Tool (Magic Wand) from the toolbox.
- Click and drag around the object you want to recolor. Use zoom (+) for precision.
- Once selected, go to Colors > Hue-Saturation.
- Adjust the sliders just like in Photopea until the selected area reflects your desired color.
- Deselect by pressing Shift+Ctrl+A or choosing Select > None.
- Save the file via File > Export As.
For complex shapes (like hair or fur), refine the selection using Select > Grow or Feather Edges to avoid harsh borders.
“Precise selections are the foundation of clean recoloring. Take time to adjust edges—it makes all the difference.” — Lena Torres, Digital Imaging Instructor
Quick Method: Use Canva for Overlay-Based Color Changes
If you're not comfortable with detailed editing, Canva offers a fast workaround using transparent overlays. This technique is ideal for background images, logos, or flat graphics.
Steps:
- Upload your image to Canva.
- Add a solid-colored shape (rectangle or circle) over the area you want to recolor.
- Resize and position it precisely.
- Select the shape, then reduce its transparency using the Transparency slider (found in the top toolbar).
- Change the blend mode (if available in your plan) to “Multiply,” “Overlay,” or “Color” for natural integration.
- Group the image and overlay (Ctrl+G) to keep them aligned.
This method won't work well for photorealistic edits but excels in stylized or graphic-heavy projects.
Do’s and Don’ts of Image Recoloring
| Do’s | Don’ts |
|---|---|
| Use non-destructive editing methods (adjustment layers when available) | Over-saturate colors to the point of unnatural appearance |
| Zoom in for accurate selections | Apply global hue shifts to images with multiple color subjects without masking |
| Save intermediate versions during editing | Ignore lighting direction—shadows should still align after recoloring |
| Match ambient light temperature (warm vs cool tones) | Forget file format: Save final images as PNG for transparency or JPG for photos |
Real Example: Updating Product Photos for E-Commerce
A small business owner sells handmade ceramic mugs online. She originally photographed each mug in red clay but receives requests for teal and coral variants. Instead of reshooting, she uses GIMP to selectively recolor the mug bodies while preserving texture and shadows.
She begins by duplicating the original image layer, applies a hue/saturation adjustment to the duplicate, masks out everything except the mug, then fine-tunes brightness to maintain realism. The entire process takes under ten minutes per variant, allowing her to expand her catalog quickly and consistently.
This approach saves time, reduces production costs, and keeps branding cohesive across listings.
Checklist: Before You Publish Your Recolored Image
- ✅ Ensure colors look natural under various lighting conditions (check on phone and desktop)
- ✅ Confirm no unintended pixelation or blurring occurred during export
- ✅ Verify file size is optimized for web use (under 2MB for standard posts)
- ✅ Compare side-by-side with the original to assess accuracy
- ✅ Test colorblind-friendly contrast if used in public-facing materials
FAQ
Can I change image color on a smartphone?
Yes. Apps like Snapseed, PicsArt, and Adobe Lightroom Mobile allow hue and saturation adjustments. Use the “Edit” tab, then navigate to “Tune” or “Curves” to modify colors selectively.
Why does my recolored image look fake?
This often happens when saturation is too high or lighting isn’t consistent. Reduce saturation slightly and ensure highlights/shadows reflect the new color realistically. Blending modes like “Soft Light” can help integrate changes naturally.
Is it possible to change black-and-white photos to color?
Yes, but this is called colorization—not simple recoloring—and requires painting color onto different areas manually while respecting skin tones, clothing, and environment. Tools like DeOldify (AI-based) can automate part of this process.
Final Thoughts and Next Steps
Changing image color is a simple yet transformative skill. With free tools and a clear workflow, anyone can produce polished results in minutes. Start with basic hue adjustments, practice selective editing, and gradually explore advanced techniques like layer blending and AI-assisted tools.
Mastery comes not from complexity, but consistency. The more you experiment with real-world examples—product images, portraits, or digital art—the more intuitive the process becomes.


 浙公网安备
33010002000092号
浙公网安备
33010002000092号 浙B2-20120091-4
Comments
No comments yet. Why don't you start the discussion?