
Resistance bands have become a staple in home fitness routines—not just because they’re affordable and portable, but because they offer scalable strength training that adapts to any fitness level. Whether you're recovering from injury, building muscle, or enhancing mobility, selecting the right band is critical to effectiveness and safety. Yet with dozens of types, materials, tensions, and configurations available, choosing the right one can feel overwhelming. The key lies not in finding the strongest or most expensive band, but the one that aligns with your current strength, goals, and movement capacity.
Understanding Resistance Band Types and Their Uses
Not all resistance bands are created equal. The term “resistance band” covers several distinct designs, each serving different purposes:
- Loop Bands (Mini Bands): Short, circular bands typically used around the thighs, knees, or ankles. Ideal for glute activation, lateral walks, and lower-body strength work.
- Tube Bands with Handles: Long elastic tubes with padded handles on each end. Best for upper-body exercises like rows, chest presses, and bicep curls.
- Flat Bands (Therapy Bands): Long, flat strips without loops. Often used in rehabilitation or physical therapy settings for controlled range-of-motion exercises.
- Fitness Bands (Pull-Up Assist Bands): Thick, heavy-duty loops designed to support bodyweight movements such as assisted pull-ups or deep squats.
- Figure-8 Bands: Shaped like an “8,” these provide dual anchor points for upper-body pulling and pressing motions with natural hand positioning.
The type you choose should reflect your workout style. For full-body home routines, many trainers recommend starting with a set of loop bands and tube bands with interchangeable resistance levels. This combination offers maximum versatility across muscle groups.
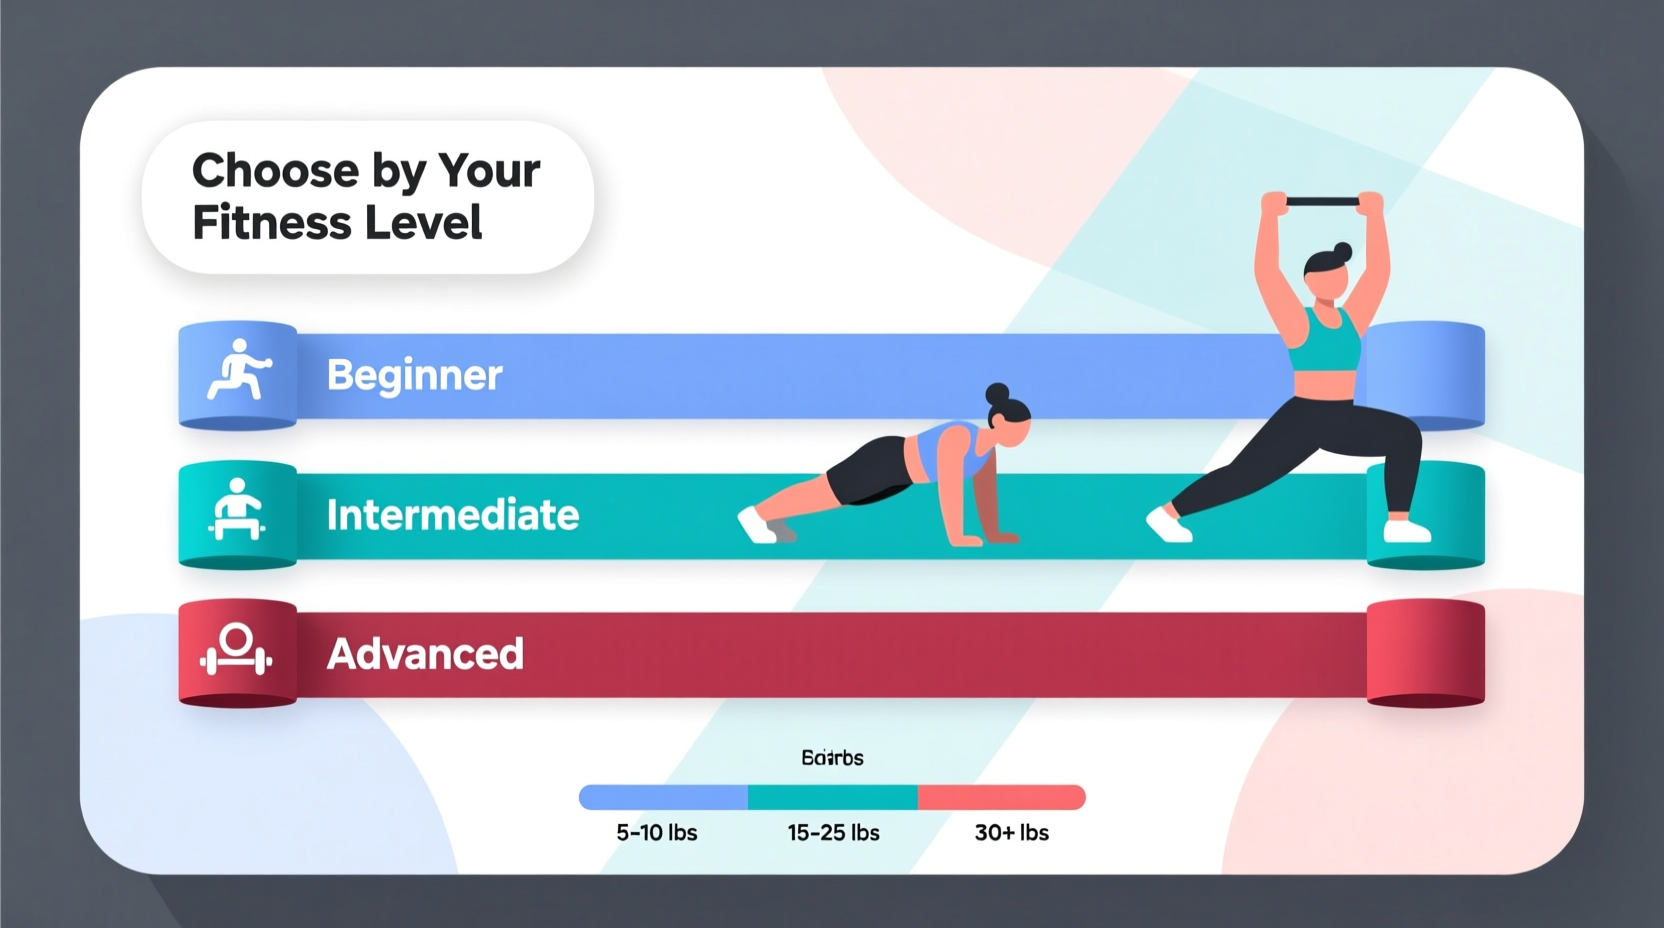
Matching Band Resistance to Your Fitness Level
Resistance is measured in pounds of force (e.g., 10–50 lbs of tension). However, manufacturers use inconsistent color coding, so relying solely on color can mislead. Instead, match resistance to your ability to perform proper form through a full range of motion.
Beginner Level (0–12 weeks of training)
Beginners benefit most from light to medium resistance that allows them to learn movement patterns safely. Look for bands offering 5–15 lbs of tension. Focus on mastering bodyweight coordination before adding load.
Common beginner goals include improving joint stability, activating underused muscles (like glutes), and building foundational endurance. A thin loop band (yellow or light green) or low-resistance tube band works well for exercises like clamshells, seated leg extensions, or wall-assisted squats.
Intermediate Level (3–12 months of consistent training)
At this stage, you’ve built baseline strength and control. You can now challenge muscles with moderate resistance—typically 15–30 lbs. Use medium-strength bands (green, red, or blue) to enhance push-ups, add resistance to lunges, or increase difficulty in shoulder stabilization drills.
Intermediate users often combine multiple bands or layer loop and tube styles to progressively overload movements. For example, placing a medium loop band above the knees during a squat adds hip abduction resistance, engaging glute medius more effectively than bodyweight alone.
Advanced Level (1+ year of regular strength training)
Advanced exercisers need high-tension bands—30–50+ lbs—to continue making gains. These are often thick loop bands (black, silver, or purple) or multi-band setups. Advanced users may also use resistance bands to augment free-weight exercises, such as adding band tension to barbell squats or deadlifts at home.
For power development, some athletes use short, ultra-dense bands for overspeed eccentrics or explosive jump training. Always ensure anchor points (door anchors, poles) are secure when using high-resistance bands to prevent recoil injuries.
“Progressive overload isn’t only about lifting heavier weights—it’s about increasing demand intelligently. Resistance bands allow precise scaling so every level can grow stronger.” — Dr. Lena Torres, Sports Physiologist & Strength Coach
Key Features to Evaluate When Choosing Bands
Beyond resistance level, several product features determine durability, comfort, and functionality.
| Feature | What to Look For | Avoid |
|---|---|---|
| Material | Natural latex (durable, elastic) or eco-friendly alternatives like TPE for sensitive skin | Bands with no material listed; cheap rubber that cracks easily |
| Tear Resistance | Reinforced stitching (for tube bands), seamless loops | Thin seams, visible mold lines, or air bubbles in the band |
| Grip & Comfort | Padded handles (tube), non-slip texture (loop), soft inner lining | Hard plastic connectors, rough edges that dig into skin |
| Versatility | Includes door anchor, carry bag, exercise guide, multiple resistance levels | Sold individually without accessories or instructions |
| Portability | Lightweight, packable, fits in gym bag | Bulk packaging, fragile components |
Latex allergies are common, so if you experience itching or redness after use, switch to a latex-free brand. Many quality manufacturers now offer hypoallergenic options without sacrificing elasticity.
Step-by-Step Guide: How to Select Your Ideal Band Set
Follow this process to confidently choose the right resistance bands tailored to your needs.
- Assess Your Current Strength and Goals
Determine whether you’re rehabbing, toning, building muscle, or training for performance. This shapes the type and resistance needed. - Choose Band Type Based on Workout Style
Do you want to do upper-body pulls? Get tube bands with handles. Focused on glute work? Prioritize loop bands. Need both? Invest in a combo set. - Select a Range of Resistances
Purchase a set with at least three levels: light, medium, and heavy. This allows progression without buying new gear every few weeks. - Check Build Quality and Safety
Stretch each band gently before first use. Look for uniform thickness, smooth texture, and no weak spots. Test door anchors securely. - Test in Real Exercises
Try the band in a squat, row, or press. Can you complete 12–15 reps with good form and slight fatigue on the last few? That’s the right resistance. - Store Properly for Longevity
Keep bands away from direct sunlight, heat sources, and sharp objects. Store loosely coiled or laid flat—never knotted.
Real Example: Sarah’s Home Workout Journey
Sarah, a 38-year-old office worker, began her fitness journey after months of sitting led to tight hips and weak glutes. She started with a basic set of loop bands—light (yellow), medium (red), and heavy (blue). Her initial routine included banded clamshells, standing kickbacks, and lateral walks with the light band above her knees.
After four weeks, she could perform 3 sets of 15 reps with ease, so she progressed to the medium band. She also added a tube band with handles for seated rows and overhead presses, targeting upper-back strength weakened by poor posture.
By week 10, Sarah combined both tools—using the medium loop band during bodyweight squats while holding the tube band anchored to a door for a simultaneous row. This supersets two movements efficiently, maximizing her 20-minute home sessions.
Today, nearly a year later, Sarah uses heavy bands for resistance-assisted step-ups and maintains her set with monthly inspections for wear. Her consistency—and smart equipment choices—helped her avoid back pain and build functional strength without ever stepping into a gym.
Essential Checklist Before Buying Resistance Bands
Use this checklist to ensure you make a safe, effective purchase:
- ✅ I know my current fitness level (beginner, intermediate, advanced)
- ✅ I’ve identified my primary workout goals (strength, rehab, mobility, hypertrophy)
- ✅ I’m buying a set with multiple resistance levels (not just one band)
- ✅ The bands are made of durable, non-toxic material (latex or latex-free)
- ✅ Tube bands have comfortable, secure handles
- ✅ Loop bands maintain shape without twisting or rolling
- ✅ Includes a door anchor and carrying case (if applicable)
- ✅ Comes with a clear resistance guide (lbs or kg, not just colors)
- ✅ Has positive reviews mentioning long-term durability
- ✅ Is backed by a warranty or satisfaction guarantee
Frequently Asked Questions
Can resistance bands build muscle as effectively as weights?
Yes—when used with progressive overload. Studies show that resistance bands can produce similar muscle growth to free weights if the final reps of each set are challenging. The key is increasing resistance over time, either by upgrading bands or altering leverage (e.g., shortening the band).
How long do resistance bands last?
With proper care, high-quality bands last 6 months to 2 years depending on frequency of use. Signs of wear include fading color, small tears, loss of elasticity, or cracking. Replace immediately if compromised—snapped bands can cause injury.
Are resistance bands safe for older adults or those with joint issues?
Yes, and they’re often recommended. The controlled, low-impact nature of band training makes it ideal for arthritis, post-injury rehab, or balance improvement. Start with very light resistance and focus on smooth, deliberate movements. Always consult a physical therapist if recovering from surgery or chronic pain.
Final Thoughts: Build a Smarter, Stronger Routine at Home
Choosing the right resistance bands isn’t about picking the toughest one—it’s about matching the tool to your current ability and long-term goals. The best band is the one you’ll use consistently, safely, and progressively. From beginners learning to activate dormant muscles to advanced lifters adding dynamic tension to compound lifts, resistance bands offer unmatched flexibility in home fitness.
Start where you are. Choose a thoughtfully constructed set with graduated resistance. Learn proper form. Track your progress. Then, gradually increase the demand on your muscles. Over time, that light yellow band will feel effortless—and you’ll reach for the black one with confidence.


 浙公网安备
33010002000092号
浙公网安备
33010002000092号 浙B2-20120091-4
Comments
No comments yet. Why don't you start the discussion?