
A burnt non stick pan doesn’t mean it’s time for replacement. With the right approach, most stubborn residue can be removed without compromising the delicate non stick surface. Many people make the mistake of reaching for steel wool or abrasive scrubbers, which only worsens the damage. The key is gentle yet effective cleaning using safe methods that preserve the coating while restoring functionality. This guide walks through proven techniques, materials to avoid, and long-term care strategies to keep your cookware in top condition.
Why You Should Never Use Abrasives on Non Stick Pans
The non stick coating—typically made from polytetrafluoroethylene (PTFE) or ceramic—is engineered to resist food adhesion and simplify cleaning. However, it’s also vulnerable to scratches and degradation when exposed to harsh tools or chemicals. Using metal scrapers, steel wool, or even some stiff nylon brushes can gouge the surface, creating microscopic pits where food builds up over time. Once damaged, the coating loses its effectiveness and may release harmful particles if overheated.
“Damaging the non stick layer not only reduces performance but can introduce health risks if flakes enter your food.” — Dr. Linda Harper, Materials Safety Researcher at the Home Appliance Safety Institute
Preserving the integrity of the coating should be the primary goal when cleaning. That means avoiding anything rough or sharp and opting instead for soft cloths, silicone pads, or sponge-based cleaners.
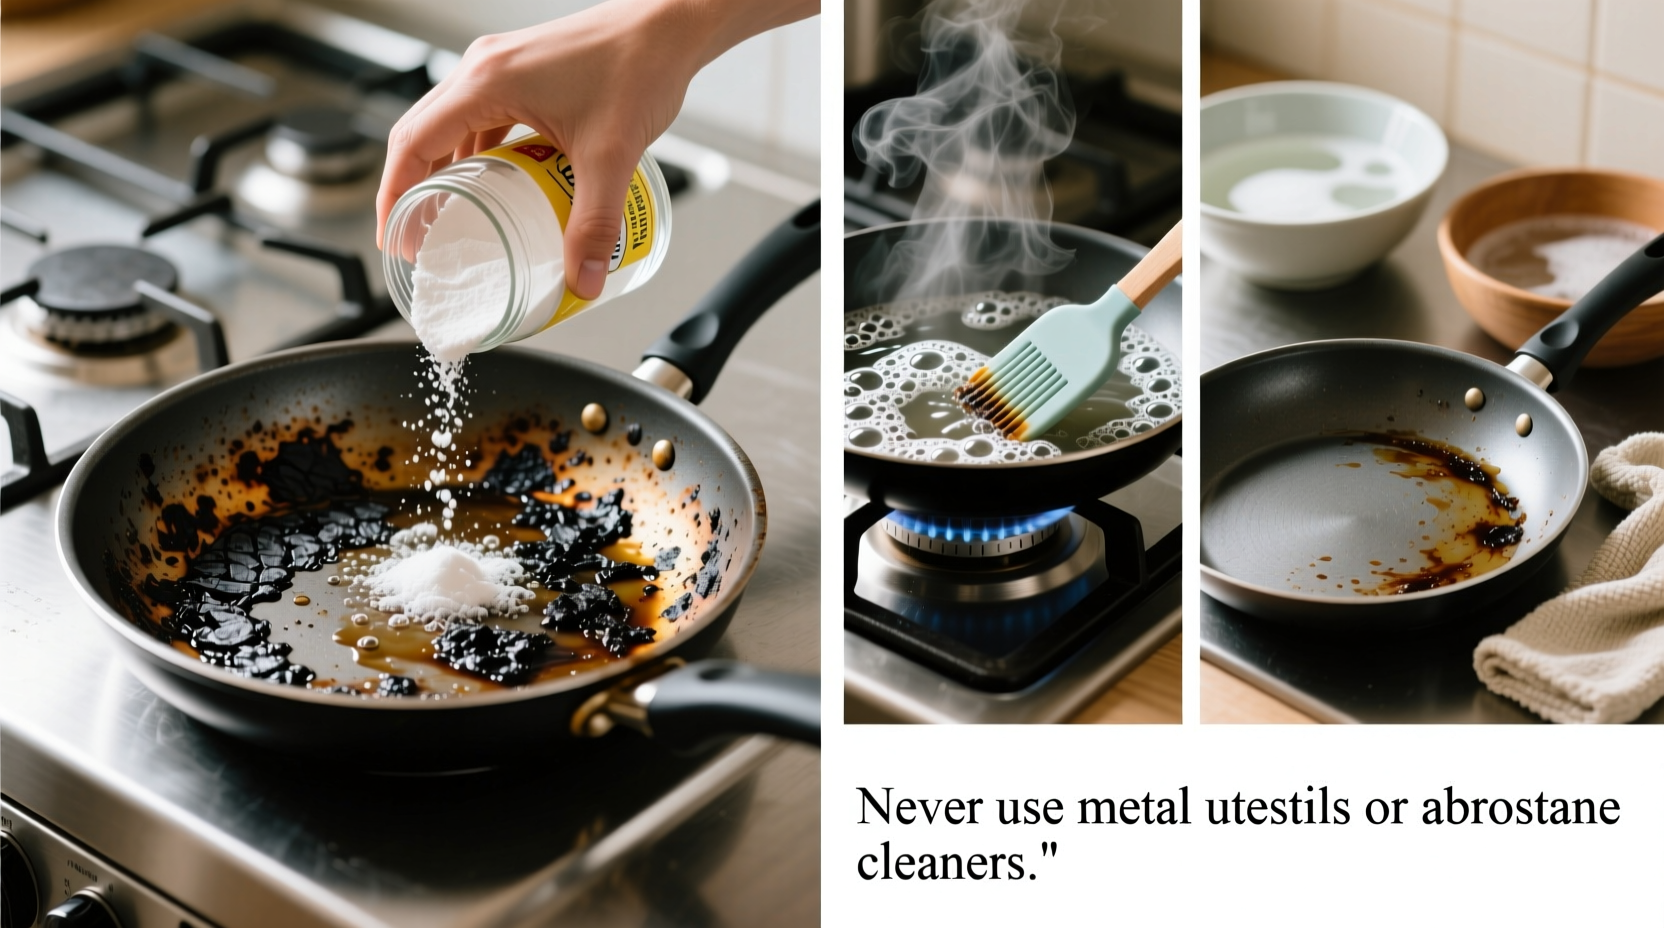
Step-by-Step: How to Remove Burnt Residue Safely
Cleaning a burnt non stick pan requires patience and the right sequence of actions. Follow this timeline for best results:
- Let the pan cool completely. Never submerge a hot pan in cold water—it can warp the base and weaken the bond between layers.
- Fill with warm water and let soak for 15–30 minutes. This loosens stuck-on food and makes scrubbing easier.
- Add two tablespoons of baking soda to the water. Baking soda acts as a mild alkali that helps break down carbonized residue.
- Bring to a gentle simmer on the stove for 5–10 minutes. Do not boil vigorously; low heat prevents stress on the coating.
- Turn off heat and allow to cool slightly. Then pour out the liquid.
- Use a soft sponge or nylon brush with dish soap to gently wipe away residue. Circular motions work best for lifting grime.
- If stains remain, make a paste of baking soda and water. Apply directly to problem areas and let sit for 10 minutes before wiping.
- Rinse thoroughly and dry with a soft towel.
Alternative Cleaning Methods That Work
While baking soda is highly effective, other natural solutions can help depending on the severity of the burn and what you have available.
- Vinegar and Water Solution: Mix equal parts white vinegar and water. Simmer in the pan for 5–8 minutes. The acetic acid helps dissolve mineral deposits and loosens charred bits.
- Lemon Juice + Salt (Fine Grain): Sprinkle fine salt over the dampened surface, then squeeze fresh lemon juice on top. Let sit for 10 minutes before wiping. The citric acid breaks down residue, while salt provides slight abrasion—use only sparingly and gently.
- Dish Soap Soak with Hot Water: Add a generous squirt of grease-cutting dish soap and fill with hot water. Let stand for several hours or overnight. Ideal for moderate sticking.
These alternatives are particularly useful for those avoiding baking soda or seeking faster odor-neutralizing effects, especially after burning oily foods.
Do’s and Don’ts When Cleaning Non Stick Cookware
| Do’s | Don’ts |
|---|---|
| Use wooden, silicone, or plastic utensils | Use metal spatulas or whisks |
| Clean with soft sponges or cloths | Scrub with steel wool or abrasive pads |
| Hand wash whenever possible | Put in the dishwasher (unless labeled safe) |
| Store with protective liners or paper between pans | Nest pans tightly without protection |
| Use low to medium heat during cooking | Preheat empty pan or use high heat |
This table highlights common behaviors that either extend or shorten the life of your non stick cookware. Following the “Do’s” consistently can add years to your pan’s usability.
Real Example: Reviving a Heavily Burnt Pan
Sarah, a home cook in Portland, accidentally left a tomato sauce simmering unattended for over an hour. By the time she returned, the bottom of her favorite non stick skillet was covered in a thick, blackened crust. Frustrated but unwilling to throw it away, she tried the baking soda simmer method described above. After soaking and simmering for 10 minutes, she noticed the edges of the burn beginning to lift. She applied a second round of baking soda paste and let it sit for 30 minutes. A final gentle scrub with a non-abrasive sponge removed nearly all residue. Though a faint shadow remained, the pan performed like new during her next cook session. Sarah now keeps a dedicated \"cleaning day\" once a month to maintain all her cookware proactively.
Checklist: Safe Non Stick Pan Maintenance Routine
- ✔ Cool the pan completely before cleaning
- ✔ Soak in warm, soapy water immediately after use
- ✔ Use only soft sponges or cloths for washing
- ✔ Avoid stacking pans without protection
- ✔ Never use cooking sprays containing lecithin or propellants—they build up and become sticky
- ✔ Re-season occasionally with a drop of vegetable oil wiped on the surface
- ✔ Inspect monthly for signs of flaking or warping
- ✔ Replace if coating shows visible peeling or deep scratches
Frequently Asked Questions
Can I use Bar Keepers Friend on a non stick pan?
No. While Bar Keepers Friend is excellent for stainless steel, its oxalic acid and mild abrasives will damage non stick surfaces. Stick to gentler options like baking soda or vinegar.
Is it safe to cook in a pan with minor scratches?
Minor surface marks are usually just cosmetic and don’t pose immediate danger. However, deep grooves where food accumulates or coating begins to flake indicate it's time to replace the pan. Flakes can mix with food and degrade further under heat.
How often should I deep clean my non stick pans?
A thorough cleaning every 2–4 weeks is ideal for regular users. If you notice food sticking more than usual or lingering odors, schedule a deep clean sooner.
Final Thoughts and Action Steps
Cleaning a burnt non stick pan doesn’t require special products or aggressive scrubbing. The most effective methods rely on simple chemistry—baking soda, vinegar, and controlled heat—to loosen debris without harming the surface. What matters most is consistency and care. Treating your non stick cookware gently during both use and cleaning dramatically extends its lifespan and ensures safer, more enjoyable cooking.
Start today by inspecting your pans. If any show signs of heavy buildup, apply one of the safe cleaning methods outlined here. Establish a routine that includes prompt soaking, soft cleaning tools, and proper storage. Your future self—and your meals—will thank you.


 浙公网安备
33010002000092号
浙公网安备
33010002000092号 浙B2-20120091-4
Comments
No comments yet. Why don't you start the discussion?