
Cast iron radiators are more than just heating units—they’re often architectural centerpieces in older homes, combining vintage charm with reliable warmth. However, years of dust accumulation, paint chipping, and grime buildup can dull their appearance and reduce efficiency. Cleaning them improperly can lead to scratches, rust, or even damage to surrounding walls and floors. The good news is that with the right tools and method, you can restore your radiator to pristine condition—without tracking dirt through your home or risking damage to its finish.
Cleaning a cast iron radiator doesn’t require harsh chemicals or aggressive scrubbing. Instead, it calls for patience, precision, and a systematic approach. Whether your radiator is painted, polished, or partially corroded, this guide provides actionable steps to clean it thoroughly while minimizing mess and preserving its integrity.
Why Proper Radiator Cleaning Matters
Dust and debris trapped between the fins and around the base of a cast iron radiator act as insulators, reducing heat output by up to 20%. Over time, this forces your heating system to work harder, increasing energy bills and shortening equipment lifespan. Beyond efficiency, unclean radiators contribute to poor indoor air quality, releasing allergens each time they heat up.
Moreover, improper cleaning—such as using abrasive pads or excessive water—can compromise protective coatings, leading to rust and pitting. Once corrosion sets in, it spreads quickly and may necessitate costly refinishing or replacement. A careful, controlled cleaning process prevents these issues and extends the life of your radiator for decades.
Essential Tools and Supplies
Gathering the right materials beforehand ensures a smooth, mess-free cleaning session. Avoid improvising with household items that could scratch or stain the surface.
- Soft-bristle brush or radiator fin comb – Ideal for removing dust from tight spaces without bending fins.
- Microfiber cloths – Non-abrasive and lint-free, perfect for wiping surfaces and drying.
- Vinegar-water solution (1:1 ratio) – Natural cleaner effective on light grime and mineral deposits.
- Mild dish soap – Use sparingly for greasy residue; avoid detergents with bleach or ammonia.
- Spray bottle – Allows controlled application of cleaning solution.
- Plastic drop cloth or old towels – Protects flooring from drips and falling debris.
- Vacuum with brush attachment – Removes loose dust before wet cleaning.
- Small container of warm water – For rinsing cloths without over-wetting the radiator.
- Rubber gloves – Protects hands, especially if dealing with old paint or soot.
Avoid steel wool, wire brushes, or chemical degreasers unless restoring a stripped radiator. These can damage finishes and accelerate oxidation.
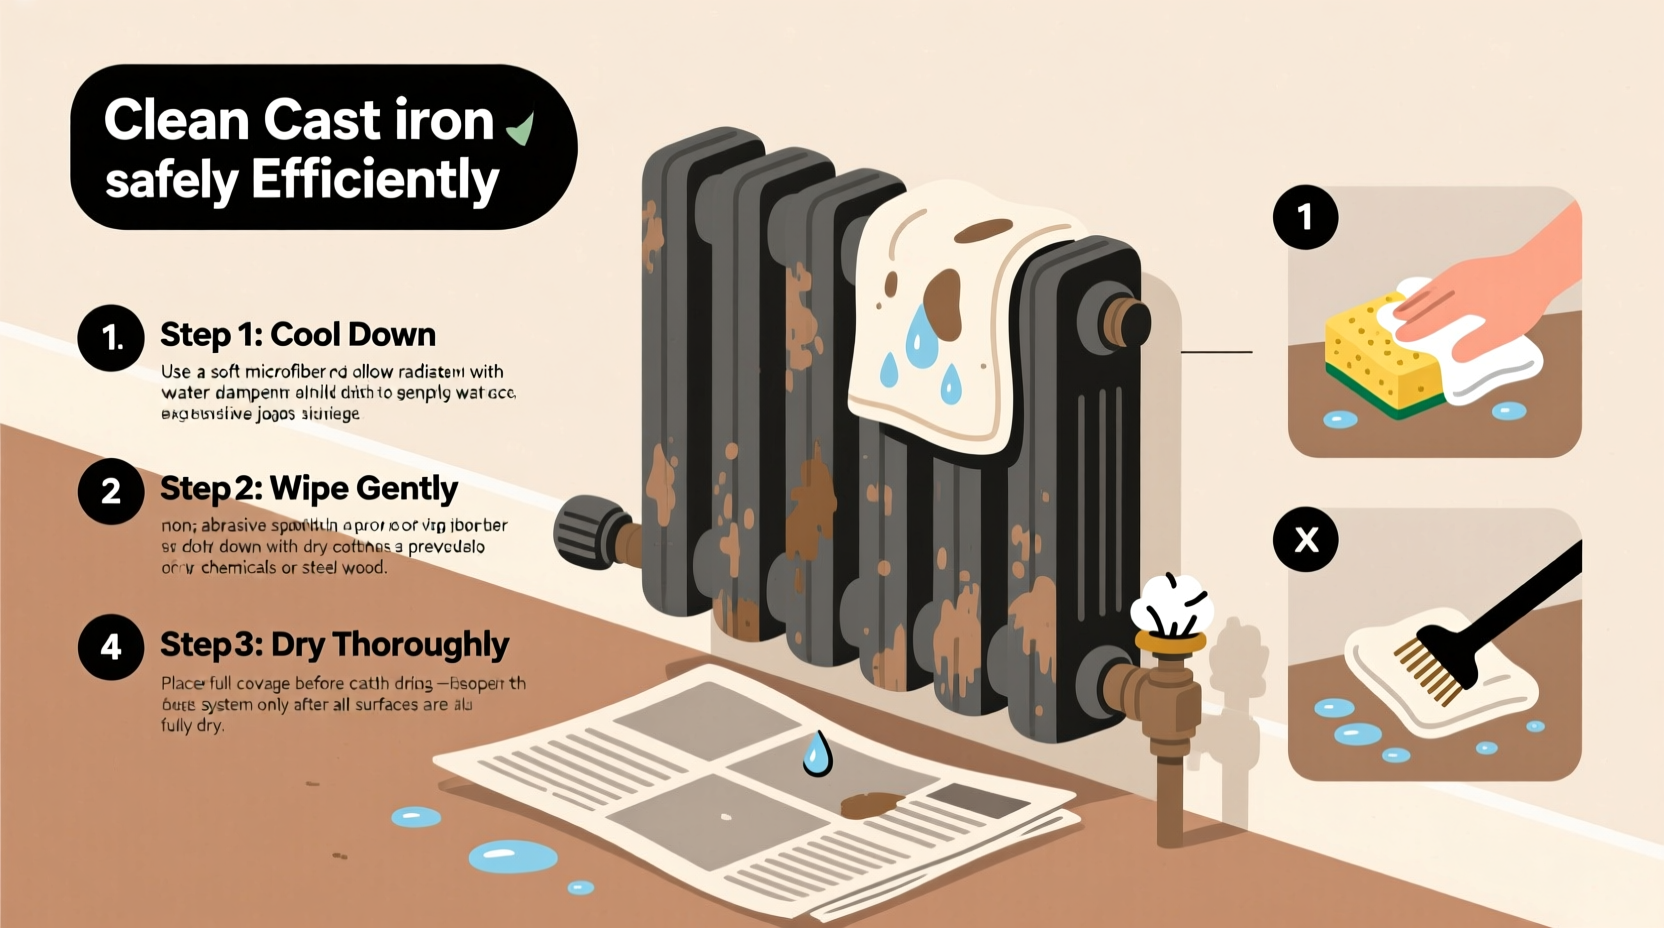
Step-by-Step Guide to Cleaning Without a Mess
Cleaning a cast iron radiator efficiently requires a sequence that contains dust and moisture at every stage. Follow this timeline to keep your space clean and the radiator safe.
- Turn off the radiator and allow it to cool completely. Never clean a hot or warm unit—sudden temperature changes can cause thermal shock, and moisture may turn to steam, spreading contaminants.
- Lay down a plastic sheet or thick towels around the base. Extend coverage at least two feet beyond the radiator’s footprint to catch falling dust and drips.
- Vacuum accessible surfaces. Use the brush attachment to gently remove loose dust from top panels, side fins, and the back near the wall. Work from top to bottom to prevent recontamination.
- Use a fin comb or soft brush to dislodge packed debris. Insert the tool horizontally between fins and pull outward to push dust downward onto the drop cloth. Do not force it—if resistance occurs, switch angles.
- Prepare your cleaning solution. Mix equal parts white vinegar and water in a spray bottle. For painted units with stubborn marks, add a few drops of mild dish soap.
- Lightly mist one section at a time. Spray only enough to dampen grime—never saturate. Excess liquid can seep into seams, promoting rust beneath paint layers.
- Wipe with a microfiber cloth. Use circular motions on flat surfaces and vertical strokes along fins. Replace cloths when visibly dirty to avoid spreading grime.
- Rinse minimally if needed. Dampen a fresh cloth with clean water and lightly go over soapy areas. Immediate drying is crucial.
- Dry thoroughly with a dry microfiber towel. Pay special attention to crevices where moisture can pool. Allow an additional 30 minutes for residual dampness to evaporate before turning the unit back on.
- Inspect and touch up if necessary. Look for flaking paint or signs of rust. Address minor chips promptly with high-heat enamel paint to prevent further deterioration.
Do’s and Don’ts: What to Avoid During Cleaning
Even experienced homeowners can make mistakes when cleaning vintage radiators. Refer to the table below to stay on track.
| Do’s | Don’ts |
|---|---|
| Work in sections to maintain control | Apply water liberally or use a soaking method |
| Use distilled water if hard water stains are present | Use bleach or ammonia-based cleaners |
| Test cleaning solution on a small hidden area first | Scrub aggressively with metal tools |
| Cover nearby furniture and vents | Leave wet rags draped over the radiator |
| Dispose of dusty cloths in sealed bags | Turn the radiator on while still damp |
“Many people don’t realize that cast iron is porous at a microscopic level. Once moisture penetrates under damaged paint, rust starts from the inside out.” — Daniel Reeves, HVAC Restoration Specialist with 22 years of experience in historic home systems
Real Example: Restoring a 1920s Radiator in a Brooklyn Brownstone
In a 1923 brownstone in Brooklyn, homeowner Maria Lopez faced a grimy cast iron radiator in her living room that hadn’t been cleaned in over 15 years. Dust bunnies clung between fins, and the once-bright cream paint was dulled by a film of urban soot. Fearing damage to the original hardwood floor, she initially avoided cleaning it altogether.
After consulting a preservation guide, Maria followed a contained cleaning protocol: she turned off the heat, laid down a vinyl painter’s tarp, and used a vacuum with a narrow nozzle to extract loose debris. She then mixed vinegar and water in a spray bottle and applied it in 6-inch sections, immediately wiping with color-coded microfiber cloths. Any heavily soiled spots were treated with a toothbrush reserved solely for this task.
The entire process took 45 minutes. Not a single drop reached the floor, and the radiator emitted noticeably more heat afterward. Maria now cleans all four radiators in her home annually, scheduling them each fall. “It’s like unlocking free heat,” she says. “And my allergies have improved too.”
When to Seek Professional Help
While routine maintenance can be done safely at home, certain situations call for expert intervention:
- Extensive paint failure or rust scaling – Indicates underlying moisture intrusion requiring stripping and repainting.
- Leaking valves or connections – Should be assessed by a licensed plumber or HVAC technician.
- Unusual noises or uneven heating – May signal airlocks or internal sludge needing professional bleeding or flushing.
- Lead paint presence – Homes built before 1978 may have lead-based paint. Disturbing it improperly poses health risks. Test kits are available, but removal should be handled by certified abatement professionals.
If you're unsure about the radiator’s condition, a home inspector or heating specialist can evaluate its structural and operational status.
Frequently Asked Questions
Can I use a steam cleaner on a cast iron radiator?
No. Steam cleaners introduce excessive moisture under high pressure, which can penetrate joints and insulation, leading to rust and mold. They also risk damaging wall coverings behind the unit. Stick to low-moisture methods.
Is it safe to paint a cast iron radiator after cleaning?
Yes, but only with high-temperature radiator paint designed to withstand repeated heating cycles. Regular paint will blister and peel. Make sure the surface is completely dry and lightly sanded before application. Apply thin, even coats to avoid clogging fins.
Will cleaning improve my heating bill?
Indirectly, yes. A clean radiator transfers heat more efficiently, allowing rooms to warm faster and thermostats to cycle off sooner. While savings vary, users commonly report 10–15% reductions in localized heating costs after deep cleaning.
Final Checklist for a Spotless, Safe Clean
Before you begin, verify you have everything ready:
- ✅ Radiator is completely cool
- ✅ Floor and nearby furniture protected
- ✅ Vacuum with brush attachment ready
- ✅ Soft brushes and microfiber cloths prepared
- ✅ Vinegar-water solution in spray bottle
- ✅ Dry towels on hand for immediate drying
- ✅ Trash bag nearby for soiled cloths
- ✅ Time blocked—allow 30–60 minutes depending on size
Conclusion: Maintain Beauty and Efficiency Year After Year
Cleaning a cast iron radiator doesn’t have to be daunting or messy. With preparation, the right tools, and a careful hand, you can preserve both its aesthetic appeal and functional performance. This simple annual ritual protects your home’s air quality, supports energy efficiency, and honors the craftsmanship of a durable, timeless heating solution.
Take pride in maintaining your radiator—it’s not just a utility, but a piece of your home’s history. Commit to regular care, and you’ll enjoy consistent warmth, lower energy strain, and a cleaner living environment for years to come.


 浙公网安备
33010002000092号
浙公网安备
33010002000092号 浙B2-20120091-4
Comments
No comments yet. Why don't you start the discussion?