
Compact discs (CDs) remain a durable and reliable medium for music, software, and data storage—when properly maintained. Despite their resilience, CDs are vulnerable to dust, fingerprints, smudges, and scratches that can impair readability and shorten their lifespan. Cleaning a CD isn’t just about removing surface grime; it’s about preserving the integrity of the reflective layer beneath the polycarbonate surface. Done incorrectly, cleaning can cause irreversible damage. But with the right techniques and tools, you can restore functionality and protect your collection for years.
Understanding CD Structure and Why It Matters
A CD consists of multiple layers: a clear polycarbonate plastic substrate, a thin reflective aluminum or gold layer, a protective lacquer coating, and a printed label on top. Data is encoded in microscopic pits arranged in a spiral track, read by a laser from the bottom side of the disc. Because the laser penetrates through the plastic base, damage or contamination on the underside directly affects performance.
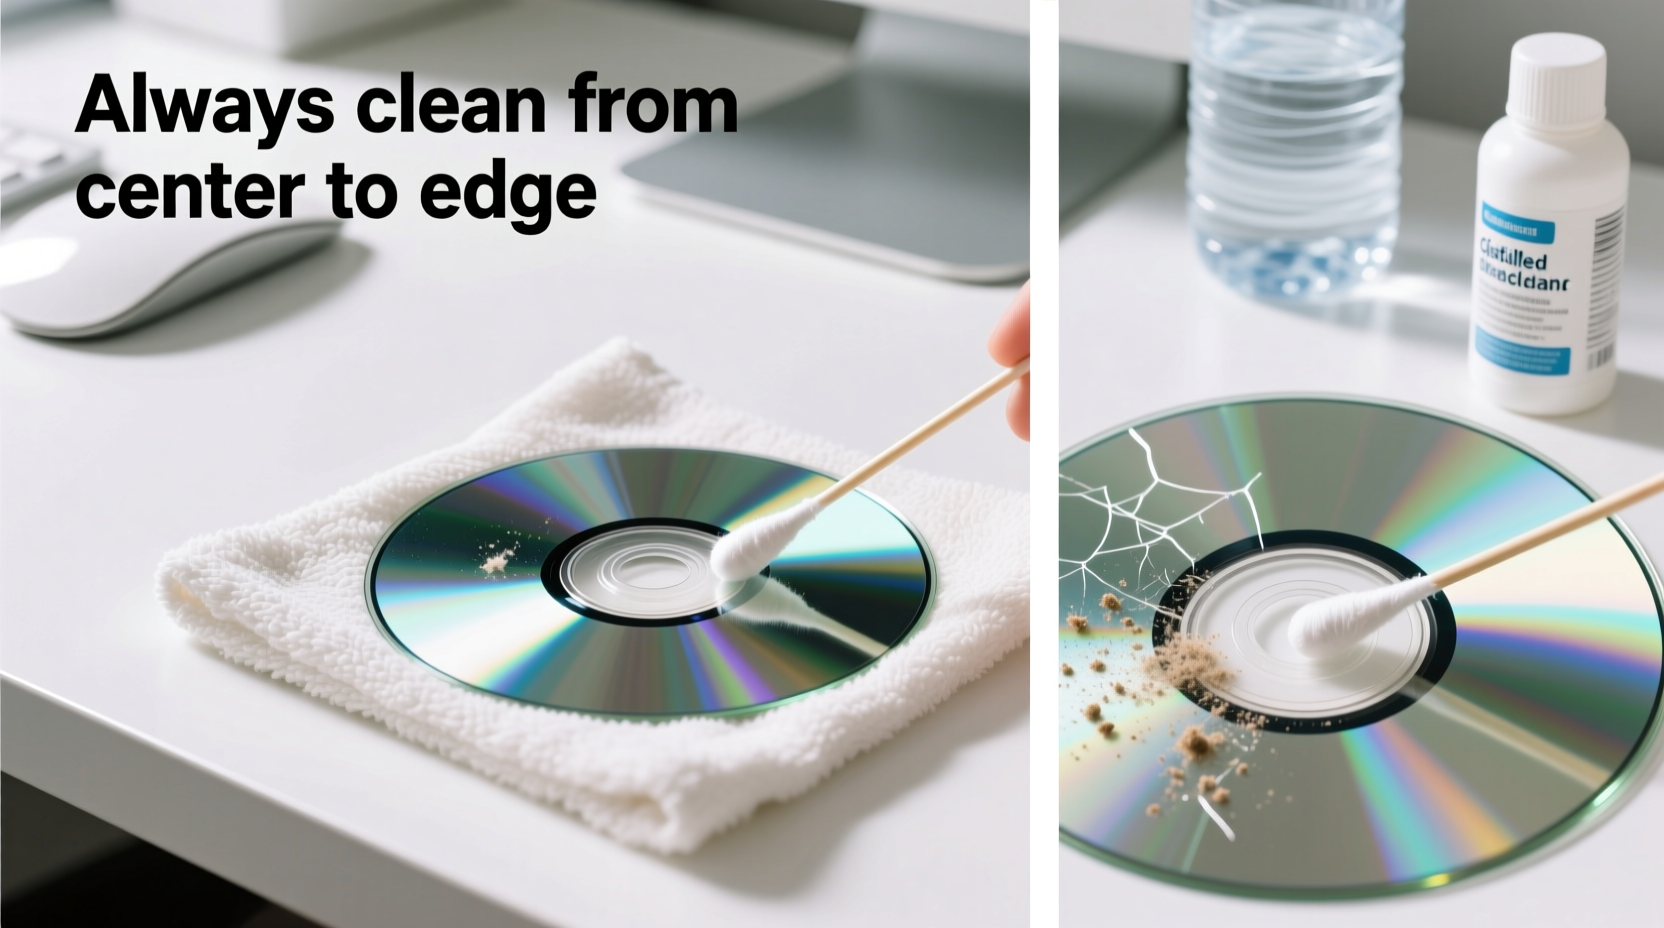
This design means that while the label side is more vulnerable to deep scratches that can destroy the data layer, the bottom side is sensitive to smudges, dust, and improper wiping. Cleaning must always be done radially—from center to edge—not in circular motions, which can create micro-scratches aligned with the data track and confuse the laser.
“Improper handling causes more CD failures than age or manufacturing defects.” — Dr. Alan Prescott, Optical Media Archivist, National Audio Preservation Society
Step-by-Step Guide to Safely Clean a CD
Cleaning a CD properly involves preparation, gentle handling, and correct drying. Follow this sequence to avoid damaging delicate surfaces:
- Wash your hands before handling the disc to prevent transferring oils and dirt.
- Inspect the CD under bright light to identify areas of smudging, fingerprints, or debris.
- Rinse gently with lukewarm water to loosen surface particles. Hold the disc by the edges or center hole.
- Apply a single drop of mild dish soap (ammonia- and fragrance-free) to your fingertip or soft lint-free cloth.
- Wipe in straight lines from center to outer edge, using minimal pressure. Never scrub in circles.
- Rinse thoroughly under running water to remove all soap residue.
- Pat dry with a microfiber cloth, again using radial motion. Do not rub.
- Allow vertical air drying on a clean towel or drying rack for 5–10 minutes before use.
Do’s and Don’ts of CD Maintenance
| Do | Don't |
|---|---|
| Handle CDs by the edges or center hole | Touch the playing surface with bare fingers |
| Use distilled water for stubborn residue | Use tap water high in minerals (can leave deposits) |
| Clean with a soft microfiber or anti-static cloth | Use paper towels, tissues, or abrasive cloths |
| Store discs vertically in jewel cases | Leave them lying flat stacked or exposed |
| Label with soft-tip CD markers only | Write on labels with ballpoint pens or hard pencils |
When Water Isn’t Enough: Tackling Stubborn Residue
Sometimes, fingerprints, adhesive residue, or dried liquids resist plain water and soap. In these cases, specialized solutions can help—but caution is essential.
For sticky residues like tape glue or label adhesive, apply a small amount of isopropyl alcohol (70% concentration) to a microfiber cloth—never directly to the disc. Gently wipe radially, then follow up with a soapy water wash to remove any chemical traces. Avoid acetone, window cleaners, or solvents containing ammonia, as they degrade the polycarbonate and protective coatings.
For heavily soiled vintage or secondhand CDs, consider using a commercial CD cleaning solution designed specifically for optical media. These are pH-balanced and non-abrasive, minimizing risk during deep cleaning.
Mini Case Study: Reviving a Family Music Archive
Sarah Thompson inherited a box of CDs from her father, including rare live recordings and personal mixes. Many were unplayable due to years of storage in a humid basement. After researching proper methods, she began cleaning one disc at a time using distilled water and a microfiber cloth. For those with visible film buildup, she used a diluted isopropyl alcohol solution. Out of 42 discs, 38 became fully functional again. Two had deep label-side scratches beyond repair, and two still skipped intermittently despite cleaning. Sarah now stores the collection in a climate-controlled cabinet with UV-protected sleeves. Her experience underscores that even neglected CDs can be rescued—with patience and the right approach.
Preventative Care Checklist
Long-term preservation starts with daily habits. Use this checklist to maintain your CD collection:
- ✅ Always return discs to their cases after use
- ✅ Store in a cool, dry place away from direct sunlight
- ✅ Keep away from heat sources like radiators or car dashboards
- ✅ Avoid stacking discs without cases
- ✅ Use CD cleaning kits every few months for frequently played titles
- ✅ Digitize critical content as backup against future degradation
“Digitization doesn’t replace physical media—it protects it. Backing up your CDs reduces wear from repeated playback.” — Lena Cho, Digital Archiving Consultant
FAQ: Common Questions About CD Cleaning
Can I use Windex or household glass cleaner on a CD?
No. Most household cleaners contain ammonia or alcohol blends that can corrode the protective lacquer and damage the reflective layer over time. Stick to water, mild soap, or approved CD cleaning fluids.
What should I do if my CD skips after cleaning?
First, reinspect the disc under light for missed smudges or fine scratches. If the surface appears clean, the issue may be internal delamination or oxidation of the metal layer—common in older discs. Try playing it on another device to rule out player error. Persistent skipping suggests permanent damage.
Is it safe to use a CD repair machine?
Professional-grade resurfacing machines can restore mildly scratched discs by polishing the plastic layer. However, consumer models vary in quality and may remove too much material, weakening the disc. Use such devices sparingly and only on non-archival copies.
Conclusion: Small Habits, Lasting Results
Cleaning a CD the right way combines knowledge, care, and consistency. By understanding the fragility of the data layer, using proper materials, and adopting preventative habits, you protect not just playability but the longevity of irreplaceable content. Whether it’s a childhood mixtape, a software installation disc, or a family photo archive, each CD holds value worth preserving. The effort invested in careful cleaning today prevents frustration tomorrow—and ensures your digital memories stay accessible for years to come.


 浙公网安备
33010002000092号
浙公网安备
33010002000092号 浙B2-20120091-4
Comments
No comments yet. Why don't you start the discussion?