
Coffee makers are essential appliances in homes and offices, but over time, mineral deposits from water and residual oils from beans can build up inside the machine. This buildup not only affects performance but can also alter the taste of your coffee. Vinegar is a natural, affordable, and effective descaling agent that removes limescale and grime. However, many users hesitate to use it because of the strong, lingering odor it can leave behind. The good news: with the right technique, you can harness vinegar’s cleaning power while ensuring your coffee tastes clean and fresh—without a trace of sourness.
The Science Behind Vinegar Cleaning
Vinegar, particularly white distilled vinegar, contains acetic acid, which dissolves calcium and magnesium deposits—the primary components of limescale. These minerals accumulate in the heating element, water reservoir, and internal tubing of your coffee maker, especially if you're using hard water. Over time, this scale reduces efficiency, slows brewing, and can even cause permanent damage.
While vinegar is excellent at breaking down these deposits, its pungent smell can permeate plastic and rubber parts of the machine. If not properly rinsed, that smell can transfer into your next few pots of coffee, making the experience unpleasant. The key isn’t to avoid vinegar—it’s to use it correctly and follow through with thorough rinsing and neutralizing steps.
“Vinegar is one of the most effective household descalers, but improper post-cleaning procedures are why so many people end up with smelly coffee afterward.” — Dr. Lena Torres, Home Appliance Chemist
Step-by-Step Guide to Cleaning Your Coffee Maker with Vinegar
Cleaning your coffee maker with vinegar doesn’t have to be complicated. Follow this detailed process to ensure deep cleaning without odor residue.
- Unplug and disassemble removable parts: Remove the carafe, filter basket, lid, and any other detachable components. Wash them with warm, soapy water and set aside to dry.
- Prepare the vinegar solution: Mix equal parts white distilled vinegar and cold water. For a standard 12-cup coffee maker, use 30 ounces of vinegar and 30 ounces of water. Do not use hot water at this stage, as it can prematurely activate the vinegar and reduce effectiveness.
- Start the brew cycle: Pour the vinegar-water mixture into the water reservoir. Place an empty filter in the basket (optional) and position the carafe. Begin the brew cycle as if making coffee, but stop it halfway through.
- Let it sit for 30 minutes: Pausing the cycle allows the vinegar solution to soak in the internal tubing and heating chamber, maximizing descaling. This dwell time is crucial for breaking down stubborn deposits.
- Complete the brew cycle: After 30 minutes, turn the machine back on to finish the cycle. Once complete, discard the vinegar solution—do not drink it.
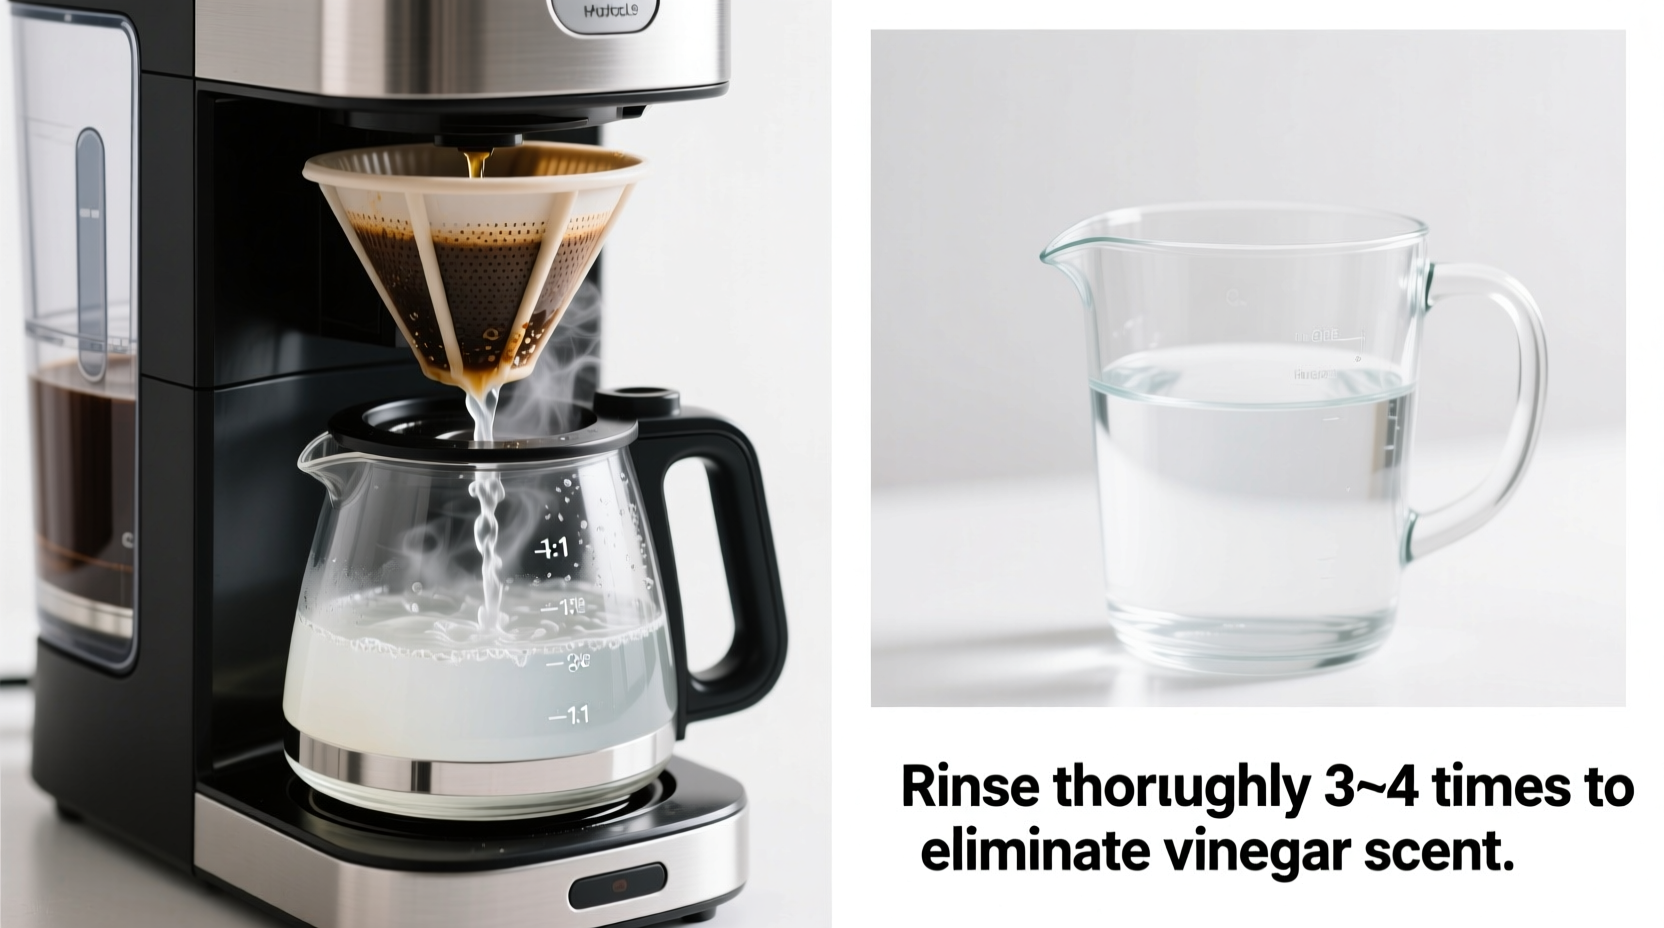
- Flush with plain water: Fill the reservoir with fresh cold water and run a full brew cycle. Repeat this process 2–3 times to thoroughly rinse out any vinegar residue.
- Wipe external surfaces: Use a damp microfiber cloth to clean the exterior, including the warming plate, buttons, and carafe base. Avoid abrasive cleaners that could scratch plastic or metal finishes.
- Neutralize with baking soda (optional): For extra assurance against odor, mix 1 teaspoon of baking soda in 4 cups of water and run one final cycle. Baking soda helps neutralize any remaining acidic traces.
- Final rinse: Run one last cycle with plain water to remove any hint of baking soda.
- Reassemble and test: Reattach all parts, brew a pot of plain water or coffee, and smell and taste the result. It should be clean and odor-free.
Do’s and Don’ts When Using Vinegar on Coffee Makers
| Do’s | Don’ts |
|---|---|
| Use white distilled vinegar only | Use scented or colored vinegar |
| Run multiple water-only cycles after cleaning | Stop after just one rinse cycle |
| Disassemble and hand-wash removable parts | Put non-dishwasher-safe components in the dishwasher |
| Clean every 1–3 months depending on usage | Wait until performance declines noticeably |
| Let the vinegar solution soak before completing the cycle | Run the full vinegar cycle without pausing |
| Store vinegar in a cool, dark place away from coffee beans | Keep vinegar near your coffee storage area |
Real Example: How Sarah Fixed Her Smelly Coffee Maker
Sarah, a remote worker and daily coffee drinker, noticed her morning brew had developed a sour aftertaste. She tried changing beans and cleaning the carafe, but the issue persisted. Researching online, she learned about descaling with vinegar. Excited to try it, she poured straight vinegar into her machine and ran a full cycle, followed by one rinse with water. The next pot of coffee still smelled like salad dressing.
Frustrated, she reached out to a coffee technician who explained that skipping the soak phase and insufficient rinsing were likely culprits. Following the correct method—equal parts vinegar and water, a 30-minute soak, and three full water cycles—she eliminated both the scale and the odor. Now, her coffee tastes clean again, and she cleans her machine every six weeks to prevent recurrence.
Alternative Methods to Eliminate Lingering Smell
If, after thorough rinsing, you still detect a faint vinegar odor, don’t panic. There are safe, effective ways to neutralize it without damaging your machine.
- Lemon juice rinse: Mix 1 tablespoon of lemon juice with 4 cups of water and run a cycle. Citric acid helps break down leftover residues and leaves a mild, pleasant scent that dissipates quickly.
- Baking soda flush: As mentioned earlier, a diluted baking soda solution (1 tsp per 4 cups water) neutralizes acidity. Just remember to follow with a plain water rinse.
- Activated charcoal trick: Place a small bowl of activated charcoal near the coffee maker overnight. It absorbs lingering odors from the air and surrounding surfaces.
- Air it out: Leave the reservoir open and the machine unplugged for a few hours after cleaning. Air circulation helps evaporate any trapped moisture carrying odor.
Never use bleach, ammonia, or commercial cleaners labeled for other appliances. These can corrode internal parts or leave toxic residues.
How Often Should You Clean Your Coffee Maker?
Frequency depends on usage and water hardness. Here’s a general guideline:
- Daily: Rinse the carafe and filter basket with warm water.
- Weekly: Wash removable parts with mild soap.
- Monthly: Perform a full vinegar cleaning if you use soft water or filtered water.
- Every 1–3 months: Descale with vinegar if using tap water, especially in hard water areas.
Signs it’s time to clean: slower brewing, unusual noises, cloudy water, or off-tastes in your coffee.
“The biggest mistake people make is cleaning too infrequently. Regular maintenance prevents scale buildup and makes each cleaning session faster and more effective.” — Marcus Lin, Certified Appliance Technician
FAQ: Common Questions About Vinegar Cleaning
Can I use lemon juice instead of vinegar?
Yes, lemon juice contains citric acid, which also descales effectively. However, it’s less concentrated than vinegar, so you may need more of it and longer soaking times. Also, ensure thorough rinsing, as sugar residues in some lemon juices can promote bacterial growth.
Will vinegar damage my coffee maker?
No, white vinegar is safe for most drip coffee makers when used as directed. It won’t harm stainless steel, plastic, or glass components. However, avoid using vinegar on machines with built-in water filters unless specified by the manufacturer, as it may degrade filter media.
Why does my coffee still taste weird after cleaning?
This usually means residual vinegar remains in the system. Run two to three additional water-only cycles. If the taste persists, try a baking soda or lemon water flush, followed by another rinse. Also, check that you’re using fresh, high-quality water—old or stale water can contribute to odd flavors.
Cleaning Checklist
- ☐ Unplug the coffee maker
- ☐ Remove and wash all detachable parts
- ☐ Mix 1:1 white vinegar and cold water
- ☐ Start brew cycle and pause halfway
- ☐ Let solution sit for 30 minutes
- ☐ Complete the vinegar cycle
- ☐ Run 2–3 plain water cycles
- ☐ Optional: Run baking soda or lemon water cycle
- ☐ Final rinse with plain water
- ☐ Reassemble and test brew
- ☐ Wipe down exterior surfaces
Conclusion: Enjoy Cleaner Coffee Without the Smell
Cleaning your coffee maker with vinegar is a simple, cost-effective way to maintain performance and flavor quality. The lingering smell often associated with this method isn’t inevitable—it results from incomplete rinsing or incorrect ratios. By following a structured approach that includes soaking, multiple flushes, and optional neutralizing steps, you can enjoy a deeply cleaned machine that produces pure, delicious coffee every time.
Make descaling part of your routine, just like refilling the bean container or replacing filters. A well-maintained coffee maker lasts longer, works better, and gives you the rich, aromatic brew you deserve. Don’t let a bad past experience with vinegar keep you from reaping its benefits. Try the method outlined here, and taste the difference a truly clean machine can make.


 浙公网安备
33010002000092号
浙公网安备
33010002000092号 浙B2-20120091-4
Comments
No comments yet. Why don't you start the discussion?