
Mechanical keyboards are prized for their tactile feedback, durability, and responsiveness. Over time, however, dust, crumbs, oils from fingers, and environmental debris accumulate between the keys, affecting both performance and hygiene. While many guides suggest removing keycaps for deep cleaning, not everyone feels comfortable doing so—especially on custom or tightly fitted boards. The good news is that you can effectively clean a mechanical keyboard without removing the keys. With the right tools and techniques, you can maintain your keyboard’s functionality and appearance while minimizing risk.
Why Clean Without Removing Keys?
Some users avoid key removal due to concerns about damaging switches, losing small parts, or misaligning keycaps during reinstallation. Mechanical keyboards with low-profile switches, compact layouts, or specialty designs (like ortholinear or split keyboards) may also make keycap removal less practical. Additionally, certain switch types—such as optical or Hall effect—are sensitive to static discharge or physical stress, making non-invasive cleaning a safer option.
Cleaning without removing keys isn’t just about convenience—it’s about preserving the integrity of your device. According to Max Rivera, a hardware technician with over a decade of experience in peripheral maintenance:
“Many warranty claims come from improper disassembly. For most users, surface and interstitial cleaning without key removal is sufficient and far safer.” — Max Rivera, Peripheral Hardware Specialist
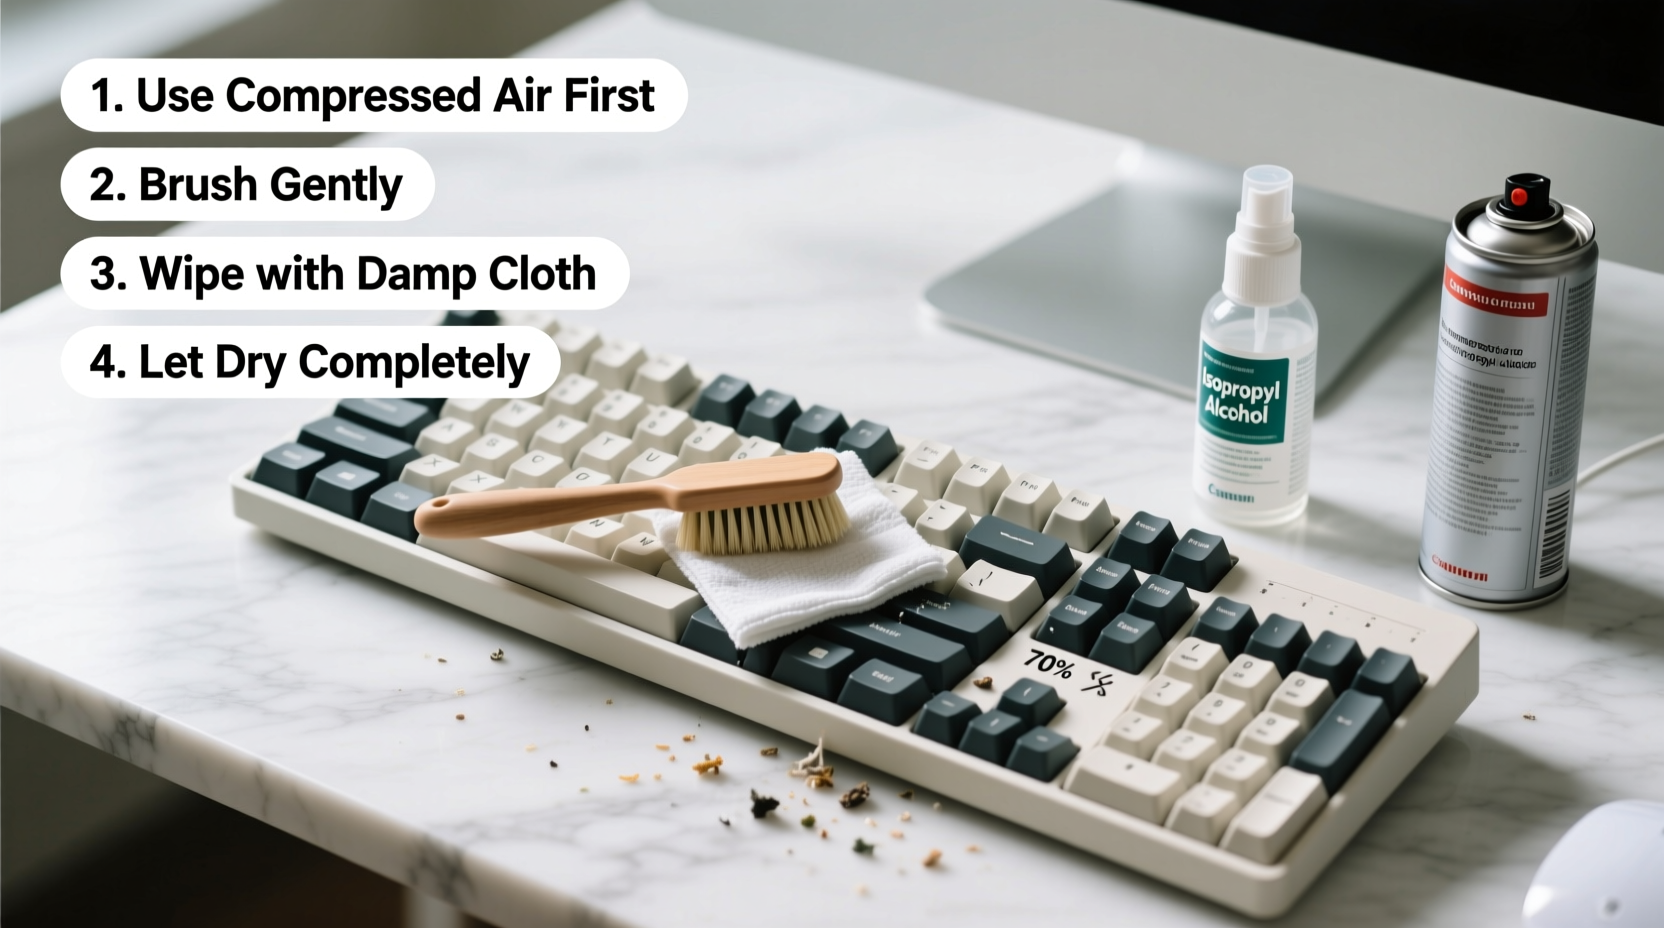
Essential Tools and Supplies
Effective cleaning starts with the right tools. Using inappropriate materials—like damp cloths or compressed air at close range—can push debris deeper or introduce moisture into sensitive areas. Below is a curated list of safe, effective supplies:
- Compressed air canister: Removes loose debris from between keys. Use short bursts and hold upright to prevent propellant discharge.
- Soft-bristle brush (e.g., clean makeup or paintbrush): Gently dislodges dust and particles without scratching surfaces.
- Microfiber cloth: Ideal for wiping keycaps and the top surface without leaving lint or scratches.
- Isopropyl alcohol (70% or higher): Used sparingly on a cloth to disinfect and remove grime. Never apply directly to the keyboard.
- Lint-free cotton swabs: For precision cleaning around stubborn spots near key stems.
- Mini vacuum with narrow nozzle (optional): Helps extract loosened debris after brushing or air blasting.
Step-by-Step Cleaning Process
Follow this detailed sequence to clean your mechanical keyboard thoroughly without removing any keycaps. Allow 20–30 minutes for a complete session, depending on keyboard size and condition.
- Power down and unplug: Disconnect the keyboard from your computer or turn off the wireless connection. This eliminates risks of short circuits or unintended keystrokes.
- Shake out loose debris: Hold the keyboard at a 45-degree angle over a trash can and gently shake it. This dislodges larger particles like crumbs or hair.
- Use compressed air: Hold the can upright and spray in short bursts between rows of keys. Move in a consistent pattern (e.g., left to right, top to bottom) to ensure full coverage. Keep the nozzle 1–2 inches away to avoid forcing debris downward.
- Brush between keys: Use a soft-bristle brush to sweep across the gaps. Angle the bristles to reach beneath keycap edges. Brush in one direction first, then reverse to lift trapped particles.
- Wipe the surface: Dampen a microfiber cloth slightly with isopropyl alcohol. Wring it until nearly dry, then wipe each keycap and the surrounding area. Focus on high-contact zones like WASD, spacebar, and Enter.
- Clean tight spaces with swabs: Dip a cotton swab lightly in alcohol, squeeze excess liquid, and carefully clean corners and crevices. Replace swabs when they become dirty.
- Vacuum residual dust (if available): Use a handheld vacuum with a narrow attachment to suction loosened debris from between keys. Avoid touching switches directly.
- Let dry completely: Allow the keyboard to sit unplugged for at least 10–15 minutes to ensure all moisture evaporates before reconnecting.
Do’s and Don’ts: Safe vs. Risky Practices
To protect your investment, follow these guidelines. Many common household habits can cause irreversible damage to mechanical switches or PCBs.
| Do’s | Don’ts |
|---|---|
| Use short bursts of compressed air | Hold the can upside down (releases liquid propellant) |
| Wipe with a barely damp microfiber cloth | Pour or spray liquids directly onto the keyboard |
| Clean in a well-lit area to spot debris | Use abrasive pads or household cleaners (e.g., bleach, Windex) |
| Store the keyboard covered when not in use | Submerge any part of the keyboard in water |
| Test functionality after cleaning | Press keys forcefully during or immediately after cleaning |
A Real-World Example: Office Worker’s Weekly Maintenance Routine
Jamal, a software developer in Austin, uses his mechanical keyboard for 8–10 hours daily. He avoids removing keycaps because his board has custom PBT caps with tight tolerances. Instead, he follows a weekly maintenance routine:
Every Friday afternoon, Jamal powers down his system and spends 15 minutes cleaning. He starts by shaking his keyboard over a bin, then uses compressed air followed by a clean makeup brush to sweep between keys. He wipes the surface with an alcohol-dampened microfiber cloth and finishes with a lint-free swab around the spacebar and Shift keys, where crumb buildup is common. After letting it sit for 10 minutes, he reconnects and tests all major keys.
Over two years, this routine has kept his keyboard responsive and visually clean. “I’ve had coworkers ask if I replaced my board,” he says. “But no—I just never skip the weekly refresh.”
Alternative Methods and Their Risks
While some online tutorials promote unconventional techniques, many pose serious risks to mechanical keyboards.
- Rice method: Burying a keyboard in rice to absorb moisture is outdated and ineffective. It introduces starch and fine particles that can jam switches.
- Water rinsing: Even if switches are labeled “water-resistant,” submerging a keyboard without removing keycaps can trap moisture under key stems, leading to corrosion or short circuits.
- Dishwasher cleaning: Absolutely not recommended. High heat, detergents, and prolonged exposure to water will destroy electronic components.
If your keyboard is heavily soiled or sticky, consider professional cleaning services or consult the manufacturer before attempting aggressive methods.
Frequently Asked Questions
Can I use hand sanitizer to clean my keyboard?
No. Hand sanitizers often contain glycerin, fragrances, and thickeners that leave behind a sticky residue. Stick to pure isopropyl alcohol on a cloth instead.
How do I know if my switches are damaged during cleaning?
After cleaning, test each key for consistent actuation. If a key feels mushy, doesn’t register, or double-presses, moisture may have seeped in. Let the keyboard dry for 24 hours in a warm, ventilated area before testing again. Persistent issues may require professional inspection.
Is it safe to use a vacuum cleaner?
Yes, but only with a low-suction handheld model and a narrow nozzle. Avoid pressing the nozzle directly onto switches, and never use a standard household vacuum—its static charge can damage internal circuitry.
Preventative Care Checklist
Maintaining a clean keyboard is easier with consistent habits. Use this checklist to stay proactive:
- ✅ Wash hands before extended typing sessions
- ✅ Avoid eating directly over the keyboard
- ✅ Cover the keyboard when not in use
- ✅ Perform quick air blasts weekly
- ✅ Wipe keycaps monthly with a dry microfiber cloth
- ✅ Schedule deep cleaning every 4–6 weeks
- ✅ Store in a low-humidity environment
Conclusion: Protect Your Investment with Smart Habits
Your mechanical keyboard is more than a tool—it’s a precision instrument built for performance and longevity. By adopting safe, non-invasive cleaning practices, you preserve its function and extend its lifespan without unnecessary risk. You don’t need to remove keycaps to keep your board in excellent condition. With regular attention, the right supplies, and a methodical approach, you can enjoy a clean, responsive typing experience for years.


 浙公网安备
33010002000092号
浙公网安备
33010002000092号 浙B2-20120091-4
Comments
No comments yet. Why don't you start the discussion?