
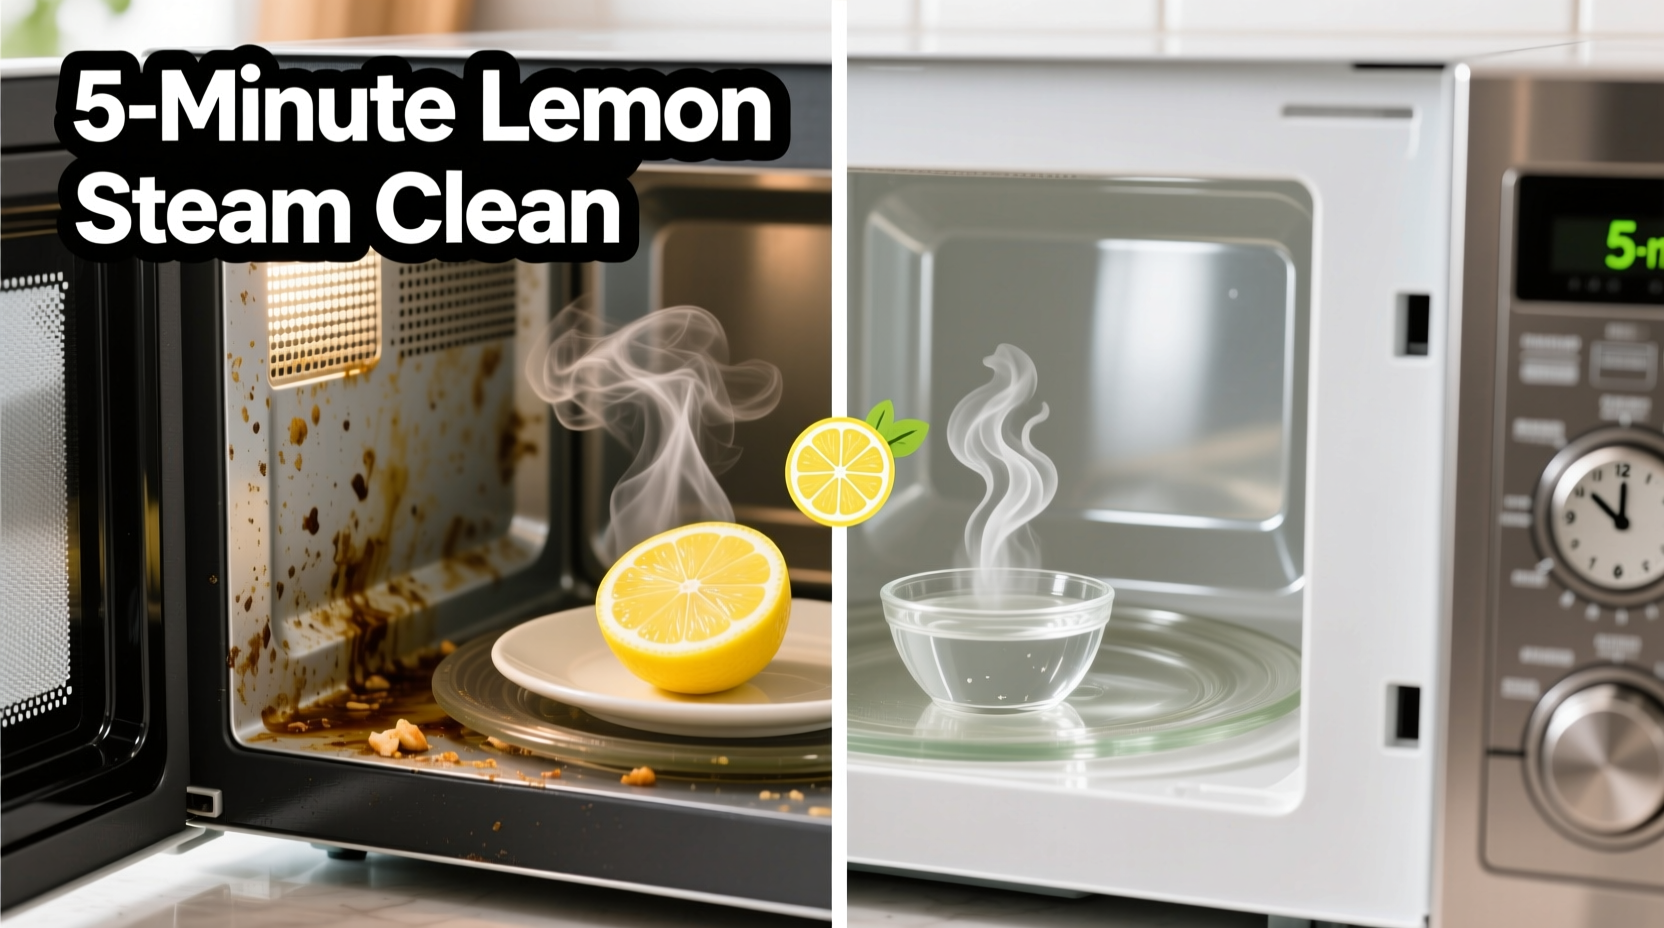
Cleaning a microwave often feels like a low priority—until you open the door and are met with a stale odor or visible splatters baked into the walls. While commercial cleaners promise quick fixes, many contain chemicals that linger on surfaces where food is heated. A far better solution? Use steam and lemon: two simple, natural ingredients that cut through grease, loosen grime, and leave behind a fresh citrus scent—all in under five minutes of active effort.
This method leverages the power of steam to soften dried-on food particles, while citric acid from lemon breaks down stains and neutralizes odors. It’s safe for all microwave-safe interiors, requires only common household items, and avoids exposing your kitchen to synthetic fragrances or toxic residues. Whether your microwave has light splashes or months of accumulated mess, this guide walks you through a foolproof process that delivers real results fast.
The Science Behind Steam and Lemon Cleaning
Steam cleaning works because heat transforms water into vapor, which penetrates and softens hardened food debris. When contained within a sealed environment like a microwave, steam increases humidity rapidly, causing stuck-on residues to swell and detach from surfaces. This principle is used in professional cleaning appliances—but here, your microwave does the work itself.
Lemon juice enhances this effect. Citric acid, naturally present in lemons, acts as a mild chelating agent, breaking down mineral deposits and organic buildup. Its acidity helps dissolve greasy films without scratching or damaging plastic, enamel, or stainless steel interiors. Additionally, lemon contains limonene, a compound known for its antibacterial properties and fresh aroma.
“Natural acids like citric acid are excellent for breaking down kitchen grime without introducing harmful byproducts.” — Dr. Lena Torres, Environmental Health Scientist
Together, steam and lemon create a synergistic cleaning action. The heat opens up the surface pores of dried spills, allowing the acid to penetrate and lift them away. No scrubbing required—at least not much.
Step-by-Step Guide: Clean Your Microwave in 5 Minutes
The entire process takes less than 10 minutes start to finish, with only about five minutes of hands-on time. Follow these steps carefully for best results:
- Gather Supplies: You’ll need one lemon, one microwave-safe bowl (preferably glass or ceramic), one cup of water, and a clean microfiber cloth or sponge.
- Cut and Squeeze the Lemon: Cut the lemon in half. Squeeze the juice from both halves directly into the bowl. Drop the squeezed halves into the bowl as well—they release additional oils when heated.
- Add Water: Pour one cup of tap water into the bowl with the lemon juice and peels. Stir gently to mix.
- Heat the Mixture: Place the bowl in the center of the microwave. Close the door and set the microwave to high for 3–4 minutes. Watch through the window: once the mixture begins to boil and steam coats the interior walls, let it continue for another 60 seconds to ensure full saturation.
- Let It Sit (Do Not Open Yet): After the timer stops, leave the microwave closed for 2–3 minutes. This allows the steam to continue working on loosening grime without escaping.
- Remove the Bowl Carefully: Use oven mitts or a towel to take the hot bowl out. Set it aside to cool slightly.
- Wipe Down the Interior: With your microfiber cloth or sponge, gently wipe all interior surfaces—ceiling, walls, turntable, and door. Most residue will come off with minimal pressure. For stubborn spots, press the cloth against the area for a few seconds before wiping.
- Clean the Turntable Separately: Remove the glass turntable and wash it with warm soapy water at the sink. Dry thoroughly before replacing.
- Final Polish: Wipe down the door seal and outer handle with a damp cloth to remove any overlooked splatter or fingerprints.
Why This Method Outperforms Chemical Cleaners
Many people reach for aerosol sprays or wipes labeled “kitchen degreaser,” but these products often do more harm than good over time. Harsh solvents can degrade plastic components inside microwaves, discolor seals, and leave volatile organic compounds (VOCs) that may transfer to food during heating.
In contrast, the lemon-and-steam method offers several advantages:
- Safety: No toxic fumes or chemical residues near food preparation areas.
- Cost Efficiency: Lemons are inexpensive and often already in the kitchen.
- Eco-Friendliness: Biodegradable ingredients reduce environmental impact.
- Multipurpose Action: Simultaneously cleans, deodorizes, and disinfects.
- Preservation of Finish: Gentle enough for repeated use without wearing down interior coatings.
A study published in the *Journal of Applied Microbiology* found that citrus-based solutions reduced bacterial counts on kitchen surfaces by up to 90% when combined with heat—making this technique not just convenient, but hygienic too.
Do’s and Don’ts When Cleaning with Steam and Lemon
| Do’s | Don’ts |
|---|---|
| Use fresh lemon juice instead of bottled if possible—higher citric acid content. | Don’t use metal bowls or containers in the microwave. |
| Leave the door closed after heating to maximize steam penetration. | Don’t rush to open the microwave immediately—wait 2–3 minutes. |
| Replace lemons with vinegar if citrus is unavailable (same ratio). | Don’t scrub aggressively with abrasive pads—even \"non-scratch\" ones can damage finishes. |
| Clean monthly for maintenance; weekly if heavily used. | Don’t forget the rubber door gasket—it traps bacteria and should be wiped regularly. |
| Use distilled water if your tap water leaves mineral spots. | Don’t microwave the lemon mixture longer than 4 minutes—risk of boiling dry. |
Real-Life Example: Reviving a Neglected Microwave
Sarah, a busy teacher and mother of two, hadn’t cleaned her microwave in nearly eight months. Between packed lunches and quick dinners, food splattered daily, and she avoided opening the door due to the persistent smell of burnt popcorn and old soup. One evening, after reading about the lemon method online, she decided to try it.
She followed the steps precisely: sliced a lemon, added it to a bowl with water, and ran the microwave for four minutes. As steam filled the cavity, she noticed dark streaks beginning to run down the walls. After letting it sit, she opened the door to find most of the caked-on sauce had softened. A single wipe removed years of buildup from the ceiling. The turntable, once stained yellow, came clean with a little soap and elbow grease. In under 15 minutes, her microwave looked—and smelled—like new.
“I was shocked,” Sarah said later. “I thought I’d have to buy a new one. Now I do this every three weeks. It’s part of my mini-kitchen reset routine.”
Tips for Long-Term Microwave Maintenance
Prevention is always easier than restoration. Incorporate these habits to keep your microwave consistently clean:
- Wipe Spills Immediately: If something bubbles over, pause cooking and wipe the spot while still warm (but not hot). Residue hardens quickly and becomes harder to remove later.
- Schedule Monthly Steam Cleans: Mark your calendar for a quick lemon treatment every 30 days, even if the microwave looks clean. Odor-causing bacteria can grow invisibly.
- Avoid Plastic Containers That Warp: Old or low-quality plastics can melt slightly and leave sticky residues that attract dust and grime.
- Keep a Dedicated Cleaning Cloth: Store a small microfiber towel under your sink specifically for appliance touch-ups.
- Use Glass Whenever Possible: Glass dishes don’t absorb odors or stains and are easier to inspect for cleanliness.
Frequently Asked Questions
Can I use bottled lemon juice instead of fresh?
Yes, but fresh lemon juice is more effective. Bottled versions often contain preservatives and have lower acidity levels, reducing their cleaning power. Freshly squeezed provides higher concentrations of citric acid and essential oils that enhance degreasing and deodorizing.
What if I don’t have a lemon?
Vinegar is an excellent substitute. Mix 1 cup of water with ¼ cup of white vinegar and follow the same procedure. The vinegar smell dissipates quickly once aired out and works just as well on tough stains.
Is this method safe for all microwaves?
Yes, as long as the interior is microwave-safe (which virtually all are). Avoid placing any metallic objects inside, and never run the microwave empty. The lemon-water solution poses no risk to electronic components when used correctly.
Checklist: Quick Microwave Refresh Routine
Print or save this checklist for easy reference:
- ☐ Gather lemon, bowl, water, and cloth
- ☐ Cut lemon and squeeze juice into bowl
- ☐ Add squeezed halves and 1 cup water
- ☐ Microwave on high for 3–4 minutes
- ☐ Wait 2–3 minutes before opening
- ☐ Remove bowl safely (use protection)
- ☐ Wipe interior with damp cloth
- ☐ Wash turntable separately
- ☐ Dry and restore components
- ☐ Schedule next cleaning in 4 weeks
Conclusion: A Cleaner Kitchen Starts Here
Cleaning your microwave doesn’t require special tools, expensive sprays, or hours of scrubbing. With just a lemon, some water, and five minutes of attention, you can transform a grimy appliance into a spotless, fresh-smelling essential of your kitchen. The steam-and-lemon method is not only efficient but sustainable, safe, and scientifically sound.
Make it a habit. Set a reminder. Share the trick with family members who use the microwave regularly. Small actions compound into lasting cleanliness—and a healthier cooking environment for everyone. Try it tonight, and experience how effortless effective cleaning can truly be.


 浙公网安备
33010002000092号
浙公网安备
33010002000092号 浙B2-20120091-4
Comments
No comments yet. Why don't you start the discussion?