
Every year, millions of households pull their artificial Christmas trees from storage, only to find them coated in a layer of dust, cobwebs, and sometimes even mold spores. While it might seem like a minor issue, neglecting to clean your tree can lead to poor indoor air quality, increased allergy symptoms, and a dull appearance that undermines the festive spirit. Cleaning a dusty artificial tree isn’t just about aesthetics—it’s a crucial step in preparing a healthy, inviting holiday environment. With the right techniques and tools, you can restore your tree to its original luster without damaging delicate branches or lights.
This guide walks through proven, safe methods for cleaning artificial trees of all sizes and materials. Whether your tree has been stored in an attic, garage, or basement, these strategies will help you remove dust effectively, prevent future buildup, and ensure your tree looks vibrant season after season.
Why Cleaning Your Artificial Tree Matters
Dust accumulation on artificial trees is more than a visual nuisance. Over time, dust binds with oils from the air, pet dander, and microscopic allergens, forming a sticky residue that clings to plastic or PVC needles. When the tree is assembled indoors, especially near heating vents, this debris becomes airborne, potentially triggering sneezing, coughing, or eye irritation—particularly in children and those with respiratory sensitivities.
Additionally, uncleaned trees often appear faded or lifeless. Dust dulls the color of greenery and diminishes light reflection from ornaments and string lights. A simple cleaning process revitalizes the tree’s appearance, making it look newer and more professionally decorated.
“Failing to clean your artificial tree annually is one of the most overlooked sources of indoor allergens during winter months.” — Dr. Lena Ruiz, Environmental Health Specialist
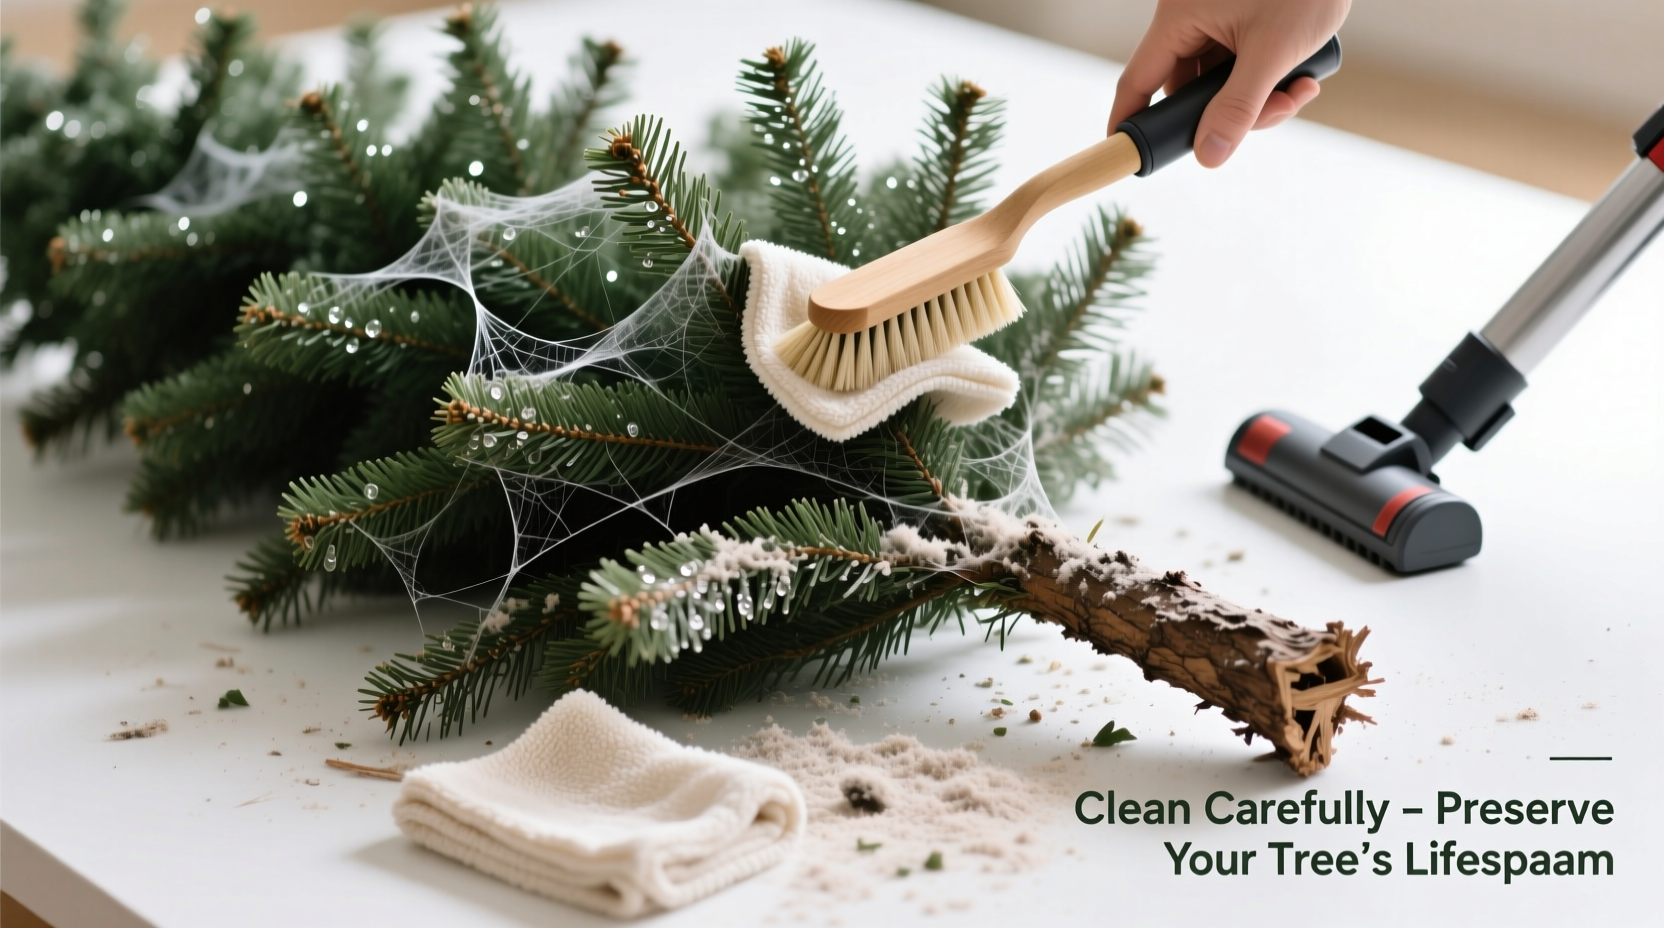
Essential Tools and Supplies
Before beginning, gather the right equipment. Using inappropriate tools—like damp cloths or vacuum attachments that are too aggressive—can bend branches or leave behind moisture that encourages mold growth. Here’s what you’ll need:
- Soft-bristle brush (a clean paintbrush works well)
- Microfiber cloth
- Handheld vacuum with brush attachment
- Lint roller
- Compressed air (optional, for tight spaces)
- Mild dish soap (if washing sections)
- Bowl or basin (for spot-cleaning)
- Plastic sheeting or tarp (to protect floors)
- Gloves (to protect hands from dust and sharp wire ends)
Step-by-Step Guide to Cleaning Your Tree
Cleaning an artificial tree requires patience and attention to detail. Rushing the process can result in broken tips or missed dust pockets. Follow this timeline-based approach for best results:
- Prepare Your Workspace (15–30 minutes)
Select a large, well-ventilated area—such as a garage, porch, or spare room. Lay down a plastic tarp to catch falling debris. Wear gloves and consider a mask if you're sensitive to dust. - Disassemble the Tree (10–20 minutes)
Remove all ornaments, lights, and treetop. If your tree comes in multiple sections, separate them completely. This allows access to inner branches that are otherwise hidden once assembled. - Dry Dusting with a Soft Brush (30–60 minutes per section)
Starting at the top of each branch, gently brush outward toward the tips using downward strokes. Focus on the underside of branches, where dust accumulates most. Rotate the branch slowly to reach all sides. - Vacuum with Brush Attachment (20–40 minutes)
Use a handheld vacuum on low suction. Gently glide the brush nozzle over clusters of needles, moving from trunk outward. Avoid pressing hard—excessive pressure can pull off tips. Empty the vacuum frequently to maintain suction. - Spot-Clean Stubborn Areas (15–25 minutes)
If certain areas have visible grime or sticky residue, mix a few drops of mild dish soap with water. Dip a corner of a microfiber cloth into the solution, wring thoroughly, and lightly wipe affected zones. Never soak the tree. Allow treated sections to air-dry completely before reassembling. - Final Pass with Lint Roller or Compressed Air (10 minutes)
Run a lint roller over dense foliage to lift remaining particles. Alternatively, use short bursts of compressed air between branches to dislodge trapped dust. Do not hold the canister too close to avoid static damage. - Inspect and Reassemble (20–30 minutes)
Check for missing or damaged tips. Replace if possible using manufacturer-supplied extras. Reattach sections securely, ensuring stability before decorating.
Do’s and Don’ts of Artificial Tree Cleaning
| Do’s | Don’ts |
|---|---|
| Use low-suction settings when vacuuming | Use high-powered shop vacs directly on branches |
| Clean in a dry, warm environment | Clean outdoors in damp or windy conditions |
| Store cleaned sections under breathable covers | Wrap trees in plastic bags immediately after cleaning |
| Wear a dust mask during cleaning | Ignore signs of mold or musty odors |
| Test any cleaning solution on a small area first | Apply commercial sprays or disinfectants liberally |
Note: Avoid steam cleaners, wet mops, or household wipes—they introduce too much moisture and can degrade the tree’s coating or wiring. Also, never place a tree in a washing machine or dishwasher, regardless of online trends.
Preventing Future Dust Buildup
The effort you invest now pays dividends next year—if you store your tree properly. Many people repackage their trees immediately after disassembly, trapping dust and humidity inside storage boxes. That single mistake guarantees heavier cleaning work the following season.
To minimize future dust accumulation:
- Allow the tree to cool and dry fully after use before packing.
- Use a tree storage bag with a drawstring and ventilation panels—never seal in plastic.
- Choose a climate-controlled storage location. Attics and garages expose trees to temperature swings and pests.
- Place silica gel packs inside the storage container to absorb excess moisture.
- Consider upright cylindrical containers that support individual sections without compression.
“The difference between a tree that needs deep cleaning and one that only requires a quick refresh often comes down to storage—not age.” — Marcus Bell, Holiday Décor Technician with 18 years of experience
Mini Case Study: The Johnson Family’s Allergy-Friendly Tree Revival
The Johnsons in Denver had stopped putting up their artificial tree for three consecutive years. Their youngest daughter developed seasonal allergies each December, with symptoms worsening after the tree went up. Doctors initially attributed it to cold weather, but the pattern suggested otherwise.
In 2023, they consulted an indoor air quality specialist who recommended testing their stored tree for allergens. Lab analysis revealed high levels of dust mites and fungal spores embedded in the foliage. Following a full cleaning protocol—including dry brushing, vacuuming, and airing out in sunlight—the family reintroduced the tree with no adverse reactions.
They now clean their tree every November as part of their holiday prep. “It takes a few extra hours,” says mother Sarah Johnson, “but seeing our daughter enjoy the holidays without medication makes it worth it.”
FAQ: Common Questions About Cleaning Artificial Trees
Can I wash my artificial tree in the shower?
No. While some bloggers suggest this method, spraying water—even lukewarm—can warp PVC needles, loosen glued-on flocking, and corrode internal wiring if the tree is pre-lit. Moisture trapped in the base or branches may also lead to mold. Stick to dry or minimally damp methods only.
How often should I clean my artificial Christmas tree?
At minimum, clean your tree once per year before setup. If stored in a dusty or humid environment (like a garage), consider inspecting and lightly dusting it mid-storage period. Trees older than five years may require deeper cleaning due to material degradation.
What should I do if my tree smells musty?
A musty odor indicates mold or mildew growth. Do not use fragranced sprays to mask it. Instead, air out the tree outside for several hours on a dry day. For persistent smells, lightly wipe affected areas with a cloth dampened with equal parts water and white vinegar, then allow to dry completely. If the smell remains, the tree may be compromised and unsafe for indoor use.
Checklist: Pre-Setup Tree Cleaning Routine
✔ Gather supplies: soft brush, microfiber cloth, handheld vacuum, gloves, tarp
✔ Choose workspace: dry, ventilated area away from furniture and electronics
✔ Disassemble: remove lights, ornaments, and separate tree sections
✔ Dry brush: go section by section, focusing on undersides of branches
✔ Vacuum: use low suction and brush attachment to collect loosened dust
✔ Spot-clean: treat stained or sticky areas with barely damp cloth
✔ Final pass: use lint roller or compressed air for residual particles
✔ Inspect: check for damage, replace missing tips if possible
✔ Reassemble: only after all parts are fully dry
Conclusion: Start the Season Right with a Clean Tree
Your artificial Christmas tree deserves more than a quick shake before decoration. Taking the time to clean it thoroughly enhances both health and holiday enjoyment. A dust-free tree improves indoor air quality, reduces allergy risks, and presents a brighter, more authentic appearance. These benefits compound over the years, extending the lifespan of your investment and preserving the magic of the season.
With the right tools, technique, and attention to detail, cleaning doesn’t have to be daunting. In fact, many families find it becomes a meaningful pre-holiday ritual—a quiet moment of preparation that sets the tone for celebration. This year, make cleanliness part of your tradition. Your lungs, your eyes, and your guests will thank you.


 浙公网安备
33010002000092号
浙公网安备
33010002000092号 浙B2-20120091-4
Comments
No comments yet. Why don't you start the discussion?