
Cleaning grout is one of the most dreaded household chores. The narrow, porous lines between tiles trap dirt, soap scum, and mildew, turning once-bright spaces into dingy eyesores. Most people assume that restoring grout means spending hours on their knees with a toothbrush—scrubbing, rinsing, repeating. But what if you could achieve spotless grout with minimal effort? Modern cleaning science and clever household tricks make it possible to deep-clean grout without the elbow grease.
The key lies in understanding how grout absorbs stains and which solutions break them down effectively. With the right combination of chemistry, timing, and technique, you can let the cleaners do the work while you focus on other priorities. This guide reveals proven methods, backed by cleaning experts and real-world results, so you can reclaim your tiled surfaces efficiently and safely.
Why Grout Gets Dirty So Easily
Grout is cement-based or epoxy-based material used to seal gaps between tiles. Most common types—especially sanded and unsanded cement grout—are highly porous. This porosity allows liquids and airborne particles to seep in quickly, making grout vulnerable to staining from coffee, wine, mold spores, hard water minerals, and daily foot traffic.
In high-moisture areas like bathrooms and kitchens, humidity encourages mold and mildew growth within the grout matrix. Over time, repeated exposure leads to discoloration, often mistaken as “permanent.” However, much of this buildup isn’t bonded to the surface—it’s trapped beneath—and can be dissolved rather than scraped away.
Effective No-Scrub Cleaning Methods That Work
The goal isn’t to remove grout but to lift embedded grime through chemical action. These methods rely on dwell time—letting the solution sit and penetrate—rather than mechanical force. Below are five reliable approaches that eliminate the need for aggressive scrubbing.
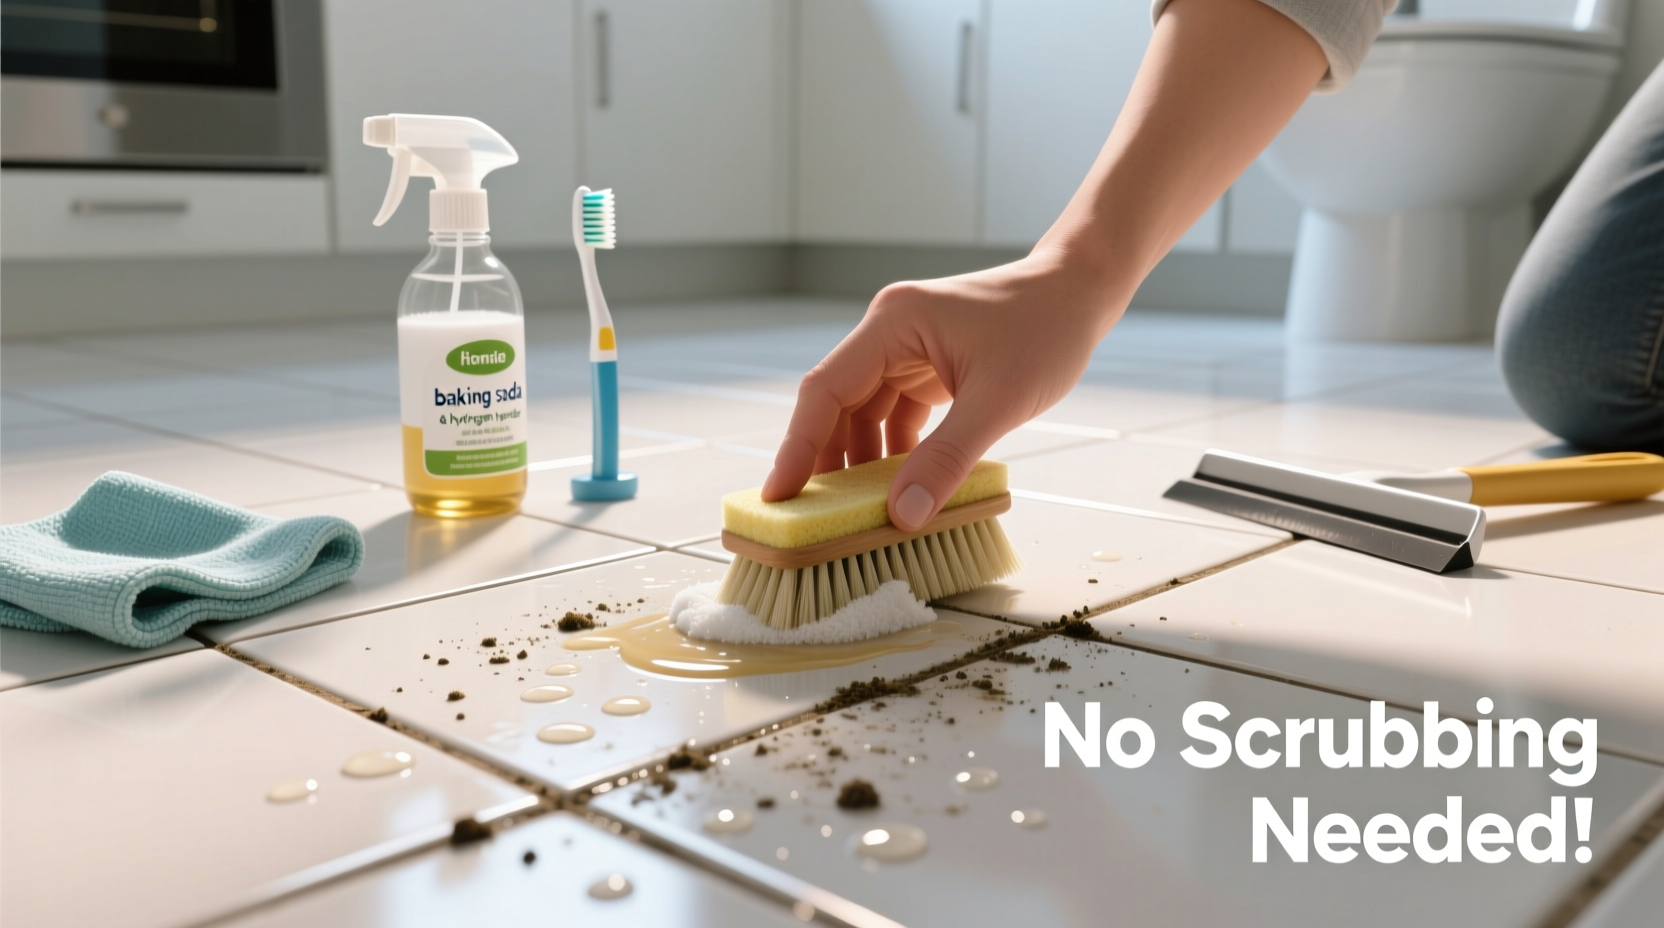
1. Baking Soda + Hydrogen Peroxide Paste (Oxygen Bleach Alternative)
A gentle yet powerful combo, baking soda and hydrogen peroxide form a bubbling reaction that lifts dirt and kills bacteria. Unlike chlorine bleach, this mixture won’t degrade grout over time or produce harmful fumes.
- Mix ½ cup baking soda, ¼ cup hydrogen peroxide (3%), and 1 tsp dish soap into a thick paste.
- Apply generously along grout lines using a spoon or small spatula.
- Cover with plastic wrap to prevent drying and enhance penetration.
- Wait 1–2 hours before wiping clean with a damp cloth.
This method works especially well on kitchen backsplashes and floor grout with organic stains. For tougher discoloration, repeat twice weekly until desired brightness returns.
2. Vinegar and Dish Soap Spray (For Light Maintenance)
White vinegar cuts through soap scum and mineral deposits, while dish soap emulsifies oils and grease. Together, they create an easy spray solution ideal for routine upkeep.
- Spray directly onto grout lines after showers or cooking sessions.
- Let sit for 15–20 minutes.
- Wipe with a microfiber cloth—no scrubbing needed.
This approach prevents buildup before it becomes problematic. It's not strong enough for blackened grout but excellent for maintaining cleanliness between deeper treatments.
3. Oxygen-Based Powder Cleaners (Deep Cleaning Without Fumes)
Oxygen bleach (sodium percarbonate) releases active oxygen when mixed with water, breaking down stains at a molecular level. Brands like OxiClean or generic versions are safe for colored grout and won't corrode metal fixtures.
“Oxygen cleaners are my top recommendation for homeowners who want effectiveness without toxicity. They’re environmentally friendly and don’t compromise grout integrity.” — Dr. Lena Patel, Home Cleaning Chemist
To use:
- Dissolve ¾ cup oxygen bleach powder in 2 cups warm water.
- Transfer to a spray bottle and saturate grout lines thoroughly.
- Cover treated areas with paper towels soaked in the solution.
- Allow 2–4 hours of dwell time.
- Rinse with clean water.
Best for large tile floors or shower walls where consistent coverage matters. Repeat monthly for optimal appearance.
4. Steam Cleaning (Mechanical-Free Deep Clean)
High-temperature steam penetrates pores, loosening embedded debris and killing 99.9% of bacteria and mold spores. A handheld garment steamer or dedicated tile steamer can deliver professional-level results with zero chemicals.
Process:
- Pre-vacuum loose dust from grout lines.
- Hold the steamer nozzle 1 inch above the surface.
- Move slowly across each line, allowing 10–15 seconds per foot.
- Blot excess moisture with a dry towel afterward.
Steam is particularly effective in bathrooms where mildew is prevalent. One session typically restores light-to-moderate grout discoloration. No scrubbing required—just consistent application.
5. Commercial Gel Cleaners (Targeted Spot Treatment)
Products like Soft Scrub With Bleach Cleaner Gel or Kaboom Mold & Mildew Stain Remover cling to vertical surfaces, staying in contact with grout longer than sprays. Their thick consistency ensures prolonged dwell time without dripping.
Application steps:
- Apply gel directly onto stained grout using the bottle nozzle.
- Wait 30–60 minutes (follow label instructions).
- Rinse thoroughly with water.
These gels contain surfactants and low-concentration bleach that dissolve biofilm and oxidize dark stains. Use sparingly and ventilate the area well. Not recommended for unsealed natural stone tiles nearby.
Real Example: Reviving a 10-Year-Old Bathroom Floor
Sarah M., a homeowner in Portland, avoided her bathroom renovation for years due to severely discolored floor grout. She assumed replacement was the only option. Instead, she tried the baking soda-hydrogen peroxide paste method described above.
After applying the paste and covering it with plastic wrap overnight, she wiped the area the next morning. To her surprise, 80% of the yellowing had lifted. Two additional applications over the following week brought the grout close to its original off-white color. She finished by sealing the grout with a penetrating sealer.
Total hands-on time: less than 45 minutes over three days. No scrubbing, no knee pain, no costly retiling. Sarah now uses a weekly vinegar-dish soap spray to maintain the results.
Do’s and Don’ts of Grout Cleaning
| Do’s | Don’ts |
|---|---|
| Use non-abrasive cloths or soft brushes | Use steel wool or harsh scrub pads |
| Allow cleaning solutions to dwell for maximum effect | Rush the process and wipe immediately |
| Seal grout after deep cleaning | Leave grout unsealed in wet areas |
| Ventilate the room during chemical use | Mix bleach with vinegar or ammonia |
| Spot-test new cleaners first | Apply strong chemicals blindly |
Step-by-Step Timeline: Deep Clean Your Grout in One Weekend
If you're tackling multiple rooms or heavily stained areas, follow this realistic two-day plan to minimize effort and maximize results.
- Day 1 – Preparation & Initial Treatment
- Clear the area (remove rugs, toiletries, etc.).
- Vacuum or sweep to remove loose debris.
- Choose your preferred no-scrub method (e.g., oxygen bleach soak).
- Apply treatment to one section (e.g., shower walls).
- Let sit for 2–4 hours, then rinse.
- Repeat on second area (e.g., floor) later in the day.
- Day 2 – Final Touches & Sealing
- Inspect for remaining stains; reapply if necessary.
- Dry the surface completely (use a fan if needed).
- Apply grout sealer using a small brush or applicator bottle.
- Allow 24 hours of curing time before regular use.
This timeline spreads out labor, reduces fatigue, and lets chemistry do the heavy lifting. Most users report visible improvement after the first day alone.
Frequently Asked Questions
Can I clean grout without using bleach?
Yes. Oxygen-based cleaners, vinegar solutions, steam, and baking soda pastes all effectively clean grout without chlorine bleach. These alternatives are safer for homes with children, pets, or sensitivities to strong fumes.
How often should I deep-clean grout?
Every 3–6 months in high-traffic or moisture-prone areas like bathrooms and kitchens. Light maintenance (spraying and wiping) should be done weekly to prevent buildup.
Why does my grout turn black again so quickly?
Unsealed grout absorbs moisture and contaminants rapidly. Black recurrence usually indicates inadequate sealing or poor ventilation. Installing an exhaust fan and reapplying sealer annually can dramatically extend cleanliness.
Checklist: No-Scrub Grout Cleaning Routine
Follow this checklist to ensure consistent, long-term results:
- ☐ Remove surface debris with vacuum or dry cloth
- ☐ Select appropriate cleaner based on stain type and location
- ☐ Test cleaner on inconspicuous area
- ☐ Apply solution evenly along grout lines
- ☐ Cover treated zones to prevent evaporation
- ☐ Allow minimum 1-hour dwell time (longer for severe stains)
- ☐ Wipe clean with damp microfiber cloth
- ☐ Rinse with water if required by product instructions
- ☐ Dry thoroughly before sealing
- ☐ Apply grout sealer and allow full cure time
Final Thoughts: Work Smarter, Not Harder
Cleaning grout doesn’t have to mean back strain and wasted weekends. By shifting focus from physical scrubbing to intelligent chemical and thermal action, you can achieve cleaner, brighter results in less time. The most effective strategies leverage dwell time, proper formulation, and preventive sealing—tools accessible to any homeowner.
Start with one method that fits your schedule and supplies on hand. Whether it’s a quick vinegar spray or a weekend oxygen bleach treatment, consistency beats intensity. Once you see what’s possible without scrubbing, you’ll rethink every tough cleaning job in your home.


 浙公网安备
33010002000092号
浙公网安备
33010002000092号 浙B2-20120091-4
Comments
No comments yet. Why don't you start the discussion?