
Most people spend hours each day typing on their laptop keyboards, yet few give them a thorough cleaning. Over time, these surfaces accumulate dust, food particles, skin cells, oils, and harmful microbes—including bacteria like E. coli and viruses such as influenza. A 2020 study by the University of Arizona found that the average keyboard carries more than 400 times the bacteria of a toilet seat. Cleaning your laptop keyboard is not just about appearance—it’s a critical part of digital hygiene. Done incorrectly, however, cleaning can damage delicate key mechanisms or spread contaminants further. This guide walks you through safe, effective methods to deep-clean your laptop keyboard while preserving its function and protecting your health.
Why Regular Keyboard Cleaning Matters
Your laptop keyboard is a high-contact surface exposed to constant hand contact, airborne particles, and environmental debris. Each keystroke transfers oils from your fingers, which attract dust and grime. Crumbs from snacks, pet hair, and even makeup residue can settle between keys, creating an ideal breeding ground for bacteria and mold.
Beyond hygiene, buildup under keys can interfere with responsiveness. Sticky keys, delayed inputs, or unresponsive buttons are often signs of internal debris rather than hardware failure. Regular maintenance prevents long-term wear and extends your device’s lifespan.
“Keyboards are microbial hotspots in personal electronics. Proper cleaning reduces infection risk, especially during flu season or in shared workspaces.” — Dr. Lena Patel, Microbiologist and Public Health Consultant
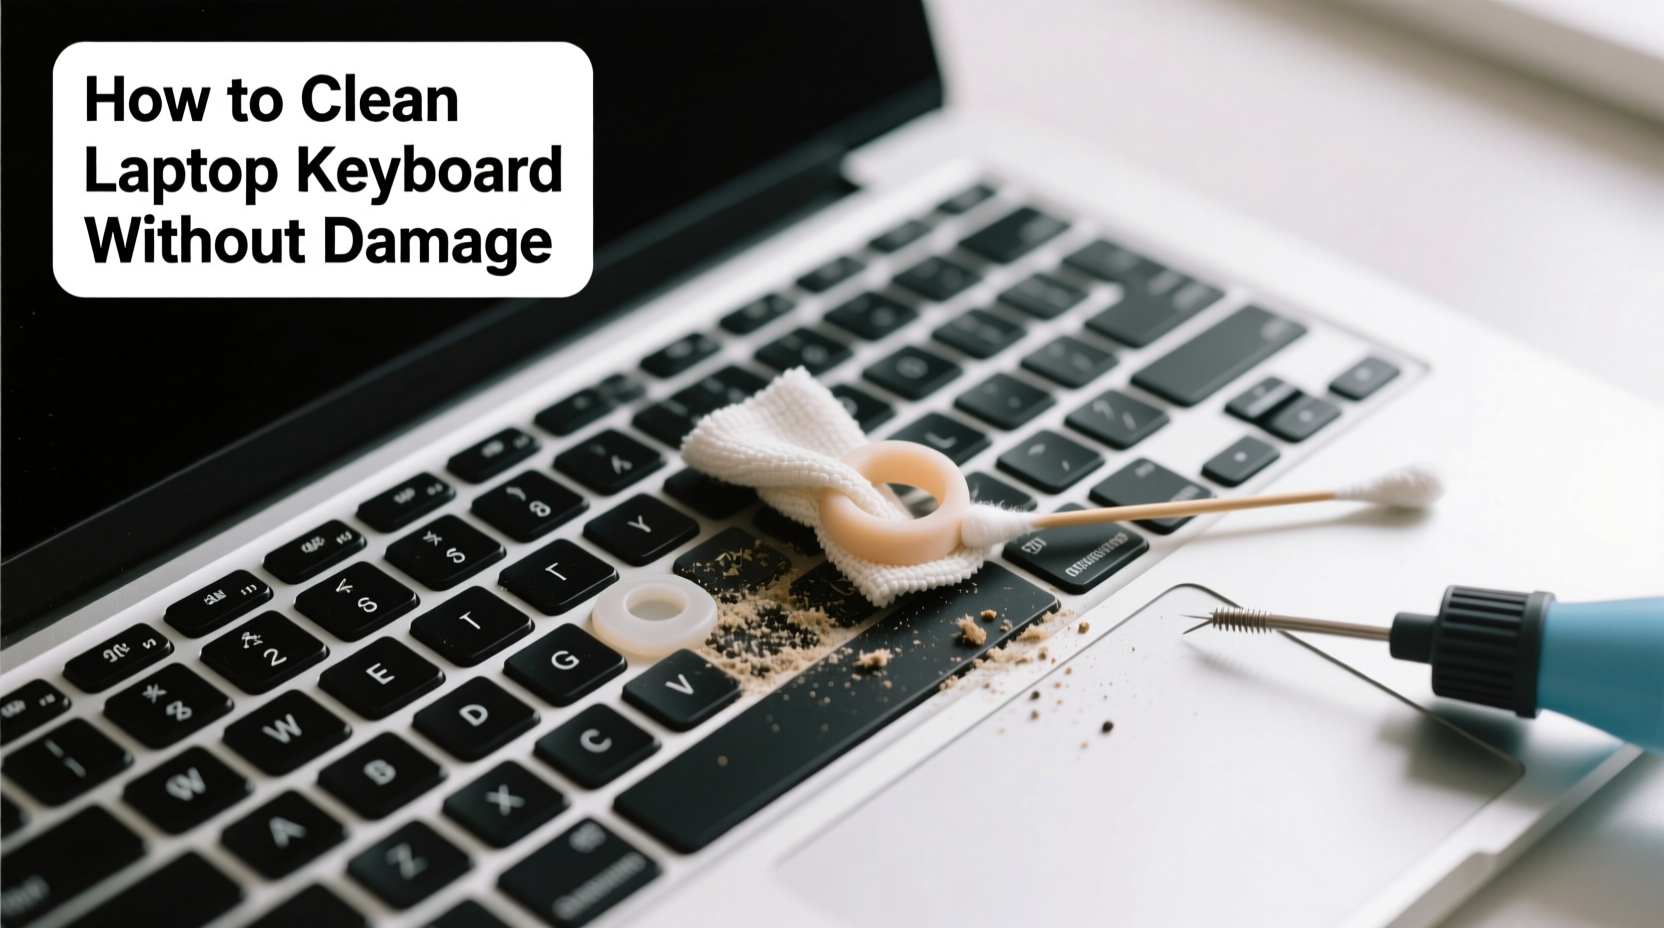
Essential Supplies: What You’ll Need (and What to Avoid)
Using the wrong tools can scratch surfaces, short-circuit components, or loosen keycaps. Choose supplies carefully to avoid irreversible damage.
| Recommended Tools | Purpose |
|---|---|
| Canned air or electric duster | Dislodges dust and debris from under keys |
| Microfiber cloth | Safe wiping—lint-free and non-abrasive |
| Isopropyl alcohol (70% concentration) | Kills germs without damaging plastic |
| Cotton swabs or soft-bristle brush | Reaches tight spaces gently |
| Distilled water | Dilutes cleaners safely; avoids mineral deposits |
Items to Avoid at All Costs
- Household cleaners (e.g., Windex, bleach): Can corrode plastic and strip coatings.
- Tap water: Leaves mineral residue and risks electrical damage if seeped inside.
- Excessive moisture: Never pour liquid directly onto the keyboard.
- Compressed air substitutes (e.g., vacuum cleaners): Static electricity may harm circuitry.
- Metal tools: Risk scratching or puncturing internal layers.
Step-by-Step: Safe Cleaning Process Without Damage
Follow this sequence to ensure both cleanliness and device safety. The entire process takes 20–30 minutes and should be done in a well-lit, dry area.
- Power down and disconnect: Shut down your laptop completely. Unplug the charger and, if possible, remove the battery.
- Shake out loose debris: Hold the laptop at a 75-degree angle over a trash can and gently shake it. This dislodges crumbs and larger particles.
- Use canned air: Spray short bursts between keys at a 45-degree angle. Move in one direction across the keyboard to push debris outward. Do not tilt the can upside down—this releases cold liquid that can damage components.
- Wipe the surface: Dampen a microfiber cloth with a mix of 50% isopropyl alcohol and 50% distilled water. Wring it until nearly dry—moist, not wet—and wipe each key and the surrounding frame. Avoid pooling liquid.
- Clean between keys: Wrap a cotton swab in the same dampened cloth or use a dry swab dipped lightly in alcohol. Gently rotate it between rows to lift grime. Replace swabs as they collect debris.
- Tackle stubborn stains: For sticky spots (e.g., dried soda), hold the damp cloth over the area for 10–15 seconds to soften residue before wiping.
- Dry thoroughly: Let the keyboard air-dry for at least 15 minutes. Never turn the laptop back on while any moisture remains.
- Final inspection: Use a flashlight to check for missed debris. Repeat steps if necessary.
“Moisture control is the number one rule. Even small amounts of liquid can migrate under the PCB and cause corrosion over time.” — Mark Tran, Laptop Hardware Technician with 12 years of field experience
Do’s and Don’ts: Best Practices Summary
| Action | Verdict | Reason |
|---|---|---|
| Use 70% isopropyl alcohol | ✅ Do | Effective germ killer, evaporates quickly, safe on plastics |
| Clean weekly with a dry microfiber cloth | ✅ Do | Prevents buildup and maintains hygiene |
| Remove keycaps for deep cleaning | ⚠️ Caution | Risky on modern laptops—can break hinges or void warranty |
| Use baby wipes | ❌ Don’t | Contain moisturizers and fragrances that leave residue |
| Spray cleaner directly on keys | ❌ Don’t | Liquid can seep into circuits and cause shorts |
| Store laptop in a dusty environment | ❌ Don’t | Accelerates contamination between cleanings |
Real-World Scenario: How One Writer Prevented Keyboard Failure
Jamie R., a freelance journalist based in Portland, worked remotely from cafes and co-working spaces. After three months of frequent travel, her laptop keys began sticking—especially the spacebar and “E” key. She initially ignored it, assuming the issue was mechanical. But when she developed recurring sinus infections, she suspected poor hygiene.
She followed a structured cleaning routine using only isopropyl alcohol, canned air, and cotton swabs. After the first session, she removed visible crumbs and dark grime. By the third week of bi-weekly cleaning, her keyboard responded smoothly again. More importantly, her office visits dropped significantly.
“I didn’t realize how much my workspace affected my health,” she said. “Now I clean my keyboard every Sunday. It takes ten minutes and feels like self-care for both me and my machine.”
Advanced Tips for Shared or High-Traffic Devices
In offices, classrooms, or households with multiple users, keyboards face higher contamination risks. Extra precautions are essential.
- Assign user-specific cleaning schedules: Rotate responsibility so no single person overlooks maintenance.
- Use antimicrobial keyboard covers: Silicone skins act as barriers but must be cleaned weekly to avoid trapping moisture.
- Sanitize after illness: If someone uses the laptop while sick, disinfect immediately using alcohol wipes—followed by air drying for 20+ minutes.
- Limit food and drink near devices: Establish a no-snacking policy to reduce particle accumulation.
FAQ: Common Questions About Keyboard Cleaning
Can I use hand sanitizer to clean my keyboard?
No. While hand sanitizer contains alcohol, it also includes gels, fragrances, and moisturizers that leave sticky residues. These attract more dust and can gum up key mechanisms over time. Stick to pure isopropyl alcohol diluted with distilled water.
Is it safe to remove laptop keys for cleaning?
Generally not recommended unless you have experience. Most modern laptop keys use scissor-switch mechanisms that are fragile and difficult to reattach properly. If a key must be removed (e.g., for spill recovery), consult your manufacturer’s guide or seek professional help. Desktop mechanical keyboards are more forgiving in this regard.
How often should I deep-clean my laptop keyboard?
For daily users: every 2–4 weeks. Occasional users: once every 6–8 weeks. Increase frequency if you eat near your laptop, have pets, or live in a dusty environment. Light surface wiping can be done weekly with a dry microfiber cloth.
Checklist: Your Complete Keyboard Cleaning Routine
Print or bookmark this checklist for regular use:
- ✅ Power off and unplug the laptop
- ✅ Remove battery if possible
- ✅ Shake out loose debris
- ✅ Blow out dust with canned air (angled spray)
- ✅ Dampen microfiber cloth with alcohol-water mix
- ✅ Wipe keys and frame (no dripping)
- ✅ Clean between keys with swabs
- ✅ Address sticky spots with gentle soaking
- ✅ Air-dry for 15–20 minutes
- ✅ Inspect with flashlight and repeat if needed
- ✅ Log cleaning date for future reference
Conclusion: A Cleaner Keyboard Is a Healthier, Longer-Lasting Device
Cleaning your laptop keyboard isn’t just about aesthetics—it’s a fundamental practice for maintaining both personal health and device performance. With minimal effort and the right supplies, you can prevent bacterial buildup, avoid costly repairs, and keep your typing experience smooth and responsive. The methods outlined here prioritize safety, effectiveness, and sustainability, ensuring your laptop remains a reliable tool for work, learning, and creativity.
Unlike disposable gadgets, laptops are long-term investments. Treating them with care—including consistent, gentle cleaning—pays dividends in longevity and peace of mind. Make keyboard maintenance a habit, not a chore, and integrate it into your digital wellness routine.


 浙公网安备
33010002000092号
浙公网安备
33010002000092号 浙B2-20120091-4
Comments
No comments yet. Why don't you start the discussion?