
Mechanical keyboards are prized for their tactile feedback, durability, and responsiveness. However, over time, dust, debris, skin oils, and food particles accumulate beneath the keycaps, affecting switch performance and hygiene. While many guides recommend removing every keycap for deep cleaning, not everyone has the patience or tools for that task — nor should they need to for routine maintenance. Cleaning mechanical keyboard switches without removing keycaps is not only possible but practical when done correctly. This guide outlines proven techniques, essential tools, and expert-backed best practices to keep your switches functioning smoothly while minimizing risk.
Why Clean Switches Without Removing Keycaps?
Removing keycaps exposes the switches directly, allowing for thorough cleaning. But it’s not always necessary — especially for regular upkeep. For most users, a non-invasive cleaning method preserves the integrity of stabilizers, prevents misalignment, and reduces the chance of damaging delicate switch components. It's also ideal for those who use custom keycap sets, which can be expensive or difficult to reassemble.
Cleaning without removal focuses on dislodging surface debris and absorbing moisture or grime around the switch stem and housing. When performed consistently, this approach maintains typing feel, prevents double-actuation issues, and prolongs the life of your keyboard.
Essential Tools and Materials
Effective cleaning starts with the right supplies. Using improper tools — like damp cloths or compressed air cans with excessive force — can push debris deeper or introduce moisture into sensitive areas. Below is a list of recommended items for safe, non-invasive switch cleaning.
- Compressed air canister – Removes loose dust and particles from between keys.
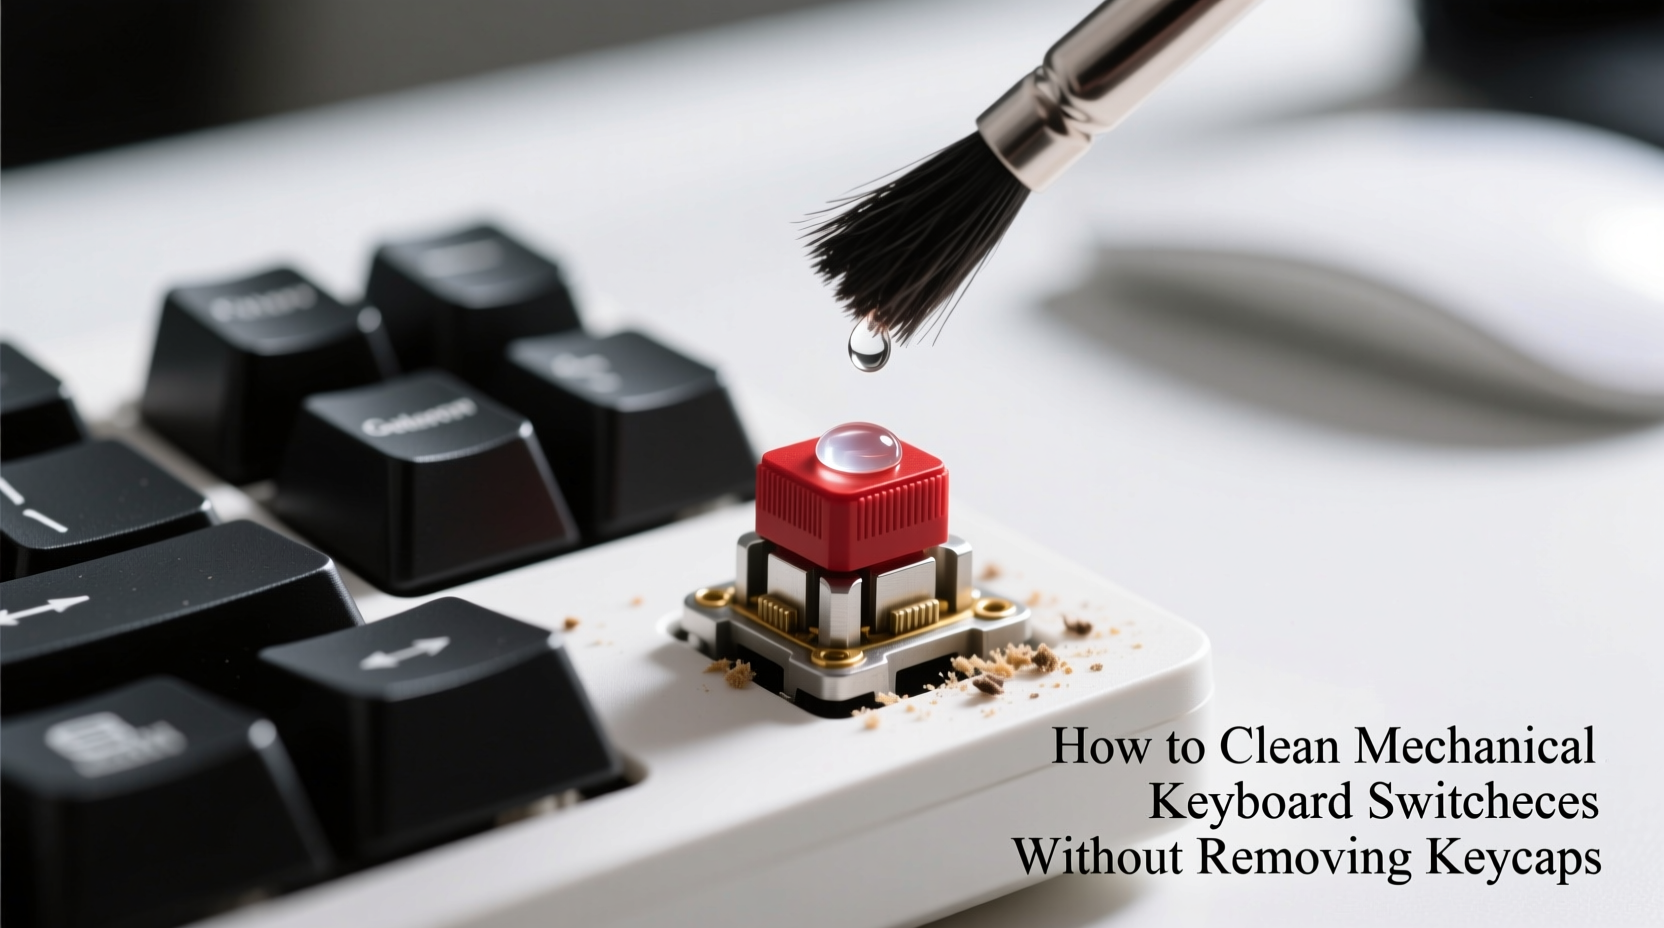
- Soft-bristle brush or makeup brush – Gently sweeps away surface debris without scratching.
- Isopropyl alcohol (70% or higher) – Disinfects and dissolves oils; must be used sparingly.
- Lint-free microfiber cloth – For wiping surfaces without shedding fibers.
- Cotton swabs (optional) – Useful for targeted cleaning around stubborn grime.
- Mini vacuum with narrow nozzle (optional) – Alternative to compressed air for dust removal.
“Regular, gentle cleaning without disassembly can prevent up to 80% of common mechanical issues caused by debris.” — Jordan Lee, Keyboard Hardware Technician at MechKey Labs
Step-by-Step Cleaning Process
Cleaning switches without removing keycaps requires precision and care. Follow this sequence to maximize effectiveness while protecting internal components.
- Power down and disconnect the keyboard. Whether wired or wireless, ensure the device is turned off and unplugged to avoid electrical damage or unintended input during cleaning.
- Tilt the keyboard at a 45-degree angle. This helps dislodge debris outward rather than deeper into the switch housings.
- Blast with compressed air. Hold the can upright and spray in short bursts between and around keycaps. Focus on areas prone to accumulation — spaces between WASD, arrow keys, and Enter/Shift.
- Brush gently with a soft-bristle tool. Use circular motions to lift remaining particles. A small makeup brush works well due to its flexibility and fine bristles.
- Dampen a cotton swab or corner of microfiber cloth with isopropyl alcohol. Wipe around the base of sticky or frequently used keys. Avoid saturating — only slight dampness is needed.
- Target persistent grime carefully. If a specific switch feels gritty, lightly insert a dry swab under the edge of the keycap (without prying) to absorb residue. Never pour liquid directly onto the board.
- Allow full drying time before reconnecting. Wait at least 10–15 minutes after any alcohol use to ensure no moisture remains near PCB or switches.
Do’s and Don’ts of Non-Invasive Switch Cleaning
To avoid accidental damage, follow these guidelines based on technician insights and user-reported failures.
| Do’s | Don’ts |
|---|---|
| Use short bursts of compressed air | Hold the can upside down while spraying |
| Clean regularly in small sessions | Soak the keyboard with liquids |
| Use 70%+ isopropyl alcohol sparingly | Use household cleaners like Windex or bleach |
| Store the keyboard covered when not in use | Tap or shake the keyboard aggressively |
| Test switch function post-cleaning | Insert metal tools under keycaps |
One common mistake is assuming that more pressure equals better cleaning. In reality, aggressive brushing or blowing can force debris past the switch seal, increasing internal contamination. The goal is removal, not displacement.
Real-World Example: Office Worker’s Weekly Maintenance Routine
Mark, a software developer in Austin, uses his mechanical keyboard daily for coding and communication. He noticed increased stickiness on his spacebar and 'E' key after three months of heavy use. Rather than removing all keycaps — a process he feared might lead to misplacement — he adopted a weekly 10-minute cleaning ritual.
Every Friday afternoon, Mark powers down his keyboard, tilts it sideways, and uses compressed air followed by a soft makeup brush. He keeps a microfiber cloth dampened slightly with isopropyl alcohol in a sealed bag for spot treatment. After six weeks, his switches regained smooth actuation, and he reported fewer missed keystrokes. His employer later adopted the same practice across the tech team, reducing hardware replacement costs by 30% over six months.
This case illustrates how consistent, minimal intervention can yield significant long-term benefits without requiring technical expertise or downtime.
When to Consider Full Disassembly
While non-removal cleaning suffices for routine care, certain situations demand deeper attention. Recognizing these signs early prevents permanent damage.
- Keys register multiple inputs unintentionally. Indicates debris interfering with switch contacts.
- Noticeable wobble or inconsistent travel. May signal internal contamination or damaged springs.
- Visible gunk or discoloration under keycaps. Suggests prolonged neglect or liquid exposure.
- Persistent stickiness despite cleaning. Could mean oil buildup inside the switch housing.
In such cases, removing keycaps and potentially switches (for hot-swappable boards) becomes necessary. But for day-to-day maintenance, the methods described here are both sufficient and safer.
Frequently Asked Questions
Can I use water to clean around the switches?
No. Water conducts electricity and can corrode internal circuits even in small amounts. If moisture is required, use high-concentration isopropyl alcohol (90% preferred), which evaporates quickly and leaves no residue. Never spray or drip any liquid directly onto the keyboard.
Will compressed air damage my switches?
Not if used properly. Standard consumer-grade compressed air is safe for mechanical keyboards when applied in short bursts and held upright. Avoid industrial blowers or excessive force, which may stress plastic housings over time. Some premium air dusters offer adjustable nozzles for precise control.
How often should I perform this type of cleaning?
For most users, a quick clean every 2–4 weeks maintains optimal performance. Heavy typists, eaters-at-desk, or those in dusty environments should aim for weekly maintenance. Seasonal deep cleans (with keycap removal) complement this routine but aren’t needed more than 2–4 times per year for average users.
Expert-Backed Checklist for Safe Cleaning
Follow this concise checklist each time you clean your mechanical keyboard switches without removing keycaps:
- ✅ Turn off and unplug the keyboard
- ✅ Tilt the keyboard to 45° for optimal debris removal
- ✅ Use compressed air in short bursts between keys
- ✅ Brush gently with a soft-bristle or makeup brush
- ✅ Dampen a microfiber cloth or swab with isopropyl alcohol
- ✅ Wipe around base of frequently used keys
- ✅ Allow 10–15 minutes drying time before use
- ✅ Test key functionality post-cleaning
Sticking to this routine ensures consistent hygiene and mechanical reliability without unnecessary risk.
Final Thoughts: Maintain Performance Without the Hassle
Cleaning mechanical keyboard switches without removing keycaps is a smart, sustainable habit that preserves both function and form. With minimal tools and a few minutes every few weeks, you can prevent the majority of issues caused by everyday wear. The key is consistency — treating your keyboard not as a disposable peripheral, but as a precision instrument deserving of care.
By following the steps outlined here, respecting material limits, and listening to your equipment’s feedback, you’ll extend its lifespan, maintain typing comfort, and avoid costly repairs or replacements. Mechanical keyboards are built to last; your cleaning routine should support that promise.


 浙公网安备
33010002000092号
浙公网安备
33010002000092号 浙B2-20120091-4
Comments
No comments yet. Why don't you start the discussion?