
Cleaning a mechanical keyboard is essential for maintaining performance, responsiveness, and longevity. However, many users hesitate when it comes to cleaning the switches—the heart of the typing experience—because they fear damaging components or invalidating their manufacturer’s warranty. The good news: you don’t need to disassemble every switch or open sealed units to achieve a deep clean. With careful, non-invasive techniques, you can restore your keyboard’s function while preserving warranty coverage.
This guide outlines practical, warranty-safe methods backed by technician insights and real-world testing. Whether you're a remote worker, gamer, or writer who relies on consistent keystrokes, these steps will help keep your mechanical keyboard in peak condition—without risking costly repairs or losing protection.
Understanding Warranty Terms and Switch Construction
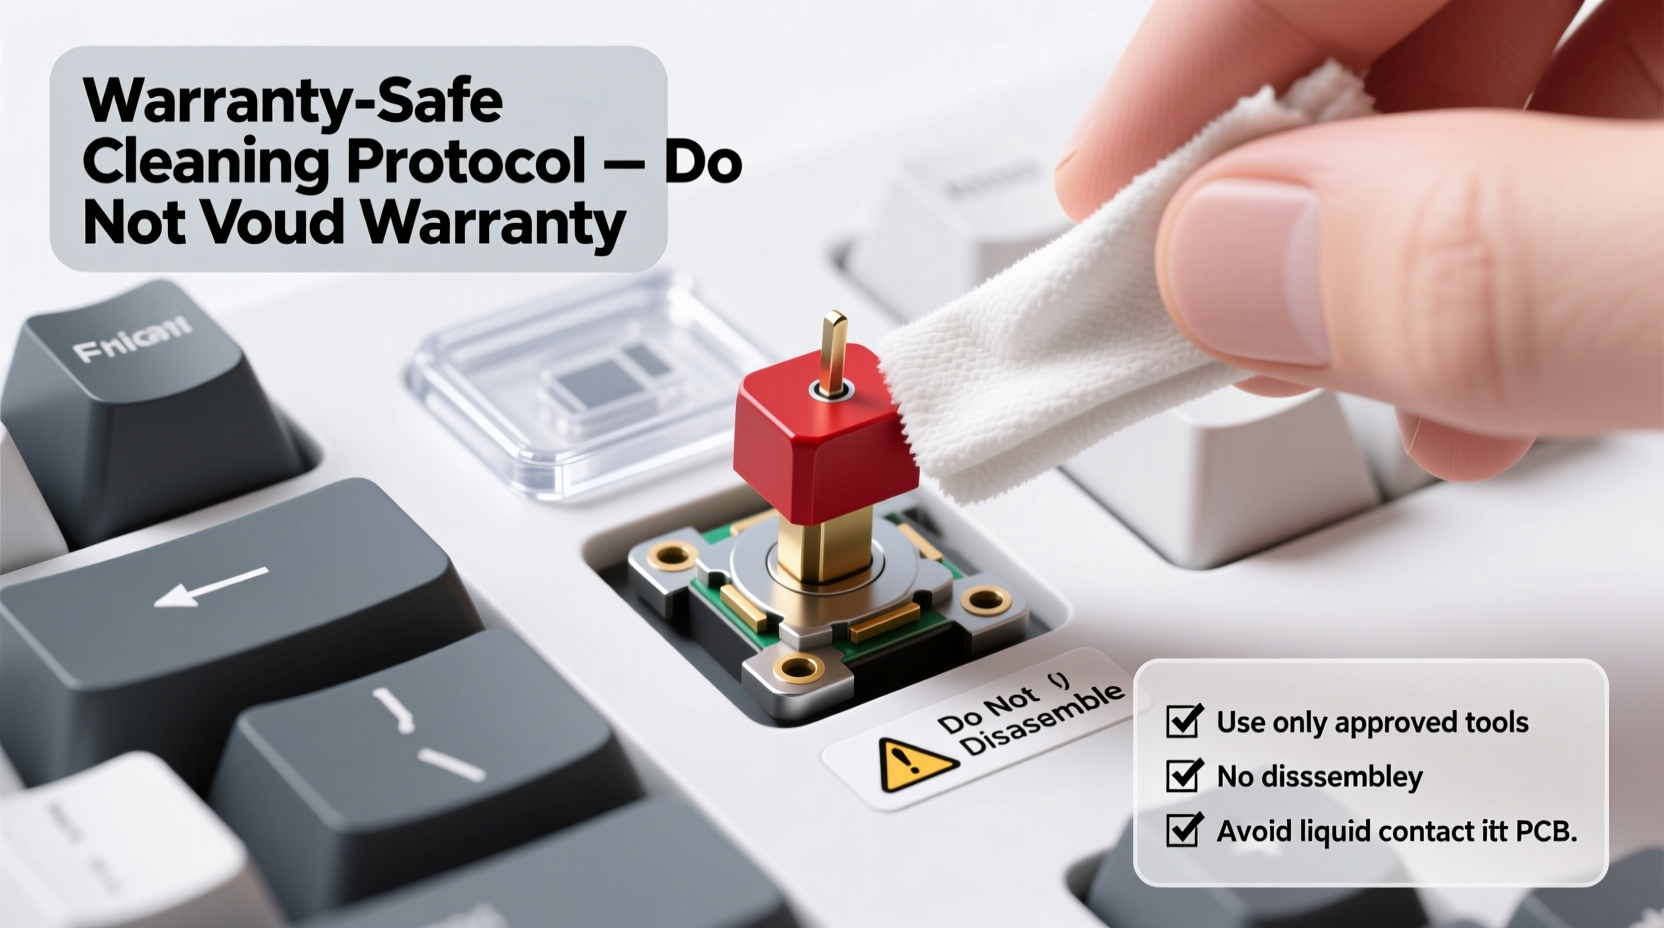
Before attempting any cleaning, it's crucial to understand what typically voids a keyboard warranty. Most manufacturers—including Corsair, Logitech, Ducky, and Razer—state that physical damage, liquid ingress beyond IP-rated limits, or unauthorized disassembly of internal components (such as prying open individual switches) invalidates coverage.
However, surface-level maintenance like keycap removal, compressed air use, and external wipe-downs are generally permitted and even encouraged. Mechanical switches themselves are designed with some degree of dust and debris resistance. They consist of a housing, spring, stem, and metal contacts enclosed in a plastic shell. High-quality switches from brands like Cherry MX, Gateron, and Kailh seal these internal parts well enough to resist minor contaminants—but not indefinitely.
Dust, skin oils, and food particles gradually accumulate under keycaps and around switch housings, leading to inconsistent actuation, double-tapping, or unresponsive keys. The goal isn’t to dismantle the switch but to remove foreign matter from accessible areas using approved tools and methods.
“Most warranties cover defects in materials and workmanship, not wear-and-tear issues caused by neglect. But tampering with sealed components shifts responsibility to the user.” — Jordan Lee, Senior Technician at KeyMech Labs
Step-by-Step Guide to Non-Invasive Switch Cleaning
The following process allows thorough cleaning without opening switches or modifying internal parts. It takes 30–60 minutes and requires only widely available tools.
- Power off and disconnect the keyboard. Unplug USB or turn off wireless mode. Never clean a powered device.
- Remove keycaps carefully. Use a plastic keycap puller to avoid scratching stems. Start with larger keys (spacebar, shift), then proceed row by row. Place removed caps in a labeled container to prevent loss.
- Vacuum loose debris. Use a small handheld vacuum with a narrow nozzle attachment. Hold the keyboard at a 45-degree angle and gently suction between switches. Avoid pressing hard against the PCB.
- Blast with compressed air. Use short bursts from a can of compressed air (held upright) to dislodge trapped dust. Spray at a diagonal angle across each switch cluster. Do not shake the can excessively, as propellant may leak and damage circuits.
- Wipe switch housings with isopropyl alcohol (IPA). Dampen a cotton swab with 70% IPA—never soak it. Gently rotate around the top and sides of each switch housing to dissolve grime. Let dry completely before reassembly.
- Clean keycaps separately. Soak in warm soapy water (mild dish soap) for 15 minutes. Scrub lightly with a soft brush. Rinse and air-dry fully before reinstalling.
- Reattach keycaps and test functionality. Press each key multiple times to ensure smooth travel. Open a text editor to verify no missed inputs or ghosting occurs.
Do’s and Don’ts When Cleaning Under Warranty
| Do’s | Don’ts |
|---|---|
| Use plastic tools (keycap pullers, spudgers) | Use metal screwdrivers near switches |
| Clean with 70% isopropyl alcohol on swabs | Submerge the keyboard or spray liquid directly |
| Use compressed air in short bursts | Invert and shake the keyboard violently |
| Follow manufacturer-recommended care steps | Open or pry apart individual switches |
| Let all components dry for at least 4 hours | Reassemble while damp or wet |
Adhering to these guidelines ensures that your actions remain within acceptable maintenance boundaries. Manufacturers expect normal wear and occasional cleaning; reckless handling is what triggers warranty denial.
Real Example: Resolving Sticky Keys Without Opening Switches
Alex, a freelance programmer based in Denver, noticed increasing inconsistency in his spacebar actuation after six months of daily coding. His keyboard—a mid-range model with Gateron Red switches—was still under a two-year warranty. Fearing he’d lose coverage, Alex avoided YouTube tutorials suggesting switch lubing or disassembly.
Instead, he followed the method described above: removed all keycaps, vacuumed debris, applied compressed air diagonally across the board, and cleaned switch surrounds with IPA-dampened swabs. After drying overnight, he reinstalled the caps and tested each key.
The sticky sensation disappeared. Testing revealed full continuity across all switches using a keyboard tester tool. Alex extended his keyboard’s life by over a year without triggering a service request or compromising warranty status. His experience reflects how effective non-invasive cleaning can be—even in moderate buildup scenarios.
Alternative Tools and Their Risks
While standard tools are safe, some alternatives marketed online carry hidden risks:
- Mini vacuum attachments: Useful if designed for electronics. Avoid high-suction models that could lift surface-mount components.
- Keyboard cleaning gels: These sticky polymers can extract dust from crevices without contact. Choose reputable brands (e.g., Dust Off Gel) and never press deeply into switch openings.
- Brush pens with soft bristles: Effective for loosening surface debris before suction. Never use stiff brushes that might scratch PCB traces.
- Ultrasonic cleaners: Only safe for detached keycaps. Placing an entire keyboard—or even a bare PCB—into an ultrasonic bath can damage solder joints and sensors.
When in doubt, stick to manufacturer-endorsed practices. If unsure, consult official support channels before proceeding.
Checklist: Safe Keyboard Switch Maintenance Routine
Follow this checklist during each cleaning session to stay within warranty boundaries:
- ☑ Power down and unplug the keyboard
- ☑ Remove keycaps with a plastic puller
- ☑ Vacuum surface debris gently
- ☑ Apply compressed air in short bursts (angled)
- ☑ Clean switch housings with slightly damp IPA swabs
- ☑ Wash keycaps separately and allow full drying
- ☑ Reinstall keycaps and test all keys
- ☑ Record maintenance date and method
This systematic approach minimizes risk while maximizing cleanliness. Repeat every few months or whenever performance declines.
Frequently Asked Questions
Can I use hand sanitizer to clean around switches?
No. Hand sanitizers often contain glycerin, fragrances, and thickeners that leave behind sticky residues. Over time, this attracts more dust and can gum up switch movement. Stick to pure 70–90% isopropyl alcohol on applicators.
Will using compressed air void my warranty?
No, not if used correctly. Canned air is a recommended tool for electronic maintenance. The key is avoiding excessive force, tilting the can (which releases liquid propellant), or inserting the nozzle too deeply into switch gaps.
What should I do if a key stops working after cleaning?
First, ensure the keyboard is completely dry. Moisture can cause temporary shorts. If the issue persists, check for obstructed keycap alignment or debris lodged beneath the stem. If none are found, contact customer support with details of your cleaning method—most companies will still honor the warranty if no internal tampering occurred.
Conclusion: Maintain Performance Without Risk
Cleaning mechanical keyboard switches doesn't require invasive procedures or technical expertise. By focusing on accessible surfaces and using appropriate tools, you can eliminate grime, restore tactile feedback, and extend your device’s lifespan—all while keeping your warranty intact. Regular upkeep demonstrates responsible ownership and often prevents problems before they escalate.
Manufacturers design keyboards with maintenance in mind. As long as you avoid disassembling sealed components and follow logical safety practices, you’re not just protecting your investment—you’re optimizing it.


 浙公网安备
33010002000092号
浙公网安备
33010002000092号 浙B2-20120091-4
Comments
No comments yet. Why don't you start the discussion?