
A sticky keyboard can disrupt productivity, make typing frustrating, and even affect the longevity of your device. Whether it's caused by spilled drinks, accumulated dust, or oily fingers, the problem is common—but so is the fear: “What if I damage my laptop and lose the warranty?” Many users hesitate to clean their keyboards thoroughly, worried that opening the device or using liquids might trigger a warranty void. The good news? You don’t need to disassemble your laptop or risk its coverage to restore smooth key function.
With the right tools and cautious techniques, you can effectively clean sticky laptop keys while keeping your manufacturer’s warranty intact. This guide walks through safe, proven methods endorsed by IT professionals and repair technicians—methods that respect warranty terms while delivering real results.
Understanding Your Laptop Warranty
Before attempting any cleaning, it’s crucial to understand what does—and doesn’t—void a typical laptop warranty. Most manufacturers, including Apple, Dell, HP, and Lenovo, offer limited warranties that cover defects in materials and workmanship for 1–3 years. These warranties generally do not cover accidental damage, liquid spills, or physical wear such as worn-out keys.
Critically, simply opening your laptop or cleaning it will not automatically void your warranty—unless you cause damage during the process. According to iFixit, a leading authority on electronics repair and maintenance:
“Warranty policies often discourage user access, but federal laws like the Magnuson-Moss Warranty Act in the U.S. prevent companies from voiding warranties solely because a consumer performed basic maintenance.” — Kyle Wiens, CEO of iFixit
This means you’re legally allowed to clean your laptop externally and in non-invasive ways without losing protection. However, removing screws, prying off components, or applying excessive moisture could be seen as tampering, especially if it leads to hardware failure.
Safe Cleaning Methods That Won’t Void Warranty
The key to maintaining warranty eligibility is avoiding irreversible modifications. The following methods are non-invasive, require no disassembly, and are recommended by both tech support forums and authorized service centers.
1. Use Compressed Air to Remove Debris
Dust, crumbs, and pet hair often accumulate beneath keys, causing them to stick. Compressed air is one of the safest and most effective tools for clearing this buildup.
To use compressed air properly:
- Power off and unplug your laptop.
- Tilt the laptop slightly forward (about 75 degrees) to allow debris to fall out.
- Spray short bursts between and under keys at a 45-degree angle.
- Use a soft brush or toothpick to gently dislodge stubborn particles after blowing.
2. Clean with Isopropyl Alcohol and Microfiber Cloth
If keys feel gummy or leave residue on your fingers, surface grime is likely the culprit. A mild solution of 70% isopropyl alcohol and water can dissolve oils and sugars without damaging plastic or coatings.
Do not pour liquid directly onto the keyboard. Instead:
- Dampen a lint-free microfiber cloth or cotton swab slightly with the solution.
- Wipe each keycap top and sides carefully.
- Avoid letting moisture seep between keys.
- Let the area air-dry completely before powering on.
This method is widely accepted by manufacturers as routine maintenance and poses no risk to warranty status when done correctly.
3. Use Adhesive Putty for Deep Crumb Removal
For debris lodged deeper than compressed air can reach, adhesive cleaning putty (often marketed as “keyboard putty” or “gadget glue”) offers a safe alternative to prying off keys.
These moldable putties lift out dust and food particles without scratching surfaces or requiring mechanical intervention. Simply press the putty into crevices and pull it out slowly. Repeat until clean.
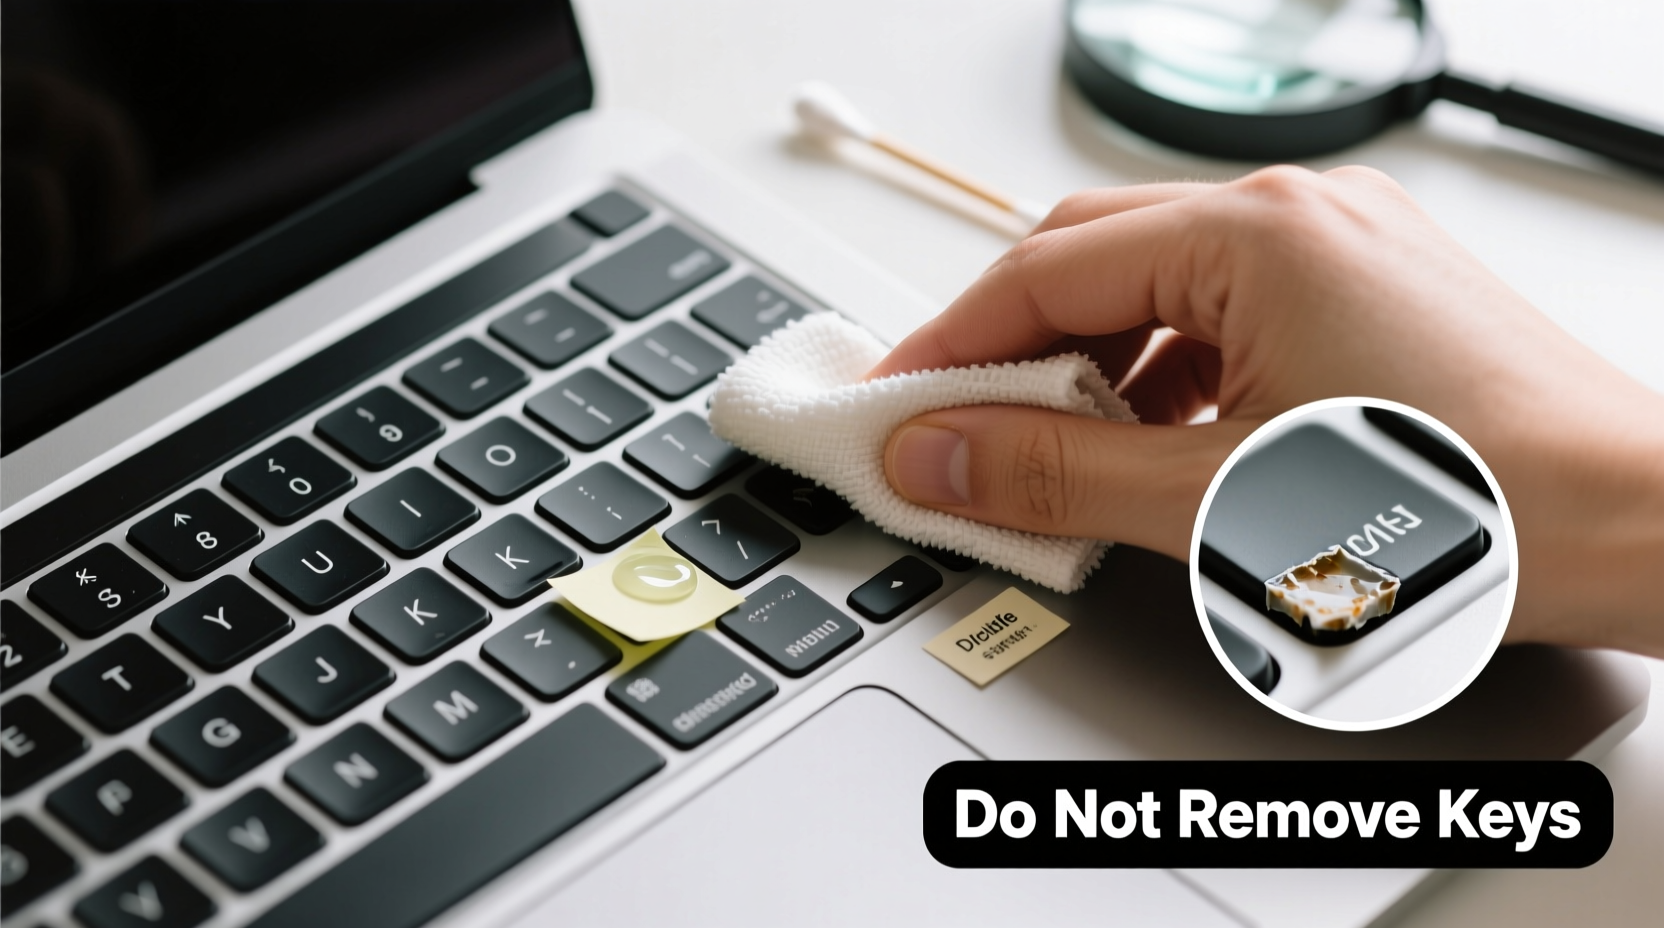
When (and How) to Remove Keys Safely
Some situations demand more thorough cleaning—especially if a spill has dried underneath a key. While removing keycaps increases risk, it doesn’t inherently void your warranty unless damage occurs.
Most modern laptops use scissor-switch mechanisms under keys, which are delicate but designed for moderate servicing. Key removal is considered acceptable maintenance *if* done properly and without force.
Step-by-Step Guide to Removing and Reattaching Keys
- Identify removable keys: Smaller keys like Enter, Shift, and Spacebar are usually detachable. Avoid removing entire keyboard panels.
- Use a plastic pry tool or fingernail: Gently insert it under one corner of the keycap and lift evenly. Do not twist.
- Inspect the mechanism: Look for sugar residue, lint, or corrosion. Clean only with a dry cotton swab or slightly dampened tool.
- Reattach the key: Align the keycap over the hinge clips and press down firmly until it clicks into place.
- Test functionality: Type repeatedly to ensure smooth travel and responsiveness.
After reattachment, wait at least 30 minutes before heavy use to confirm stability.
Mini Case Study: Recovering from a Coffee Spill
Jamie, a freelance writer, accidentally knocked over a half-full mug of sweetened coffee onto her HP Spectre. After immediate shutdown and drying, the spacebar remained sticky. Afraid of voiding her two-year warranty, she avoided taking it to a third-party repair shop.
Instead, she used compressed air and a microfiber cloth dampened with isopropyl alcohol. When that didn’t fully resolve the issue, she carefully removed the spacebar using a plastic spudger from a phone repair kit. Beneath it, she found dried syrup residue. Using a dry swab, she cleaned the area and reattached the key. Full function returned, and her laptop continued under warranty when later serviced for an unrelated battery defect.
Her experience shows that careful, informed intervention can solve sticky keys without compromising future support.
Do’s and Don’ts of Laptop Keyboard Maintenance
| Do’s | Don’ts |
|---|---|
| Power off the laptop before cleaning | Never spray liquids directly onto the keyboard |
| Use 70% isopropyl alcohol on a cloth—not the key itself | Avoid using household cleaners like Windex or bleach |
| Use compressed air regularly (every 1–2 months) | Don’t use metal tools to scrape under keys |
| Clean hands before typing to reduce oil buildup | Never submerge any part of the laptop |
| Remove keys only when necessary and with proper tools | Don’t force a key back on if it doesn’t click |
Essential Tools for Safe Cleaning
You don’t need expensive gear to maintain your laptop. Here’s a checklist of affordable, effective tools:
- Can of compressed air
- Lint-free microfiber cloths
- 70% isopropyl alcohol
- Cotton swabs (preferably foam-tipped)
- Plastic pry tool or guitar pick
- Adhesive cleaning putty
- Soft-bristled brush (like a clean toothbrush)
Keep this small kit in your workspace for monthly maintenance. Regular upkeep prevents buildup and reduces the need for aggressive cleaning later.
Frequently Asked Questions
Will wiping the keyboard with alcohol void my warranty?
No. Surface cleaning with a lightly dampened cloth is considered routine care and is not grounds for warranty denial. Just ensure the cloth is not dripping wet and never apply liquid directly to the device.
Can I remove all my keys for deep cleaning?
It’s not recommended. Only certain keys (Enter, Shift, Spacebar, etc.) are designed to be removed. Smaller keys like letters and numbers often have fragile retention clips. Removing too many increases the risk of misalignment or breakage, which could lead to denied claims if damage is evident.
What should I do if my laptop was already damaged before cleaning?
If your laptop has pre-existing issues like a cracked case or malfunctioning port, proceed with extra caution. Document the condition beforehand with photos or notes. If you plan to seek warranty service later, avoid any cleaning that involves disassembly or moisture near damaged areas.
Conclusion: Maintain Performance Without Risking Coverage
Cleaning sticky laptop keys doesn’t require technical expertise or risky procedures. By using simple tools and following non-invasive methods, you can restore smooth typing and extend your device’s life—all while staying within warranty guidelines. The goal isn’t perfection, but consistent, thoughtful care that prevents minor issues from becoming major failures.
Manufacturers expect normal wear and tear. What they don’t cover is neglect or reckless handling. By treating your laptop with attention and using the right techniques, you protect both its function and your right to service.


 浙公网安备
33010002000092号
浙公网安备
33010002000092号 浙B2-20120091-4
Comments
No comments yet. Why don't you start the discussion?