
Over time, every keyboard accumulates dust, crumbs, pet hair, and skin cells beneath its keys. These contaminants not only affect typing performance but can also harbor bacteria and cause key sticking or failure. While many users reach for compressed air as a quick fix, improper use can damage sensitive components or push debris deeper into the mechanism. Cleaning under keyboard keys requires precision, the right tools, and a methodical approach. This guide provides a comprehensive walkthrough on how to effectively—and safely—use compressed air to maintain your keyboard’s hygiene and functionality without risking harm.
Why Cleaning Under Keyboard Keys Matters
A dirty keyboard isn’t just unsightly—it can impact both health and performance. Studies from the University of Arizona have shown that the average computer keyboard carries more germs than a toilet seat. Beyond microbial buildup, accumulated debris interferes with switch actuation, especially in mechanical keyboards where even small particles can prevent full keystroke registration.
Regular cleaning preserves longevity, ensures consistent responsiveness, and reduces the risk of long-term mechanical wear. Compressed air is one of the most effective non-contact tools for dislodging particles from tight spaces. However, because of its high pressure and potential to scatter grime, it must be used correctly to avoid doing more harm than good.
“Using compressed air improperly is like using a firehose to clean a watch—effective if controlled, destructive if reckless.” — Jordan Lee, Electronics Maintenance Technician
Essential Tools and Precautions
Before beginning any cleaning process, gather the necessary supplies and understand what to avoid. The goal is to remove debris without damaging internal circuits, loosening keycaps, or freezing components.
- Compressed air can (with straw nozzle): Choose a brand designed for electronics, such as Dust-Off or Falcon Zero. Avoid generic dusters meant for household surfaces.
- Microfiber cloth: For wiping down surfaces without scratching.
- Cotton swabs (optional): Useful for spot-cleaning around stubborn residue after air blasting.
- Isopropyl alcohol (70% or higher, optional): Only for external wipe-downs—never spray directly onto the keyboard.
- Small brush (soft-bristle): Helps loosen packed-in dust before using air.
What Not to Do When Using Compressed Air
| Don't | Reason |
|---|---|
| Tilt or shake the can while spraying | Liquid refrigerant can spray out and damage circuits or freeze switches |
| Spray too close to the keys (less than 2 inches) | Excessive pressure can pop off keycaps or stress plastic housings |
| Use canned air on a plugged-in or powered-on device | Static discharge or moisture could lead to electrical faults |
| Blow air vertically downward into laptop keyboards | Debris may fall onto the motherboard below the keyboard assembly |
| Repeat rapid bursts continuously | Can cool internal parts excessively, leading to condensation risks |
Step-by-Step Guide: Safe Use of Compressed Air Under Keyboard Keys
Cleaning under keyboard keys with compressed air is most effective when done systematically. Follow this timeline-based procedure to ensure thoroughness and safety.
- Power Down and Disconnect
Turn off your computer or laptop. Unplug wired keyboards; disconnect Bluetooth keyboards. Never clean a live device. - Remove Surface Debris
Hold the keyboard at a 45-degree angle over a trash can. Gently tap the back to dislodge loose crumbs. Use a soft brush to sweep across the top surface, working between rows of keys. - Stabilize the Keyboard
Place the keyboard on a stable, clean surface. If possible, tilt it slightly forward so gravity helps eject loosened particles outward instead of deeper inward. - Attach the Nozzle and Test Spray
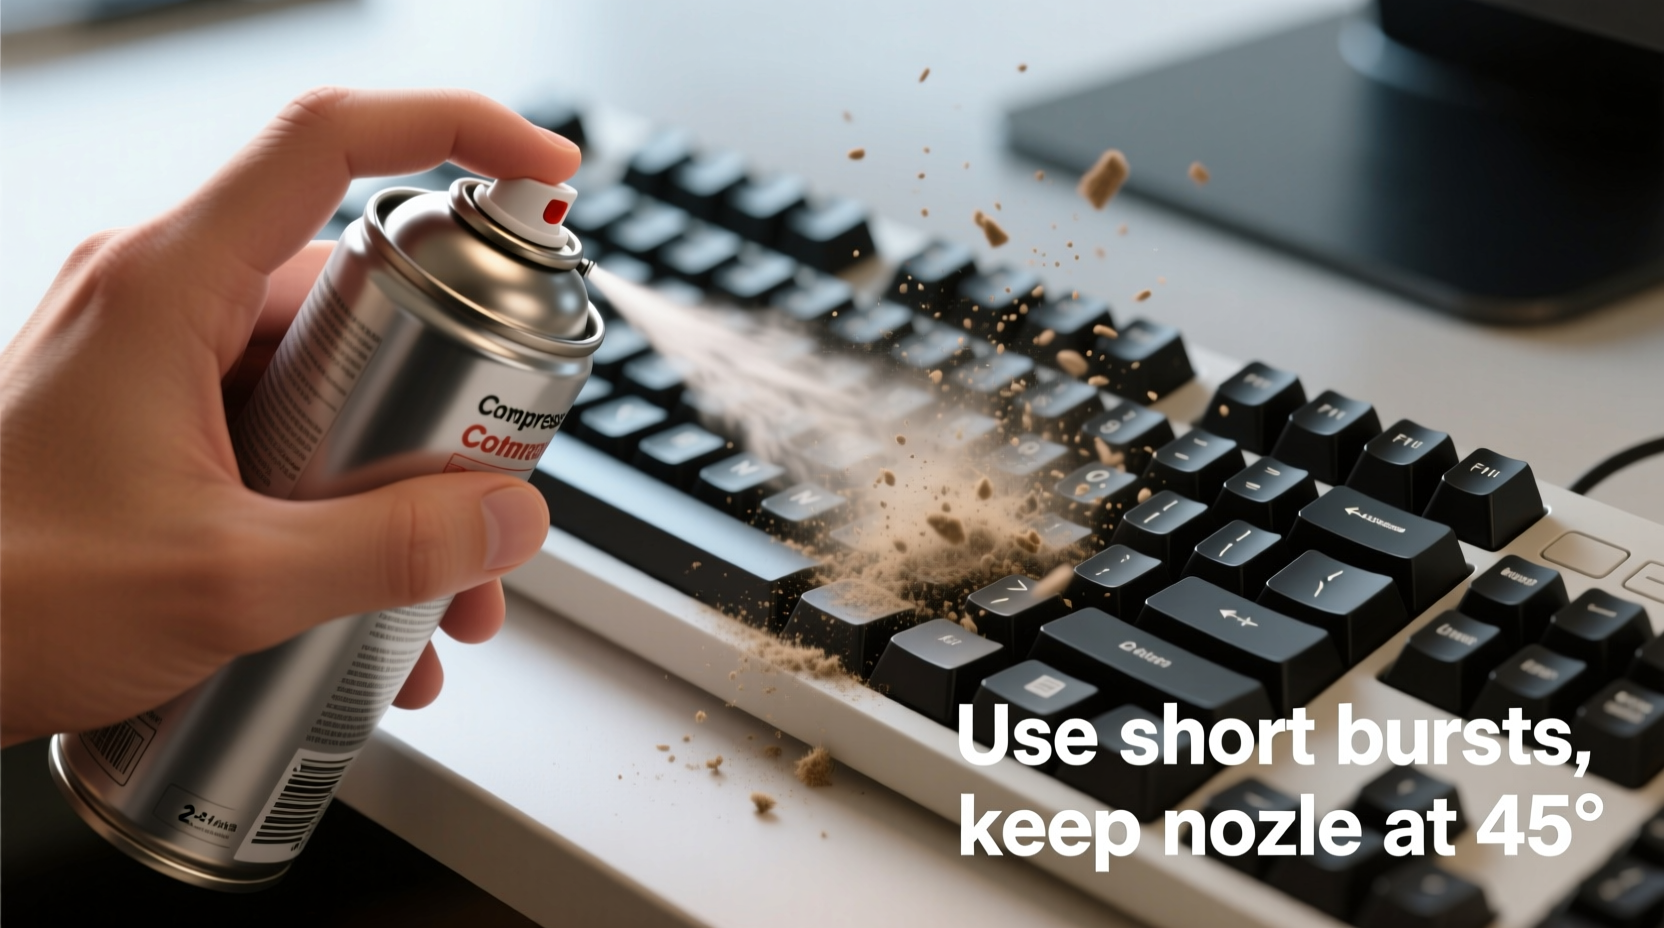
Snap the thin straw nozzle onto the compressed air can. Perform a test burst into the air to clear any initial liquid discharge. - Blast Between and Under Keys
Position the nozzle 2–3 inches above the key gaps. Use short, controlled bursts (1–2 seconds each), angling the stream diagonally across key clusters rather than straight down. Focus on areas between frequently used keys (e.g., spacebar, Enter, Shift). - Target Sticky or Unresponsive Keys
If certain keys feel gritty or unresponsive, aim the airflow along their edges. Press the key halfway down and blow around its base to free trapped particles. - Rotate and Repeat
Flip the keyboard gently and repeat the process from different angles. Rotate it 90 degrees and treat side zones to access shadowed crevices. - Wipe Down Afterward
After airing, use a dry microfiber cloth to remove residual dust from the tops of keys. For smudges, lightly dampen the cloth with isopropyl alcohol and wipe carefully—avoid letting liquid seep underneath. - Let It Sit Before Reconnecting
Wait 5–10 minutes before plugging in or turning on the device. This allows any static charge to dissipate and ensures no lingering moisture.
Real-World Example: Recovering a Grimy Office Keyboard
Daniel, a remote software developer, noticed his 'E' and 'R' keys were registering double inputs. He dismissed it as a software glitch until he spotted black specks emerging from beneath the keys. Using a $10 can of compressed air, he followed the angled-blow technique described above. After three rounds of short bursts and gentle tapping, a clump of pet hair mixed with dried soda crystals fell out near the backspace key. Post-cleaning, all keys responded normally. Daniel now cleans his keyboard monthly, preventing recurrence.
This case illustrates how minor neglect can lead to functional issues—and how proper use of compressed air resolves problems efficiently without costly replacements.
When to Go Beyond Compressed Air
While compressed air excels at dislodging dry debris, it cannot dissolve sticky residues like spilled juice, coffee rings, or oily fingerprints. In such cases, additional steps are needed—but caution remains critical.
- If you suspect liquid spillage, disconnect immediately and let the keyboard dry for at least 48 hours before attempting any cleaning.
- For sticky film, lightly moisten a cotton swab with isopropyl alcohol and run it along the edge of affected keys. Do not insert deeply or saturate.
- Mechanical keyboard owners may benefit from periodic deep cleaning: remove all keycaps, rinse them in warm soapy water, clean the plate with a damp cloth, then reassemble after complete drying (24+ hours).
“Air alone won’t fix gunked-up switches. Combine it with selective manual cleaning for best results.” — Lin Zhao, Mechanical Keyboard Enthusiast & DIY Repair Blogger
Checklist: Safe Keyboard Cleaning With Compressed Air
- ☑ Power off and unplug the keyboard
- ☑ Remove visible debris by shaking or brushing
- ☑ Attach nozzle to compressed air can
- ☑ Hold can upright during use
- ☑ Use short bursts from 2–3 inches away
- ☑ Angle airflow diagonally across key rows
- ☑ Treat multiple angles by rotating the keyboard
- ☑ Wipe surface with dry microfiber cloth
- ☑ Wait 5–10 minutes before reconnecting
- ☑ Schedule monthly maintenance sessions
Frequently Asked Questions
Can I use compressed air on a laptop keyboard?
Yes, but extra care is required. Laptops have compact internals, and debris blown downward may land on the motherboard or fan. Tilt the screen open to about 120 degrees and aim the air at an upward diagonal angle to encourage particles to exit toward the front edge. Never hold the can upside down.
How often should I clean my keyboard with compressed air?
For regular home or office use, every 4–6 weeks is sufficient. Heavy typists, those eating near their desk, or pet owners should clean every 2–3 weeks. Gamers might prefer monthly cleaning due to intense usage patterns.
Is there a safer alternative to compressed air?
A small battery-powered electric duster with adjustable airflow offers more control and eliminates cold-propellant risks. Some models include soft brushes and suction functions. However, they tend to be less powerful than pressurized cans for deeply embedded debris.
Final Thoughts and Action Plan
Cleaning under keyboard keys isn’t just about aesthetics—it’s a crucial part of digital hygiene and hardware preservation. Compressed air, when used correctly, is a fast, efficient, and safe method for maintaining optimal performance. By following the guidelines outlined here—respecting distance, angle, orientation, and frequency—you protect your investment and enhance your daily computing experience.
Don’t wait until keys start sticking or ghost typing occurs. Build keyboard maintenance into your routine the same way you update software or back up files. A two-minute cleaning session once a month can extend your keyboard’s life by years.


 浙公网安备
33010002000092号
浙公网安备
33010002000092号 浙B2-20120091-4
Comments
No comments yet. Why don't you start the discussion?