
White sneakers are a wardrobe staple—versatile, stylish, and easy to pair with almost any outfit. But their pristine appearance doesn’t last long. Scuffs, dirt, yellowing soles, and stains from daily wear can dull even the freshest pair. While commercial cleaners exist, not everyone wants to invest in specialty products for occasional use. Enter a surprising household hero: toothpaste.
This guide reveals how ordinary toothpaste—yes, the kind you brush your teeth with—can effectively clean white sneakers when used correctly. It’s a budget-friendly, accessible solution that’s gained traction among sneaker enthusiasts, travelers, and parents alike. More than just a myth or viral trend, this method leverages mild abrasives and cleaning agents already present in many toothpastes to lift grime without damaging fabric or rubber.
But like any hack, success depends on technique, materials, and knowing which types of toothpaste work best. Misuse can lead to discoloration, residue buildup, or fiber damage. This article walks through the science, step-by-step application, dos and don’ts, real-world results, and expert-backed tips to ensure your sneakers come out cleaner—not compromised.
The Science Behind Toothpaste as a Cleaner
Toothpaste isn’t designed for shoes, but its formulation makes it surprisingly effective for surface-level cleaning. Most standard toothpastes contain three key components relevant to stain removal:
- Mild abrasives (like calcium carbonate or hydrated silica) gently scrub away surface dirt without gouging material.
- Surfactants help break down oils and organic residues—ideal for tackling scuff marks or grass stains.
- Bleaching agents (in whitening varieties) contain low concentrations of hydrogen peroxide or blue covarine to brighten enamel, which can also help restore whiteness to yellowed rubber soles.
When applied properly, these ingredients work together to lift superficial stains from canvas, mesh, leather, and synthetic uppers. The abrasive action polishes rather than strips, making it safer than harsh chemical solvents for delicate materials.
“While not a substitute for professional sneaker care systems, non-gel toothpaste can be an effective spot treatment for minor scuffs and sole yellowing.” — Marcus Lin, Footwear Restoration Technician, SneakerLab NYC
It's important to note: gel toothpastes, those with strong dyes, or extra-whitening formulas containing high levels of peroxide may cause staining or degradation on certain fabrics. Stick to classic white paste formulas for best results.
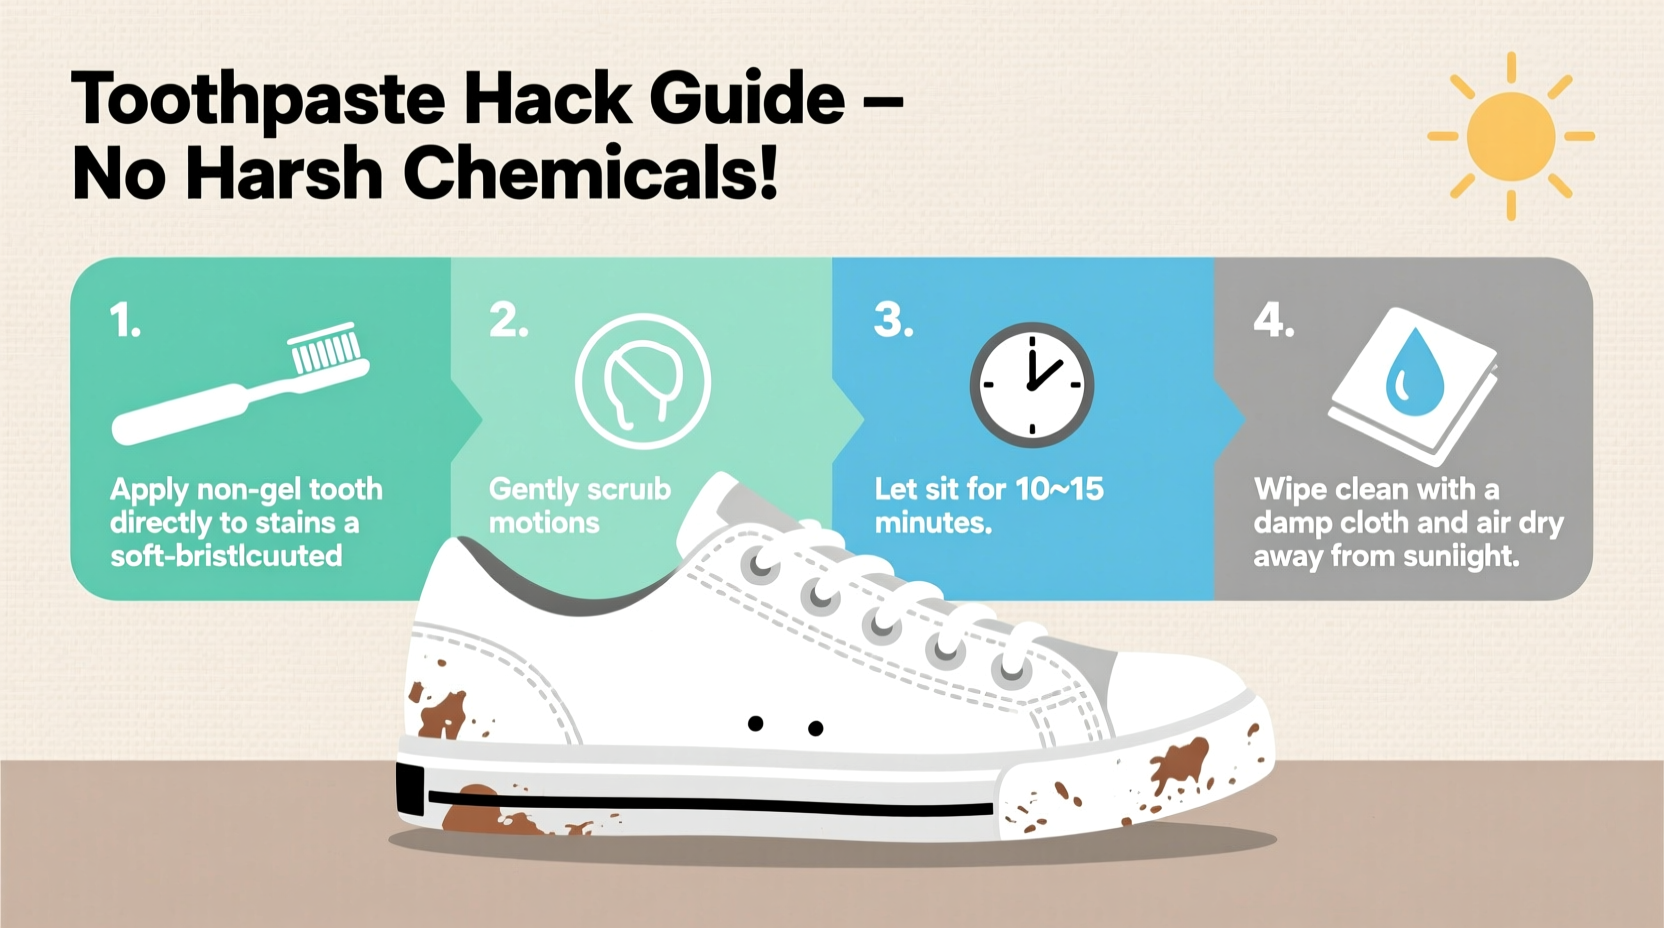
Step-by-Step Guide to Cleaning White Sneakers with Toothpaste
Cleaning sneakers with toothpaste is simple, but precision matters. Follow this timeline-based process to avoid mistakes and maximize effectiveness.
- Prep Your Workspace (5 minutes)
Choose a well-ventilated area with access to water. Lay down paper towels or an old cloth to protect surfaces. Remove laces and insoles if possible to clean them separately. - Gather Supplies
You’ll need:- Non-gel, white toothpaste (avoid colored or gel variants)
- Soft-bristled toothbrush (an old one works fine)
- Clean microfiber or cotton cloth
- Bowl of lukewarm water
- Optional: mild dish soap for pre-cleaning heavy grime
- Dry Brush First (3–5 minutes)
Use the dry toothbrush to remove loose dirt, dust, and debris from seams, treads, and fabric. This prevents scratching during wet cleaning. - Spot Test (2 minutes)
Apply a small amount of toothpaste to an inconspicuous area (e.g., near the heel tab). Wait 10 minutes. Check for discoloration or texture change. If none occurs, proceed. - Apply Toothpaste (10–15 minutes)
Squeeze a pea-sized amount onto the toothbrush. Gently scrub in circular motions on stained areas—focus on toe caps, side panels, and rubber trim. For soles, use firmer pressure along yellowed edges. - Let It Sit (5 minutes)
Allow the paste to dwell. This gives mild abrasives and surfactants time to lift embedded particles. Do not let it dry completely. - Rinse & Wipe (5 minutes)
Dampen the cloth with lukewarm water. Wipe off residue thoroughly. For canvas, lightly dab—do not soak. Repeat until no paste remains. - Air Dry (6–12 hours)
Place sneakers in a shaded, airy space. Avoid direct sunlight or heaters, which accelerate yellowing. Stuff with paper towels to maintain shape and absorb moisture.
Do’s and Don’ts: What Works and What Doesn’t
Not all sneakers respond the same way to toothpaste. Material type, age, and original finish affect outcomes. Use the table below to determine whether your pair is suitable.
| Sneaker Material | Safe with Toothpaste? | Best Practices |
|---|---|---|
| Canvas (e.g., Converse, Vans) | Yes | Use light pressure; avoid soaking; rinse promptly |
| Leather (e.g., Adidas Stan Smith) | Yes (with caution) | Test first; use minimal paste; condition afterward |
| Mesh/Nylon (e.g., Nike Flyknit) | Limited | Only for spot cleaning; avoid deep scrubbing |
| Suede/Nubuck | No | Moisture causes permanent staining; use specialist brushes only |
| Rubber Soles | Yes | Scrub firmly; ideal for removing yellowing and scuffs |
Avoid these common pitfalls:
- Using gel or colored toothpaste—can leave streaks or dye fabric.
- Applying excessive force—may fray fibers or wear down logos.
- Leaving toothpaste on too long—drying residue becomes harder to remove and may etch surfaces.
- Skipping the spot test—especially crucial for vintage or limited-edition pairs.
Real Example: Reviving a Pair of Worn-Out Keds
Jamie, a college student in Portland, wore her white canvas Keds nearly every day during spring term. By finals week, they were grimy, with brownish stains near the toes and yellowed soles. She didn’t want to buy new ones yet couldn’t afford a sneaker cleaning service.
She tried the toothpaste method using Colgate Cavity Protection (white paste), an old toothbrush, and a microfiber towel. After dry brushing, she applied the paste to both the upper and sole, scrubbing in small circles for about 12 minutes total. She wiped clean with damp cloth and let them air dry overnight inside her closet.
The next morning, the toe stains had faded significantly—about 80% removed. The soles looked noticeably whiter, though not brand-new. There was no damage to the fabric or logo stitching. Jamie repeated the process two weeks later for maintenance and reported her sneakers lasted the entire summer without further deterioration.
Her takeaway: “It’s not magic, but it’s close enough when you’re on a budget. I wouldn’t trust it with my dad’s vintage Air Force 1s, but for everyday shoes? Totally worth it.”
Checklist: How to Clean White Sneakers with Toothpaste Safely
Follow this concise checklist before starting:
- ☐ Choose non-gel, white toothpaste (no blue stripes or strong dyes)
- ☐ Remove laces and insoles for separate cleaning
- ☐ Dry brush to remove surface debris
- ☐ Perform a spot test on hidden area
- ☐ Apply paste with soft toothbrush using circular motions
- ☐ Let sit for 5 minutes (do not let dry)
- ☐ Wipe thoroughly with damp microfiber cloth
- ☐ Air dry away from sunlight or heat sources
- ☐ Re-lace and inspect after drying
- ☐ Store in breathable container once clean
Frequently Asked Questions
Can I use any type of toothpaste?
No. Only plain white paste toothpastes without gels, dyes, or strong whitening additives should be used. Gel formulas lack abrasives and often contain ingredients that attract dirt. Whitening pastes with high peroxide levels may oxidize fabric over time, causing yellowing instead of preventing it.
Will toothpaste damage my sneakers?
Potentially, if misused. Aggressive scrubbing, prolonged exposure, or use on incompatible materials like suede can degrade textures or cause discoloration. Always follow safety guidelines and conduct a patch test first.
How often can I clean my sneakers this way?
Limit treatments to once every 4–6 weeks per pair. Overuse can wear down finishes and weaken fibers. Between cleanings, spot-clean with a damp cloth and store properly to minimize buildup.
Final Thoughts: A Practical Hack with Limits
Cleaning white sneakers with toothpaste isn’t a miracle fix, but it’s a smart, accessible strategy when done right. It won’t revive heavily soiled or structurally damaged footwear, nor replace pH-balanced sneaker cleaners for premium materials. However, for routine touch-ups, travel emergencies, or budget-conscious care, it delivers noticeable improvements with minimal investment.
The key lies in understanding your sneaker’s composition and respecting the limits of household products. When combined with proper storage, regular maintenance, and gentle handling, this method can extend the life and appearance of everyday white kicks.
Don’t expect salon-level results every time—but do expect cleaner, brighter soles and refreshed uppers with minimal effort. That’s the essence of a true life hack: practical, repeatable, and grounded in real utility.


 浙公网安备
33010002000092号
浙公网安备
33010002000092号 浙B2-20120091-4
Comments
No comments yet. Why don't you start the discussion?