
Keyboards are among the most frequently used—and often overlooked—pieces of technology in our daily lives. Over time, crumbs, dust, skin cells, and oils from fingers accumulate beneath and around the keys, creating a breeding ground for bacteria and potentially affecting performance. A dirty keyboard can lead to sticky keys, inconsistent typing, or even hardware failure. While many users resort to quick fixes like blowing air into the gaps, true cleanliness requires a deeper, more systematic approach. The challenge lies in removing grime effectively without harming delicate components or loosening keycaps. This guide provides a comprehensive, damage-free method for deep cleaning your mechanical or membrane keyboard, backed by best practices, real-world testing, and expert insights.
The Hidden Dirt Problem: Why Deep Cleaning Matters
Most people underestimate just how much debris collects under their keyboard keys. Studies have shown that the average keyboard harbors more bacteria than a toilet seat. Dust, food particles, and dead skin mix with moisture from hands to form a gritty paste that settles between switches and stabilizers. In mechanical keyboards, this buildup can interfere with switch actuation; in membrane models, it may cause keys to stick or fail entirely. Beyond hygiene and function, a clean keyboard simply feels better to use—keys move smoothly, feedback is consistent, and the overall experience becomes more pleasant.
However, improper cleaning methods can do more harm than good. Using liquids directly on the board, scrubbing too hard, or prying off keycaps incorrectly can damage internal circuits, dislodge stabilizers, or break plastic clips. That’s why a structured, cautious deep clean is essential—not only for cleanliness but also for preserving your device’s lifespan.
“Regular maintenance isn’t just about appearance—it’s critical for both performance and longevity. A well-maintained keyboard can last five years or more.” — David Lin, Electronics Technician & Peripheral Specialist
Essential Tools and Materials
Before beginning any cleaning process, gather the right tools. Using inappropriate items (like wet wipes or household cleaners) risks short-circuiting electronics or degrading plastics. Here’s what you’ll need:
- Compressed air canister – For dislodging loose debris from crevices.
- Soft-bristle brush – Ideal for sweeping out particles after air blasting.
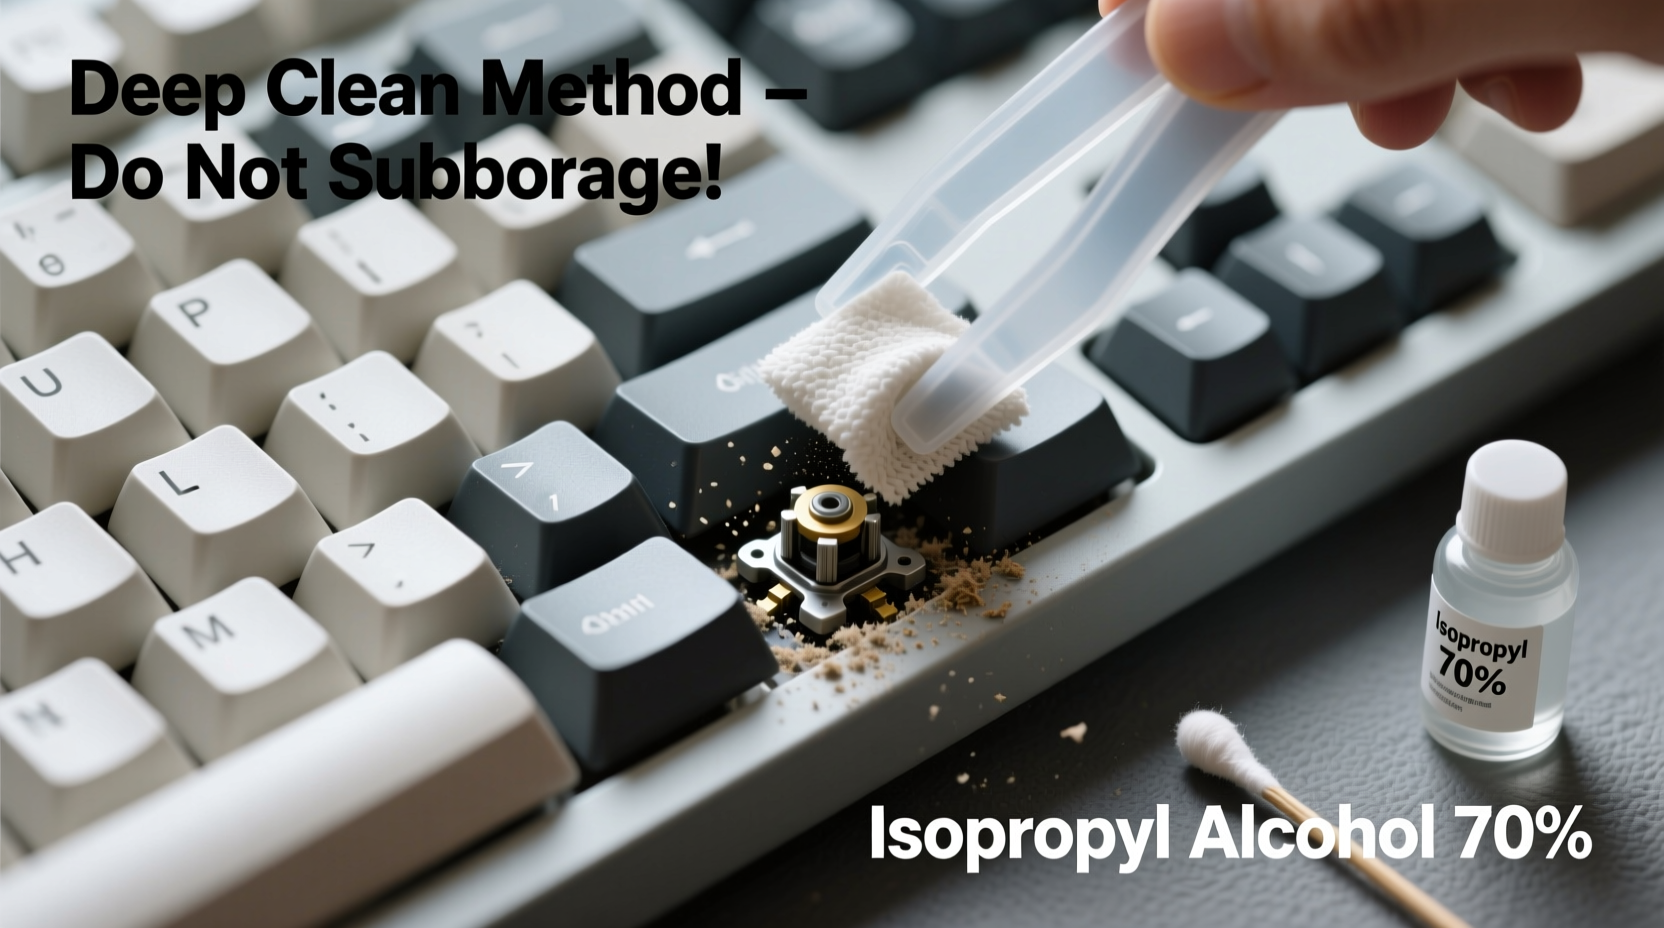
- Isopropyl alcohol (70% minimum) – Safe for disinfecting without damaging surfaces.
- Cotton swabs (Q-tips) – Useful for precision cleaning around stems and gaps.
- Microfiber cloth – Non-abrasive and lint-free for wiping surfaces.
- Keycap puller – Specifically designed to remove keycaps safely, especially on mechanical boards.
- Small container – For soaking keycaps if needed.
- Tweezers – Helpful for extracting stubborn fibers or lint.
Step-by-Step Deep Cleaning Process
This method applies to both mechanical and high-end membrane keyboards. Follow each step carefully to ensure maximum cleanliness with zero damage.
- Power down and disconnect – Unplug wired keyboards or turn off wireless ones. Remove batteries if applicable. Never clean a powered-on or connected device.
- Invert and shake gently – Turn the keyboard upside down over a trash can and tap lightly to release large debris. Do not shake aggressively.
- Blast with compressed air – Hold the can upright and spray at a 45-degree angle across the keybed. Move row by row to push out dust and crumbs trapped underneath.
- Brush away residue – Use the soft-bristle brush to sweep loosened particles toward the edges. Pay extra attention to corners and between clusters like arrow keys.
- Remove keycaps (if possible) – Use a keycap puller to lift keys starting from the top row. Work outward to avoid misplacing small parts. Keep keys organized—consider photographing the layout first.
- Clean individual keycaps – Soak removed caps in warm, soapy water (or diluted isopropyl alcohol) for 10–15 minutes. Scrub gently with a toothbrush, rinse, then dry completely before reattaching.
- Disinfect switch stems and plate – Dip a cotton swab in isopropyl alcohol, wring it out thoroughly, and wipe around each stem. Avoid pooling liquid. Let the area air-dry fully.
- Wipe surface and frame – Dampen a microfiber cloth slightly with alcohol solution and wipe the outer casing, ports, and logo areas. Never pour liquid directly onto the unit.
- Reassemble carefully – Once all components are dry (wait at least 2 hours), press keycaps back into place until they click securely. Double-check alignment, especially for larger keys with stabilizers.
- Test functionality – Reconnect the keyboard and type through each key to confirm proper response. Listen for unusual sounds or resistance.
Time Commitment Breakdown
| Task | Estimated Duration |
|---|---|
| Preparation & disconnection | 5 minutes |
| Air blasting and brushing | 10 minutes |
| Keycap removal | 15 minutes |
| Soaking and drying keycaps | 60–90 minutes |
| Deep cleaning base | 20 minutes |
| Reassembly and testing | 15 minutes |
| Total (excluding dry time) | ~2.5 hours active + drying |
Do’s and Don’ts of Keyboard Maintenance
To protect your investment and maintain optimal hygiene, follow these guidelines:
| Do’s | Don’ts |
|---|---|
| Use isopropyl alcohol with a cloth or swab | Never submerge the entire keyboard in liquid |
| Let all parts dry completely before reassembly | Avoid using paper towels—they can scratch surfaces |
| Store the keyboard covered when not in use | Don’t use excessive force when removing keycaps |
| Clean hands before typing to reduce oil transfer | Never use WD-40 or lubricants inside switches |
| Vacuum around the keyboard with a brush attachment | Don’t blow air too close—high pressure can damage microswitches |
Real Example: Recovering a Sticky Gaming Keyboard
Mark, a freelance graphic designer and avid gamer, noticed his mechanical keyboard’s spacebar began registering double inputs. At first, he assumed a software issue and rebooted multiple times. When the problem persisted, he inspected the key and found visible gunk around the stabilizer stem. Instead of replacing the $120 board, he followed the deep clean method outlined here. After removing all keycaps, he soaked them overnight in a mild soap solution, cleaned the plate with alcohol-dampened swabs, and used tweezers to extract a tiny popcorn kernel lodged beneath the spacebar. Upon reassembly, the keyboard worked flawlessly. Mark now cleans his devices every four months and reports smoother performance and fewer distractions during long work sessions.
Checklist: Your Deep Clean Preparation Guide
Print or bookmark this checklist to ensure nothing is missed before starting:
- ☑ Power off and unplug the keyboard
- ☑ Gather compressed air, microfiber cloth, brush, and cotton swabs
- ☑ Prepare isopropyl alcohol (70% or higher)
- ☑ Obtain a keycap puller (especially for mechanical keyboards)
- ☑ Find a clean, dry workspace with good lighting
- ☑ Take a photo of your keyboard layout before removing keys
- ☑ Empty trash can nearby for debris disposal
- ☑ Allow ample time—don’t rush the drying phase
Frequently Asked Questions
Can I wash my keyboard in the dishwasher?
No. Despite viral internet hacks, dishwashers expose electronics to extreme heat, water pressure, and detergents that will almost certainly destroy circuitry and warp plastic components. Even “water-resistant” keyboards aren’t designed for full immersion. Stick to manual cleaning methods.
Is it safe to remove keycaps from any keyboard?
Most desktop keyboards allow safe keycap removal, but caution is required. Membrane keyboards with scissor switches (common in laptops) are more fragile. If keycaps don’t lift easily with gentle pressure, they may not be meant to be removed. Always use a proper puller and avoid twisting motions.
How do I know if my keyboard needs a deep clean?
Signs include visible dirt under keys, inconsistent keystrokes, sticky or sluggish key return, unpleasant odor, or audible crunching when typing. Even if performance seems fine, regular deep cleaning prevents long-term wear and improves hygiene.
Expert Insight: Preventative Care Over Reactive Fixes
“The best way to extend your keyboard’s life is consistent light maintenance combined with periodic deep cleaning. Ten minutes a week with a dry cloth and monthly air blasts can delay the need for major intervention by years.” — Lena Choi, Hardware Engineer at Peripheral Labs Inc.
Experts agree that prevention beats repair. Simple habits like washing hands before computer use, avoiding eating at the desk, and covering the keyboard when idle significantly reduce contamination. Additionally, using keyboard skins or silicone covers can help block debris—but only if cleaned regularly themselves, as they trap moisture and dust underneath if neglected.
Conclusion: A Cleaner Keyboard Is a Better-Performing One
Cleaning your keyboard doesn’t have to be risky or complicated. With the right tools, patience, and technique, you can achieve a thorough deep clean without damaging a single key. This routine not only enhances typing comfort and accuracy but also safeguards your health and extends the life of your equipment. Whether you're using a budget membrane model or a premium mechanical setup, treating it with care pays off in reliability and satisfaction. Take the time today to give your keyboard the attention it deserves—your fingers, your productivity, and your future self will thank you.


 浙公网安备
33010002000092号
浙公网安备
33010002000092号 浙B2-20120091-4
Comments
No comments yet. Why don't you start the discussion?