
Laptops are essential tools for work, study, and entertainment, but their performance can degrade over time due to dust buildup in critical components—especially the cooling fan. A clogged fan forces the system to overheat, leading to throttling, loud noises, and even hardware failure. While cleaning the fan seems like a logical fix, many users hesitate, fearing they’ll void their warranty or damage sensitive electronics with static discharge. The good news: it’s entirely possible to clean your laptop fan safely and effectively without either consequence—if you follow the right procedures.
This guide walks you through every step, from preparation to reassembly, with emphasis on manufacturer compliance, electrostatic safety, and long-term maintenance. Whether your laptop is under warranty or several years old, these methods apply universally across brands like Dell, HP, Lenovo, Apple, and ASUS.
Understanding the Risks: Warranty and Static Damage
Before touching any screwdriver, it's crucial to understand two primary concerns: warranty status and electrostatic discharge (ESD).
Most manufacturers void warranties if internal components are accessed by unauthorized personnel. However, this doesn’t mean you can't open your device. Many companies—including Apple and Lenovo—explicitly state that user-upgradable parts (like RAM or SSDs) can be replaced without penalty. Unfortunately, fans rarely fall into this category, so proceed with caution.
The second risk—static damage—is often underestimated. Human bodies can carry thousands of volts of static electricity, invisible and harmless to us but lethal to microchips and circuitry. A single accidental touch with charged fingers can fry a motherboard or GPU. That’s why ESD protection isn’t optional—it’s mandatory.
“Even low-level static discharges, imperceptible to humans, can degrade semiconductor junctions over time.” — Dr. Alan Reyes, Electronics Reliability Engineer at IEEE
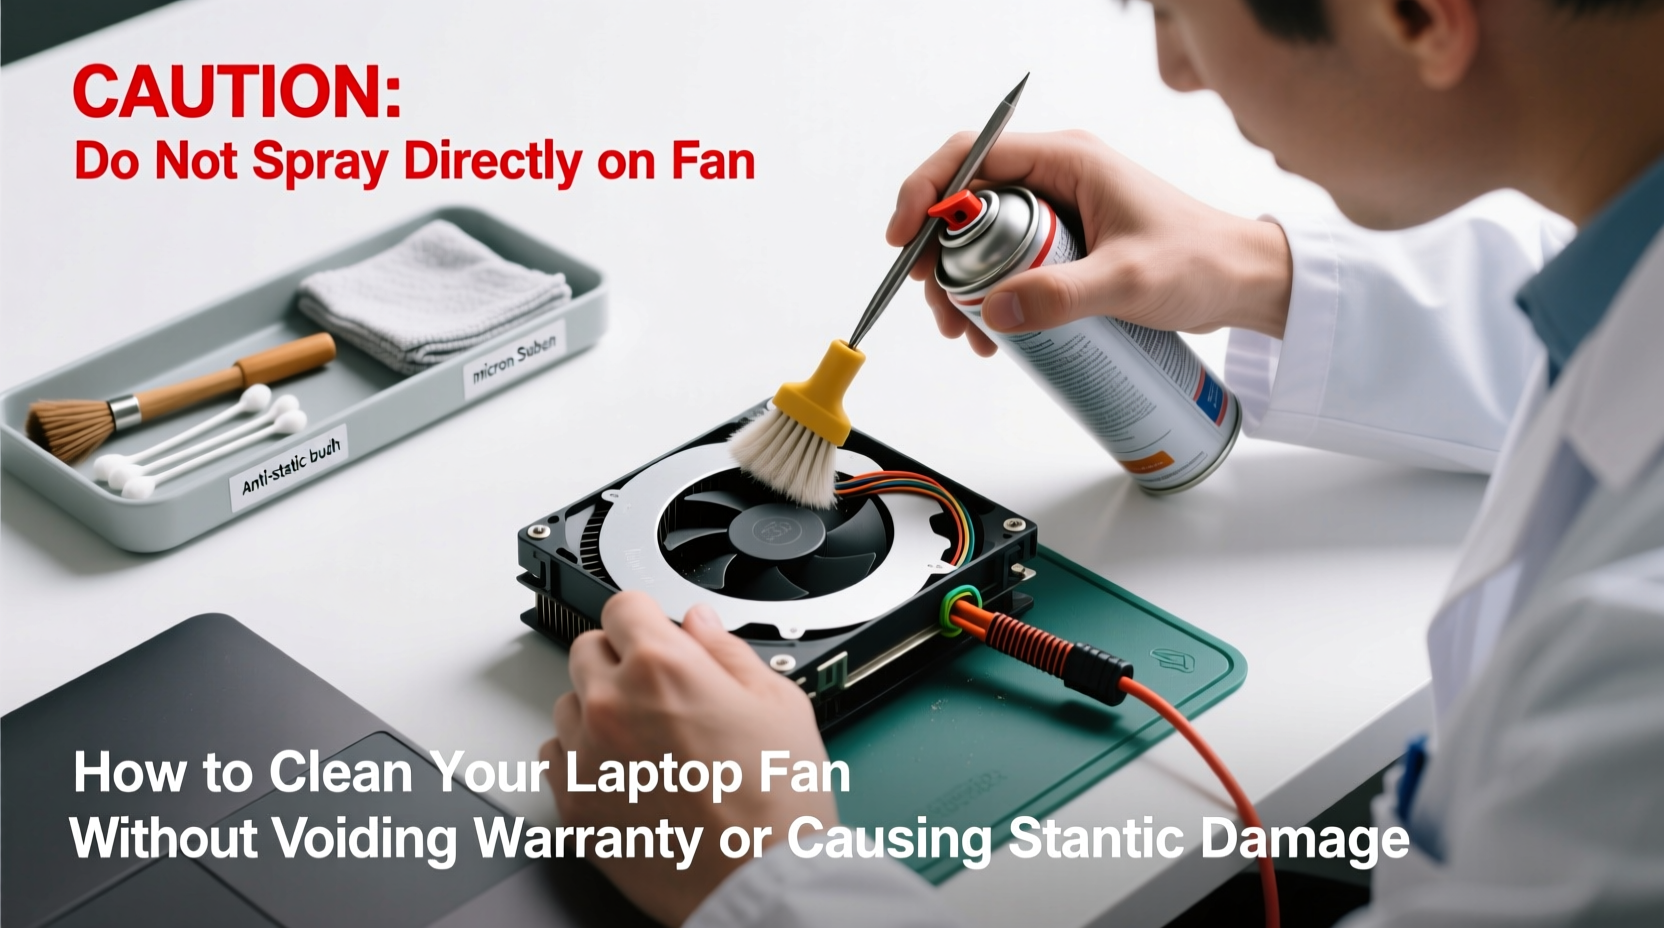
Pre-Cleaning Checklist: Tools and Preparation
Success starts before you power down. Gather all necessary tools and create a safe workspace. Rushing this phase increases the risk of losing screws, damaging connectors, or introducing contaminants.
What You’ll Need
- Compressed air canister (with straw nozzle)
- Soft-bristle brush (anti-static preferred)
- Plastic spudger or opening tool
- Precision screwdriver set (Phillips #0 and #00 common)
- Anti-static wrist strap (highly recommended)
- Small container for screws (magnetic tray ideal)
- Clean microfiber cloth
- Isopropyl alcohol (90%+ purity, optional for stubborn grime)
- Well-lit, clutter-free surface
Workspace Setup Tips
- Avoid carpeted floors—opt for wood or tile.
- Turn off HVAC systems temporarily to reduce airborne dust.
- Keep pets and children away during disassembly.
- Use a non-conductive mat if available.
Step-by-Step Guide to Safe Fan Cleaning
This method assumes moderate technical comfort. If your laptop has a sealed design (e.g., MacBook Air M-series), skip to the external cleaning section.
- Back up your data. Unexpected shutdowns during cleaning could corrupt files.
- Power down completely. Shut down the OS, then unplug the charger.
- Remove the battery (if removable). This eliminates electrical risk. On most modern laptops, the battery is internal—do not attempt removal unless trained.
- Ground yourself. Attach an anti-static wrist strap to bare skin and connect the clip to an unpainted metal part of a grounded desk or radiator. No strap? Touch a grounded metal object (like a lamp base) frequently during work.
- Open the back panel. Use the correct screwdriver. Keep screws organized by location. Some models have hidden screws under rubber feet—check service manuals online.
- Locate the fan assembly. Usually near vents, connected via a small cable to the motherboard. Note its position and wiring path.
- Blow out dust with compressed air. Hold the fan rotor still with a plastic tool to prevent overspinning. Spray in short bursts at a 45-degree angle. Do not shake the can upside down.
- Brush gently if needed. For stubborn debris, use a soft brush dipped lightly in isopropyl alcohol. Wipe only the blades and housing—never the motor shaft.
- Inspect surrounding areas. Heat sinks and intake vents also collect dust. Clean them using the same method.
- Reassemble carefully. Reverse the disassembly steps. Ensure all connectors are seated and screws tightened evenly but not over-torqued.
- Test before full use. Power on and monitor fan noise and temperature using tools like HWMonitor or Core Temp.
“Spinning a fan too fast with compressed air can damage bearings. Always stabilize the blade manually.” — Tech Repair Lab, iFixit Contributor
Warranty-Safe Alternatives: External Cleaning Methods
If opening your laptop feels too risky—or your model explicitly prohibits user access—external cleaning is a viable, warranty-friendly option.
Many overheating issues stem from blocked intake vents rather than internal fan clogs. These are accessible without disassembly.
Non-Invasive Cleaning Steps
- Shut down and unplug the laptop.
- Hold it at a slight angle over a trash can.
- Use compressed air to blow through side and bottom vents. Focus on intake zones (usually near hinges or underside edges).
- Repeat from multiple angles to dislodge trapped particles.
- Wipe exterior vents with a microfiber cloth dampened slightly with isopropyl alcohol.
- Run the laptop on a hard, flat surface (not beds or couches) to improve airflow.
For laptops with user-accessible RAM/SSD compartments, some owners remove the bottom panel solely to reach the fan—this is a gray area. Check your warranty terms. Dell, for example, considers such panels “customer replaceable units,” meaning access won’t void coverage. HP and Lenovo vary by model.
| Brand | Typical Warranty Policy on User Access | Recommended Action |
|---|---|---|
| Dell | Does not void warranty for accessing CRU (Customer Replaceable Units) | Safe to open if within CRU guidelines |
| HP | Case-by-case; some models exclude fan access | Check service manual before proceeding |
| Lenovo | Generally allows upgrades; fan cleaning not specified | Low risk if done carefully |
| Apple | Voided by third-party internal access on most models | Stick to external cleaning only |
| ASUS | Mixed policies; newer models more restrictive | Verify model-specific policy online |
Real Example: Recovering a Overheating Work Laptop
Mark, a freelance graphic designer, noticed his 3-year-old Lenovo ThinkPad X1 Carbon was shutting down unexpectedly during rendering tasks. Task Manager showed CPU temperatures hitting 98°C. He feared hardware failure but didn’t want to lose warranty coverage.
Instead of opening the chassis, he first tried external cleaning. After blowing compressed air through the left-side vent for two minutes, he observed visible dust ejection. He repeated the process weekly for a month while monitoring temps.
Temperatures dropped to 82°C under load—still high, but stable. Encouraged, he checked Lenovo’s support site and found his model had a user-accessible bottom panel covering the SSD and fan duct. The manual confirmed this was a permitted action.
Using a precision screwdriver and wrist strap, he removed the panel, cleaned the fan with care, and reassembled. Post-cleaning, his CPU idled at 45°C and peaked at 70°C during renders. No warranty claims were affected, and performance improved significantly.
This case illustrates how combining external methods with informed internal access can resolve thermal issues safely.
Frequently Asked Questions
Will cleaning the fan actually improve performance?
Yes. Dust restricts airflow, forcing the CPU and GPU to throttle under load. Cleaning restores proper cooling, maintaining peak speeds longer and reducing lag during intensive tasks like gaming or video editing.
How often should I clean my laptop fan?
Every 6–12 months for average use. Environments with pets, carpets, or high dust levels may require cleaning every 3–4 months. Listen for increased fan noise or sudden shutdowns as warning signs.
Can I use a household vacuum instead of compressed air?
No. Vacuums generate static and lack precision. They may also suck in small components or fail to dislodge compacted dust. Compressed air is safer and more effective when used correctly.
Final Recommendations and Maintenance Plan
Cleaning your laptop fan doesn’t have to be risky. With the right tools, knowledge, and caution, you can maintain optimal cooling without compromising your warranty or inviting static damage.
Adopt a proactive approach: clean externally every few months, monitor temperatures using free software, and inspect vents regularly. When internal cleaning becomes necessary, verify your warranty terms, ground yourself properly, and document each step.
Remember, prevention is easier than repair. Avoid using your laptop on soft surfaces, keep it upright when possible, and consider a cooling pad for extended sessions.


 浙公网安备
33010002000092号
浙公网安备
33010002000092号 浙B2-20120091-4
Comments
No comments yet. Why don't you start the discussion?