
Playing your Nintendo Switch on a larger display enhances immersion, but not everyone has access to a TV or monitor. Fortunately, you can use your laptop as a screen by leveraging an HDMI input capture card. While laptops typically only support HDMI output, a capture card bridges the gap by receiving video signals from external devices like the Switch. This method is widely used by streamers, travelers, and gamers who want flexibility without sacrificing quality. Here’s how to do it correctly, what equipment you’ll need, and common pitfalls to avoid.
Understanding the Basics: Why Laptops Can’t Natively Receive HDMI Input
Most users assume that because their laptop has an HDMI port, it can receive video input. However, nearly all consumer laptops are designed with HDMI output ports only—meant to send video *to* external monitors, not receive it. The hardware simply lacks the circuitry required for input functionality. That’s where HDMI capture cards come in.
A capture card acts as an external video receiver. It takes the HDMI signal from your Switch, converts it into a digital format, and sends it to your laptop via USB. Once installed, software on your laptop decodes and displays the feed in real time. This setup is identical to what professional streamers use when broadcasting gameplay from consoles.
Required Equipment and Setup Checklist
Before proceeding, ensure you have all necessary components. Using incompatible or low-quality gear may result in lag, no signal, or dropped frames.
Essential Gear
- Nintendo Switch (Docked Mode): Must be placed in the official dock with HDMI output enabled.
- HDMI Cable (Standard or High-Speed): To connect the Switch dock to the capture card.
- USB-Powered HDMI Capture Card: Compact models like the Elgato HD60 S+, AverMedia Live Gamer Mini, or cheaper alternatives such as ELEPHONO or IOGEAR.
- USB 3.0 Port (or higher) on Laptop: Required for sufficient bandwidth; USB 2.0 often causes lag or low resolution.
- Video Capture Software: Options include OBS Studio (free), Streamlabs, or proprietary apps bundled with branded cards.
Optional But Recommended
- Powered USB hub (if your laptop struggles with power delivery)
- External power adapter for the Switch dock (prevents battery drain during extended play)
- Second monitor (to view editing/streaming interface while playing)
“Capture cards turned my travel gaming setup around—I now play Zelda on my 15-inch laptop screen anywhere.” — Jordan Lee, Digital Nomad & Casual Streamer
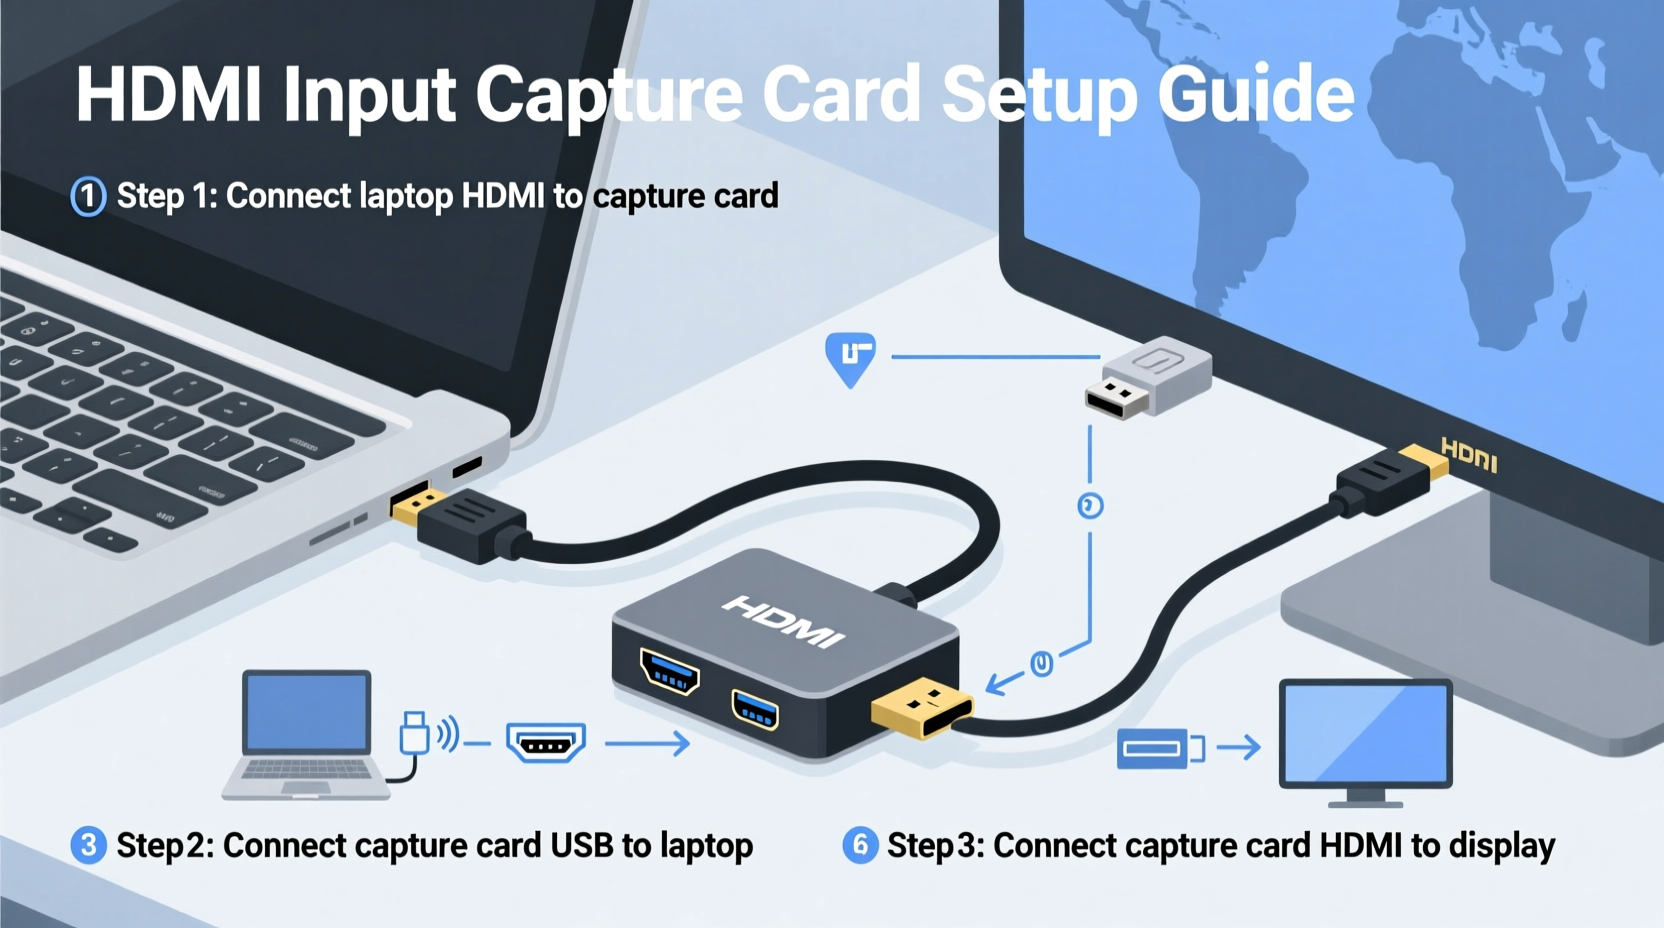
Step-by-Step Connection Process
Follow this sequence carefully to ensure a stable connection between your Switch and laptop.
- Dock Your Switch: Insert the Switch into its official dock and connect the dock’s AC adapter to maintain full performance.
- Connect HDMI Out to Capture Card: Use an HDMI cable to link the dock’s HDMI output port to the “HDMI IN” port on the capture card.
- Link Capture Card to Laptop: Plug the capture card into your laptop via USB 3.0 or better. Look for a blue-tinted port if available—it usually indicates USB 3.0+.
- Launch Capture Software: Open OBS Studio or your preferred app. If using OBS:
- Go to Sources → + → Video Capture Device
- Select your capture card from the device list (e.g., “Elgato Game Capture”)
- Set resolution to 1080p at 60fps if supported, otherwise default to 720p
- Power On the Switch: Turn on your console. You should see the Switch home screen appear in the preview window of your software.
- Adjust Display Settings: Resize the preview to fit your laptop screen or set it to borderless fullscreen for an immersive experience.
- Test Audio and Video: Play a game briefly to check for sync issues, latency, or resolution drops.
Performance Considerations and Troubleshooting
Even with the right gear, performance hiccups can occur. Here’s how to diagnose and fix them.
Common Issues and Fixes
| Issue | Possible Cause | Solution |
|---|---|---|
| No Signal Detected | Capture card not recognized or wrong source selected | Replug USB, restart software, verify correct device in settings |
| Lag or Delay (Input Latency) | Low USB bandwidth or software encoding overhead | Use USB 3.0+, lower preview resolution, disable unnecessary filters in OBS |
| Audio-Video Sync Problems | Driver conflicts or high system load | Update audio drivers, adjust audio sync offset in software |
| Green or Glitchy Screen | Poor HDMI cable or insufficient power | Replace HDMI cable, use powered USB hub |
| Switch Stuck in Handheld Mode | Dock not properly connected or faulty HDMI handshake | Ensure Switch clicks into dock fully, reboot dock and capture card |
Latency is the most critical factor when gaming. Even a 100ms delay can disrupt fast-paced titles like Super Smash Bros. or Splatoon. For best results, choose a capture card that supports passthrough mode (like the Elgato HD60 S+) so you can simultaneously output to a TV while capturing to your laptop—this allows near-zero-latency local play.
Optimizing for Low Latency
- Use OBS Studio’s Game Capture (Preview) mode instead of recording to reduce processing load.
- Disable hardware acceleration in OBS if your laptop has integrated graphics only.
- Enable “Low Latency Mode” in your capture software if available.
- Keep your laptop plugged into power—battery-saving modes throttle USB performance.
Real-World Example: Gaming on the Go
Consider Maya, a university student who lives in a dorm room without a TV. She wanted to play Breath of the Wild on a bigger screen than her Switch’s built-in display but didn’t want to buy a monitor. After researching options, she purchased a $40 HDMI capture card online and connected it to her Windows laptop using OBS Studio.
Within 20 minutes, she had her Switch running in docked mode, displaying perfectly on her 14-inch screen. She adjusted the OBS window to fullscreen borderless mode, giving her a clean, distraction-free view. Although there was slight input lag (~80ms), it didn’t affect exploration or puzzle-solving. For faster games, she occasionally uses headphones and plays locally on the TV in the common room—but for solo sessions, her laptop setup works flawlessly.
This solution saved her space, money, and gave her flexibility. She later started streaming her Animal Crossing island tours to friends using the same setup, turning a simple display project into a creative outlet.
Do’s and Don’ts When Using Capture Cards
| Do’s | Don’ts |
|---|---|
| Use a high-speed HDMI cable under 6 feet | Use damaged or ultra-long HDMI cables |
| Keep your capture software updated | Assume all capture cards perform equally—budget models vary in quality |
| Play less timing-sensitive games (RPGs, puzzles) if experiencing minor lag | Expect flawless 1080p60 on older laptops with weak processors |
| Utilize passthrough if you own a secondary screen | Run multiple USB-intensive devices on the same hub |
| Secure cables to prevent accidental disconnections | Leave the capture card plugged in during laptop transport—risk of damage |
“Not all capture cards are created equal. Entry-level models work fine for casual viewing, but for smooth gameplay, invest in one with USB 3.0+ and H.264 encoding.” — Derek Wu, AV Technician & Streaming Consultant
Frequently Asked Questions
Can I use any HDMI capture card with my laptop?
Most USB-powered HDMI capture cards are compatible with Windows and macOS, provided your OS supports the drivers. Always check manufacturer specifications before purchasing. Some budget cards lack Mac compatibility or require third-party software.
Will this setup drain my laptop battery quickly?
Yes. Running video decoding, USB data transfer, and display rendering simultaneously consumes significant power. Always keep your laptop plugged in during use to avoid unexpected shutdowns and performance throttling.
Is there noticeable input lag? Can I play competitive games?
Lag varies by setup. Basic capture cards introduce 70–150ms of delay, which is acceptable for single-player adventures but problematic for fast multiplayer action. For competitive play, use the capture card only for streaming while playing directly on a TV via passthrough.
Final Tips and Best Practices
To get the most out of your Switch-to-laptop setup, follow these final recommendations:
- Label your cables: Distinguish the HDMI going to the capture card from others to avoid confusion.
- Create an OBS profile: Save your Switch layout as a scene preset for quick loading.
- Monitor temperatures: Long sessions can heat up both the Switch and capture card. Allow airflow and avoid enclosing devices in tight spaces.
- Backup plan: Keep your original TV setup ready in case the capture card fails or needs firmware updates.
- Explore dual-monitor workflows: Use your laptop screen for gameplay and a second monitor for chat, overlays, or notes if streaming.
Conclusion: Unlock Portable Big-Screen Gaming
Connecting your Nintendo Switch to your laptop screen using an HDMI capture card is a smart, cost-effective way to enjoy docked-mode gaming without a TV. With the right hardware and configuration, you can achieve crisp visuals and responsive performance suitable for most game genres. Whether you're traveling, living in a small space, or building a mobile streaming rig, this setup offers remarkable versatility.
The key lies in choosing reliable equipment, optimizing software settings, and understanding the limitations of your system. Once configured, the process becomes seamless—plugging in and playing within minutes. Millions of gamers already rely on this method daily, proving that innovation often comes not from new hardware, but from clever use of existing tools.


 浙公网安备
33010002000092号
浙公网安备
33010002000092号 浙B2-20120091-4
Comments
No comments yet. Why don't you start the discussion?