
Creating a festive and visually harmonious Christmas light display requires more than just plugging in strings of bulbs. One of the most overlooked yet critical aspects is ensuring consistent brightness across all strands. Mismatched brightness can make your display look uneven—some areas glaringly bright, others dim and dull. Achieving balance isn’t complicated, but it does require attention to detail, planning, and understanding the technical factors that influence light output.
Brightness inconsistency often stems from mixing incompatible types of lights, using mismatched power sources, or daisy-chaining too many strands together. The good news? With the right approach, you can create a seamless glow that enhances your home’s holiday charm without drawing attention to flaws.
Understanding Light Brightness: Lumens, Voltage, and LED vs. Incandescent
The first step in coordinating brightness is understanding what determines how bright a strand appears. Three key factors are lumens (light output), voltage (electrical supply), and bulb type—primarily LED versus incandescent.
Lumens measure the total visible light emitted by a source. Unlike watts, which measure energy consumption, lumens tell you how bright the light actually is. For example, a 50-lumen mini string light will appear significantly dimmer than a 200-lumen one, even if both use the same number of bulbs.
Voltage plays a crucial role, especially when connecting multiple strands. Most household Christmas lights operate at 120V, but individual strands may be designed to draw specific voltages. If one strand drops below its rated voltage due to overloading a circuit, it will dim noticeably.
The choice between LED and incandescent bulbs dramatically affects brightness and energy efficiency:
- LED lights typically produce more lumens per watt, last longer, and run cooler. However, not all LEDs are created equal—there are warm white, cool white, and multicolor variants with different brightness levels.
- Incandescent lights offer a classic, softer glow but consume more power and generate heat. They tend to have lower lumen output and shorter lifespans.
Mixing these two types on the same display almost always results in visible brightness discrepancies. Even within the same category, differences in manufacturing can lead to variation.
“Consistency in brightness starts with consistency in components. Never assume two ‘white’ LED strands are identical—measure their output or test them side by side.” — Daniel Reyes, Holiday Lighting Designer & Certified Electrician
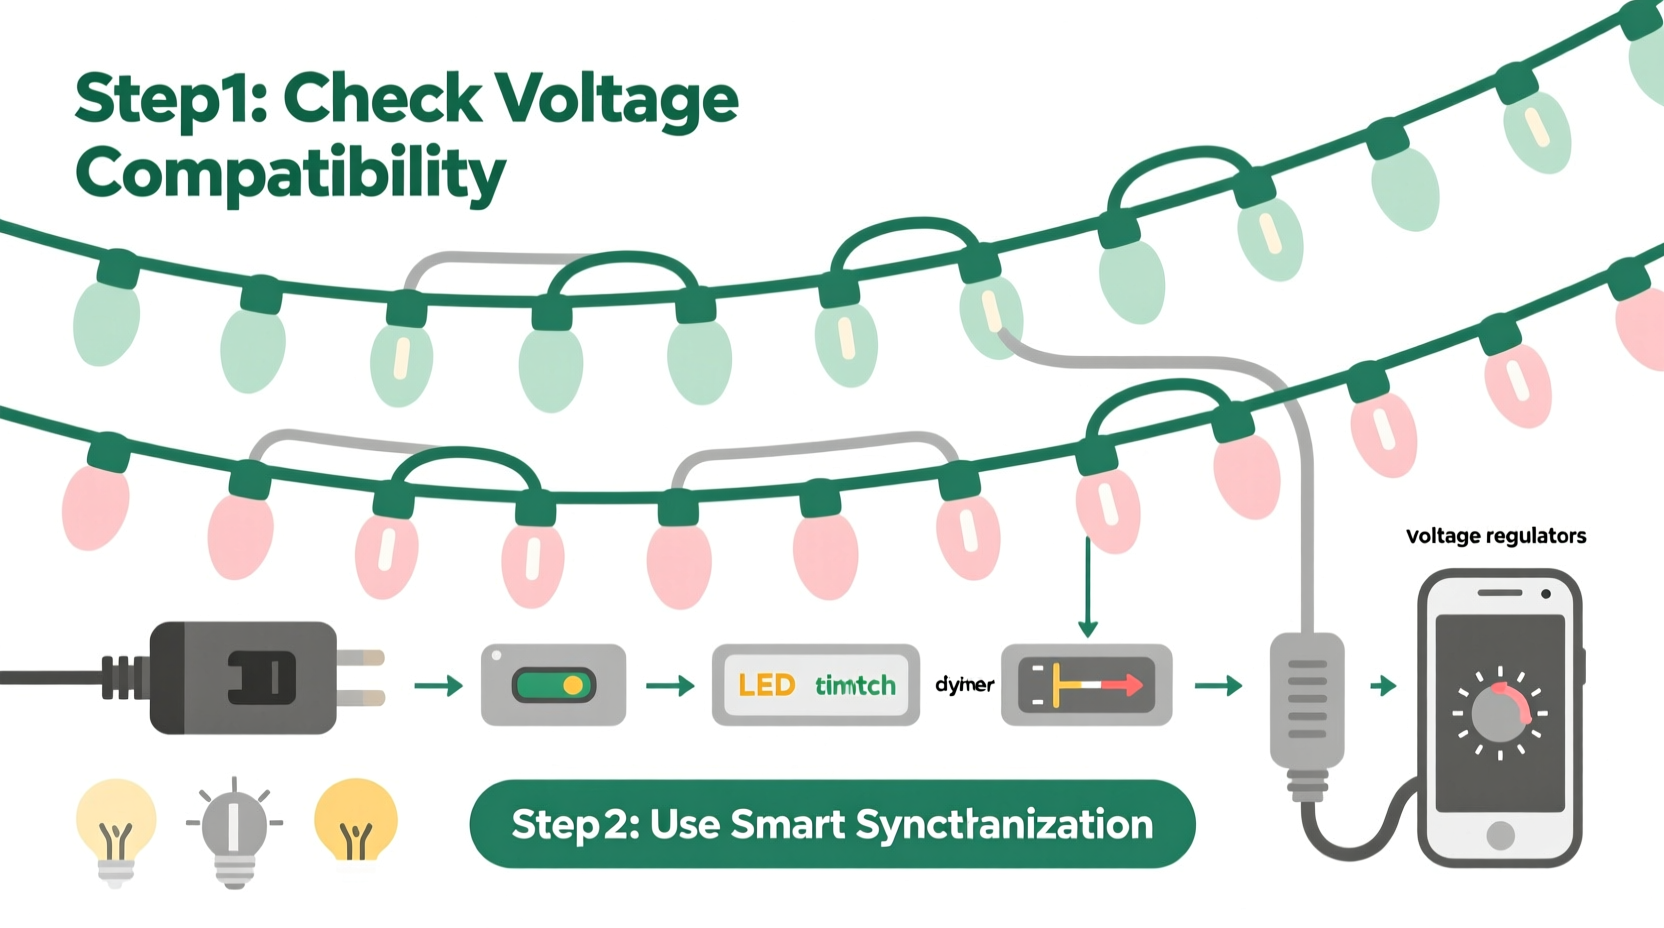
Matching Brightness Across Strands: A Step-by-Step Guide
Coordinating brightness begins long before installation. Follow this sequence to ensure uniformity from setup to final display.
- Purchase from the same brand and model line. Even slight variations between manufacturers can affect color temperature and lumen output. Buying in bulk from the same product line ensures compatibility.
- Check packaging specifications. Look for lumen ratings, voltage requirements, and maximum connectable lengths. Avoid combining strands with different “max link” limits.
- Test all strands before installation. Plug each one into the same outlet and observe them side by side in low-light conditions. Note any that appear dimmer or warmer/cooler in tone.
- Group strands by brightness level. Set aside any outliers. Use identically performing strands for primary display areas like rooflines and trees. Reserve mismatched ones for less visible zones like back porches.
- Use matching extension cords and power sources. Voltage drop occurs when electricity travels through long cords or overloaded circuits. Use heavy-duty outdoor-rated cords and spread loads across multiple outlets.
- Avoid exceeding daisy-chain limits. Most LED strands can support 4–6 connected units; incandescents often max out at 3. Going beyond this leads to noticeable dimming on downstream strands.
- Install inline voltage regulators if needed. For large displays, consider using commercial-grade power injectors or regulated power supplies to maintain consistent voltage across long runs.
Balancing Color Temperature and Visual Perception
Brightness isn’t just about intensity—it’s also influenced by color temperature, measured in Kelvins (K). Two strands with identical lumen output can appear differently bright depending on their hue.
For instance:
- Warm white (2700K–3000K) emits a yellowish glow similar to candlelight. It feels cozy but subjectively dimmer.
- Cool white (5000K–6500K) has a bluish-white tone that appears brighter to the human eye, even at the same lumen level.
- Daylight (6500K+) mimics noon sunlight and maximizes perceived brightness, though it may feel harsh in residential settings.
Using warm and cool whites together—even if they’re the same brightness—can create an unbalanced effect. The cool white will dominate visually, making adjacent warm strands seem underlit.
To avoid this, standardize your color temperature across the entire display. Choose one shade and stick to it. If you want layered effects, use dimmers or zoning instead of mixing temperatures.
| Color Temperature | Perceived Brightness | Best Use Case |
|---|---|---|
| 2700K (Warm White) | Low | Front porches, windows, intimate areas |
| 3500K (Soft White) | Medium | Rooflines, garages, mixed lighting |
| 5000K (Cool White) | High | Tree wraps, signage, modern displays |
| 6500K (Daylight) | Very High | Commercial displays, security accents |
Real-World Example: The Neighborhood Display That Went Viral
In 2022, a suburban home in Portland, Oregon, gained local fame for its perfectly synchronized Christmas display. Neighbors and passersby praised its even glow—no flickering, no dark spots, no jarring contrasts.
The homeowner, Mark Teller, a software engineer with a passion for precision, spent weeks planning his setup. He purchased 48 identical 100-light LED strands from a single manufacturer, all rated at 180 lumens and 3000K color temperature. Before installing, he tested each one using a light meter app and grouped them into four batches based on actual output.
He used six dedicated outdoor circuits, each powering no more than five strands via commercial-grade extension cords. Power injectors were installed halfway along longer runs to prevent voltage drop. The result? A display so uniform it looked professionally installed.
“People assumed I hired a company,” Mark said. “But it was just attention to detail. Matching brightness made all the difference.”
Common Mistakes and How to Avoid Them
Even experienced decorators fall into traps that compromise brightness coordination. Here are the most frequent errors—and how to fix them:
- Mixing old and new strands: Over time, LEDs degrade slightly and may dim. Replacing one broken strand with a newer model can create a mismatch. Solution: Replace entire sections, not single strands.
- Using indoor lights outdoors: Indoor-rated strands often have lower brightness and aren’t built for weather resistance. This leads to inconsistent performance. Always use outdoor-rated lights for exterior displays.
- Overloading power strips: Plugging too many strands into one strip causes voltage sag. Use surge-protected, outdoor-rated power strips with individual switches.
- Ignoring transformer quality: Cheap plug-in transformers can fluctuate in output. Invest in regulated power supplies for large installations.
- Assuming all “white” LEDs are the same: Two brands may label their lights as “warm white” but differ by 300K. Always verify specs or test visually.
Checklist: Ensuring Brightness Consistency
Use this checklist before setting up your display:
- ☐ Buy all strands from the same product line and batch if possible.
- ☐ Verify lumen output and color temperature on packaging.
- ☐ Test every strand side by side before installation.
- ☐ Group strands by brightness and assign zones accordingly.
- ☐ Use outdoor-rated extension cords and avoid daisy-chaining beyond manufacturer limits.
- ☐ Distribute electrical load across multiple circuits.
- ☐ Install surge protectors and timers for safety and longevity.
- ☐ Re-test after full installation to catch any dimming issues.
Frequently Asked Questions
Can I mix LED and incandescent lights if I control brightness with a dimmer?
Technically yes, but not recommended. LEDs and incandescents respond differently to dimming circuits. Incandescents dim smoothly, while LEDs may flicker or cut out prematurely unless using compatible dimmers. Even then, color rendering and fade behavior will differ, leading to visual inconsistency.
Why do the last few bulbs on my strand look dimmer?
This is a classic sign of voltage drop, often caused by exceeding the maximum number of connectable strands or using undersized extension cords. Each additional strand adds resistance, reducing voltage to the end units. Solution: Reduce chain length or use a power injector mid-run to boost voltage.
How can I measure brightness accurately?
Use a digital lux meter or a calibrated light meter app on your smartphone. Measure at a fixed distance (e.g., 12 inches) in a dark room. Compare readings across strands to identify outliers. Aim for less than a 10% variance between units in the same zone.
Final Thoughts: Shine Bright, Not Uneven
A stunning Christmas light display isn’t just about quantity—it’s about quality and consistency. Coordinating brightness across multiple strands transforms a chaotic tangle of lights into a cohesive, professional-grade presentation. By selecting compatible products, testing thoroughly, and respecting electrical limits, you ensure every corner of your display contributes to a unified glow.
Take the time to plan, test, and refine. Your neighbors will notice. Your photos will shine. And most importantly, your holiday spirit will radiate clearly—without being dimmed by avoidable mismatches.


 浙公网安备
33010002000092号
浙公网安备
33010002000092号 浙B2-20120091-4
Comments
No comments yet. Why don't you start the discussion?