
The blooming onion—a dramatic, golden-brown blossom of crispy fried onion petals drizzled with zesty dipping sauce—is one of the most iconic appetizers in American casual dining. Originating from chain restaurants in the late 20th century, it has become synonymous with indulgent comfort food. While many assume this dish requires professional equipment or culinary training, it is entirely possible—and surprisingly straightforward—to recreate at home. With the right technique, a few pantry staples, and attention to detail, home cooks can produce a blooming onion that rivals any restaurant version. This guide demystifies the process, offering clear, actionable steps for achieving perfect texture, flavor, and presentation without deep-fryers or commercial kitchens.
Definition & Overview
A blooming onion consists of a large yellow or sweet onion (typically Vidalia or Walla Walla) cut into thin, connected strips from the top down, then soaked in ice water to encourage the layers to curl outward into a flower-like shape. The prepared onion is coated in seasoned flour and breadcrumbs, deep-fried until crisp, and served hot with a tangy dipping sauce—most commonly a variation of ranch or spicy mayonnaise-based condiments.
The dish gained widespread popularity through the Outback Steakhouse chain, which trademarked the \"Bloomin' Onion\" in 1993. However, its roots trace back to earlier culinary traditions involving battered and fried vegetables, particularly in Southern U.S. and Japanese tempura cuisines. The modern blooming onion stands out not only for its visual appeal but also for its contrast of textures: a shatteringly crisp exterior giving way to tender, slightly sweet inner layers.
Creating a blooming onion at home allows customization of ingredients, oil temperature control, and seasoning precision—factors often overlooked in mass-produced versions. It’s ideal for entertaining, game-day spreads, or as a weekend cooking project that combines technique and showmanship.
Key Characteristics
| Characteristic | Description |
|---|---|
| Flavor Profile | Sweet and savory, enhanced by garlic, paprika, and herbs in the breading; balanced by acidic dipping sauce. |
| Texture | Crispy outer crust with tender, slightly chewy interior petals. |
| Aroma | Toasted breadcrumbs, roasted onion, and warm spices during frying. |
| Color | Deep golden brown when properly fried; pale yellow interior. |
| Heat Level | Mild unless spiced heavily; heat primarily comes from optional cayenne or hot sauce in the batter or dip. |
| Culinary Function | Appetizer or shareable snack; occasionally used as a sandwich topping in gourmet burgers. |
| Shelf Life | Best consumed immediately; loses crispness within 30 minutes. Not suitable for refrigeration or reheating without quality loss. |
Practical Usage: Step-by-Step Guide
Successfully making a blooming onion hinges on three critical phases: preparation, breading, and frying. Each stage must be executed precisely to ensure structural integrity, even cooking, and maximum crunch.
Ingredients & Equipment
- 1 large yellow or sweet onion (about 6–7 inches in diameter)
- 1 cup all-purpose flour
- 1 tsp garlic powder
- 1 tsp onion powder
- 1 tsp smoked paprika
- ½ tsp cayenne pepper (optional)
- 1 tsp salt
- 1 large egg
- 2 tbsp milk or buttermilk
- 1 cup panko breadcrumbs
- Peanut, canola, or vegetable oil (for deep frying)
- Ice water (for soaking)
Equipment: Sharp chef’s knife, cutting board, large bowl, wire rack, slotted spoon, deep heavy pot (Dutch oven preferred), thermometer (candy/deep-fry recommended), paper towels.
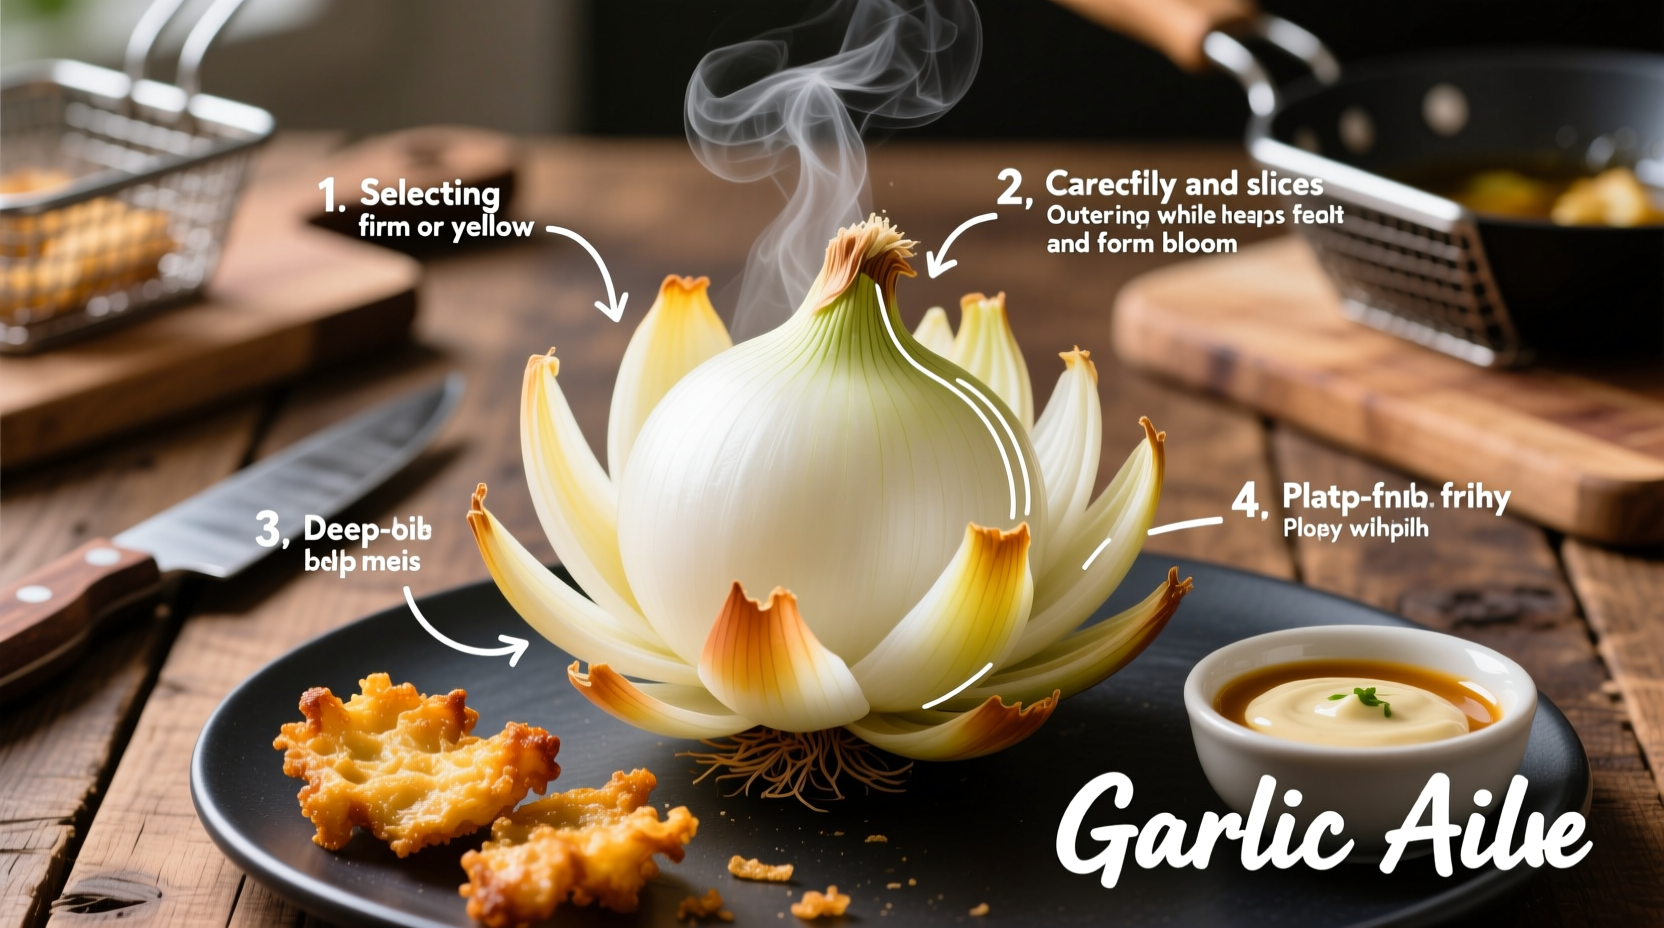
Step 1: Cutting the Onion
- Peel the onion, removing all outer skin while preserving the root end intact—this keeps the layers attached.
- Place the onion root-side down on the cutting board. Slice vertically from top to bottom, rotating the onion a quarter turn after each cut.
- Make 16–24 evenly spaced cuts, depending on onion size. Aim for slices about ¼ inch thick. Too few cuts result in sparse blossoms; too many compromise structure.
- Once cut, submerge the onion in a bowl of ice water for 30–60 minutes. This firms the layers and encourages them to splay outward into a bloom.
Pro Tip: For optimal blooming, chill the onion in ice water for at least 30 minutes. Cold water causes the cells to contract, enhancing curling once removed. Do not soak longer than 90 minutes, as excess moisture becomes difficult to dry later.
Step 2: Preparing the Breading Station
Set up a three-stage breading station:
- Flour Mixture: In a shallow dish, combine flour, garlic powder, onion powder, paprika, cayenne, and salt.
- Egg Wash: In a second bowl, whisk egg with milk until smooth.
- Breadcrumbs: Spread panko breadcrumbs in a third dish. Panko provides superior crunch compared to regular breadcrumbs due to its larger, flakier texture.
Remove the onion from ice water and gently shake off excess liquid. Pat thoroughly with paper towels—any remaining moisture will cause splattering and uneven breading adhesion.
Step 3: Coating the Onion
- Dredge the onion in the seasoned flour, ensuring all exposed surfaces are lightly coated. Shake off excess.
- Transfer to the egg wash, allowing excess to drip off.
- Press firmly into the panko breadcrumbs, rotating to cover all sides. Use your fingers to tuck crumbs between the petal gaps for full coverage.
- Let the coated onion rest on a wire rack for 5–10 minutes. This helps the coating set and adhere better during frying.
Expert Advice: Double-coating (flour → egg → crumbs → egg → crumbs) yields an extra-crispy crust, but increases oil absorption. Reserve this method for special occasions where maximum crunch is desired.
Step 4: Frying to Perfection
- Fill a heavy-bottomed pot with 2–3 inches of oil. Heat over medium-high until the oil reaches 350°F (175°C). Use a thermometer for accuracy—too cool results in greasy onions; too hot burns the exterior before the inside cooks.
- Gently lower the onion into the oil using tongs or two spoons, flower side up. Fry for 4–5 minutes, turning halfway for even browning.
- When golden brown and crisp, remove with a slotted spoon and drain upright on a wire rack placed over paper towels. Avoid laying flat, which traps steam and softens the base.
- Serve immediately while hot and crunchy.
\"The key to a great blooming onion isn’t just the recipe—it’s temperature discipline. A fluctuating fry temp ruins texture. Invest in a reliable thermometer; it pays off every time.\" — Chef Elena Torres, Culinary Instructor, Institute of American Cuisine
Variants & Types
While the classic blooming onion uses yellow or sweet onions and a standard breading mix, several variations exist to suit dietary needs, flavor preferences, or creative experimentation.
By Onion Type
- Sweet Onions (Vidalia, Maui, Walla Walla): Lower sulfur content creates milder, naturally sweeter flavor—ideal for balancing rich breading.
- Yellow Onions: More pungent when raw but caramelize beautifully when fried. Best for those who prefer a stronger onion presence.
- Red Onions: Less common due to tighter layers and sharper bite, but usable for color contrast in gourmet presentations.
By Breading Style
| Type | Coating Composition | Best For |
|---|---|---|
| Classic Crunch | Flour + egg + panko | Traditional texture and appearance |
| Gluten-Free | Almond flour or rice flour + egg + gluten-free panko | Celiac-safe diets |
| Vegan | Chickpea flour + plant milk + flaxseed “egg” + panko | Plant-based diets |
| Spicy Kick | Add cayenne, chili powder, or crushed red pepper to flour and crumbs | Bold flavor seekers |
| Herb-Infused | Fresh dill, parsley, or chives mixed into egg wash or crumbs | Fresh, aromatic profile |
Alternative Cooking Methods
- Air Fryer Version: Lightly spray breaded onion with oil and cook at 375°F for 15–18 minutes, rotating halfway. Results are less uniformly crisp but significantly lower in fat.
- Oven-Baked: Place on oiled rack and bake at 425°F for 20–25 minutes. Requires careful monitoring to avoid drying.
- Beer Batter Option: Skip the flour-egg-crumb sequence; instead, dip pre-soaked onion into cold beer batter (flour, beer, salt, baking powder) and deep-fry. Creates a lacy, tempura-style crust.
Comparison with Similar Ingredients
The blooming onion is sometimes confused with other fried onion dishes. Understanding distinctions ensures proper technique and expectations.
| Dish | Structure | Cooking Method | Texture | Key Difference |
|---|---|---|---|---|
| Blooming Onion | Whole onion cut into connected petals | Deep-fried with breading | Crispy outside, tender inside | Entire onion cooked as single unit; sculptural form |
| Onion Rings | Sliced rounds, separate pieces | Deep-fried with breading | Uniform crunch throughout | No structural connection; simpler prep |
| French Fried Onions | Thin shredded strips | Deep-fried, unbreaded or lightly coated | Light, airy, very crisp | Used as garnish; not a main item |
| Zucchini Blossoms | Whole flowers, often stuffed | Deep-fried with light batter | Delicate, floral, tender | Vegetable flower vs. bulb; seasonal availability |
Practical Tips & FAQs
Q: Can I prepare a blooming onion ahead of time?
A: Partial prep is possible. You can cut and soak the onion up to 2 hours in advance and store it submerged in ice water in the refrigerator. However, breading should occur no more than 15 minutes before frying to prevent sogginess. Fully assembled onions cannot be stored safely before cooking.
Q: What oil is best for frying?
A: Choose oils with high smoke points (above 400°F) and neutral flavors. Peanut oil is ideal for its crisp finish and thermal stability. Alternatives include canola, sunflower, or refined avocado oil. Avoid olive oil or butter, which burn easily.
Q: Why did my blooming onion fall apart during frying?
A: Common causes include cutting too deeply (severing the root), insufficient drying after soaking, or disturbing the onion too much during frying. Ensure the root remains intact and handle gently with utensils.
Q: How do I keep it crispy?
A: Serve immediately. If transporting, place on a ventilated container (not sealed) and use a heat pack. Reheating in a conventional oven or air fryer at 350°F for 3–5 minutes may restore some crispness, but never achieves original quality.
Q: Are there healthier alternatives?
A: Yes. Air frying reduces oil usage by up to 80%. Alternatively, use whole-wheat panko and egg whites for lighter nutrition. However, accept that texture will differ from traditional deep-fried versions.
Q: What sauces pair well?
A: Classic choices include:
- Blooming Onion Sauce: Mayonnaise, ketchup, minced garlic, lemon juice, Worcestershire, dash of hot sauce.
- Chipotle Ranch: Buttermilk ranch with pureed chipotle in adobo.
- Lemon Aioli: Garlic-infused mayonnaise with lemon zest and juice.
- Yogurt-Dill Dip: Greek yogurt, fresh dill, garlic, lemon, salt.
Storage Note: Leftover sauce can be refrigerated in an airtight container for up to 5 days. Do not store fried onions—they degrade rapidly in texture and safety.
Summary & Key Takeaways
Creating a blooming onion at home is a rewarding culinary challenge that blends artistry and technique. Success depends on selecting the right onion, precise cutting, thorough drying, proper breading, and maintaining accurate frying temperatures. Unlike restaurant versions, homemade iterations allow full control over ingredients, seasoning, and oil quality, resulting in a fresher, more personalized appetizer.
Key takeaways:
- Use a large sweet or yellow onion and preserve the root to maintain structure.
- Soak in ice water for 30–60 minutes to encourage blooming.
- Dry thoroughly before breading to ensure adhesion and reduce splatter.
- Maintain oil at 350°F using a thermometer for consistent results.
- Serve immediately with a complementary dipping sauce for peak enjoyment.
Ready to impress guests or elevate your weekend cooking? Try making a blooming onion with a custom spice blend and signature dipping sauce—your next dinner party just got its star appetizer.


 浙公网安备
33010002000092号
浙公网安备
33010002000092号 浙B2-20120091-4
Comments
No comments yet. Why don't you start the discussion?