
A gallery wall is more than just a collection of framed art—it’s a visual narrative that reflects personality, memory, and taste. When done well, a gallery wall can transform an empty hallway or blank living room wall into a curated focal point. But what if your frames don’t match? What if they’re inherited, collected over time, or sourced from different eras and styles? The good news: mismatched frames aren’t a flaw—they’re an opportunity.
The key to styling mismatched frames lies not in uniformity, but in cohesion. With thoughtful selection, intentional arrangement, and attention to balance, you can turn a diverse set of frames into a dynamic and harmonious display. This guide walks through the principles and practical steps for creating a gallery wall that feels both eclectic and intentional.
Understand the Difference Between Cohesion and Uniformity
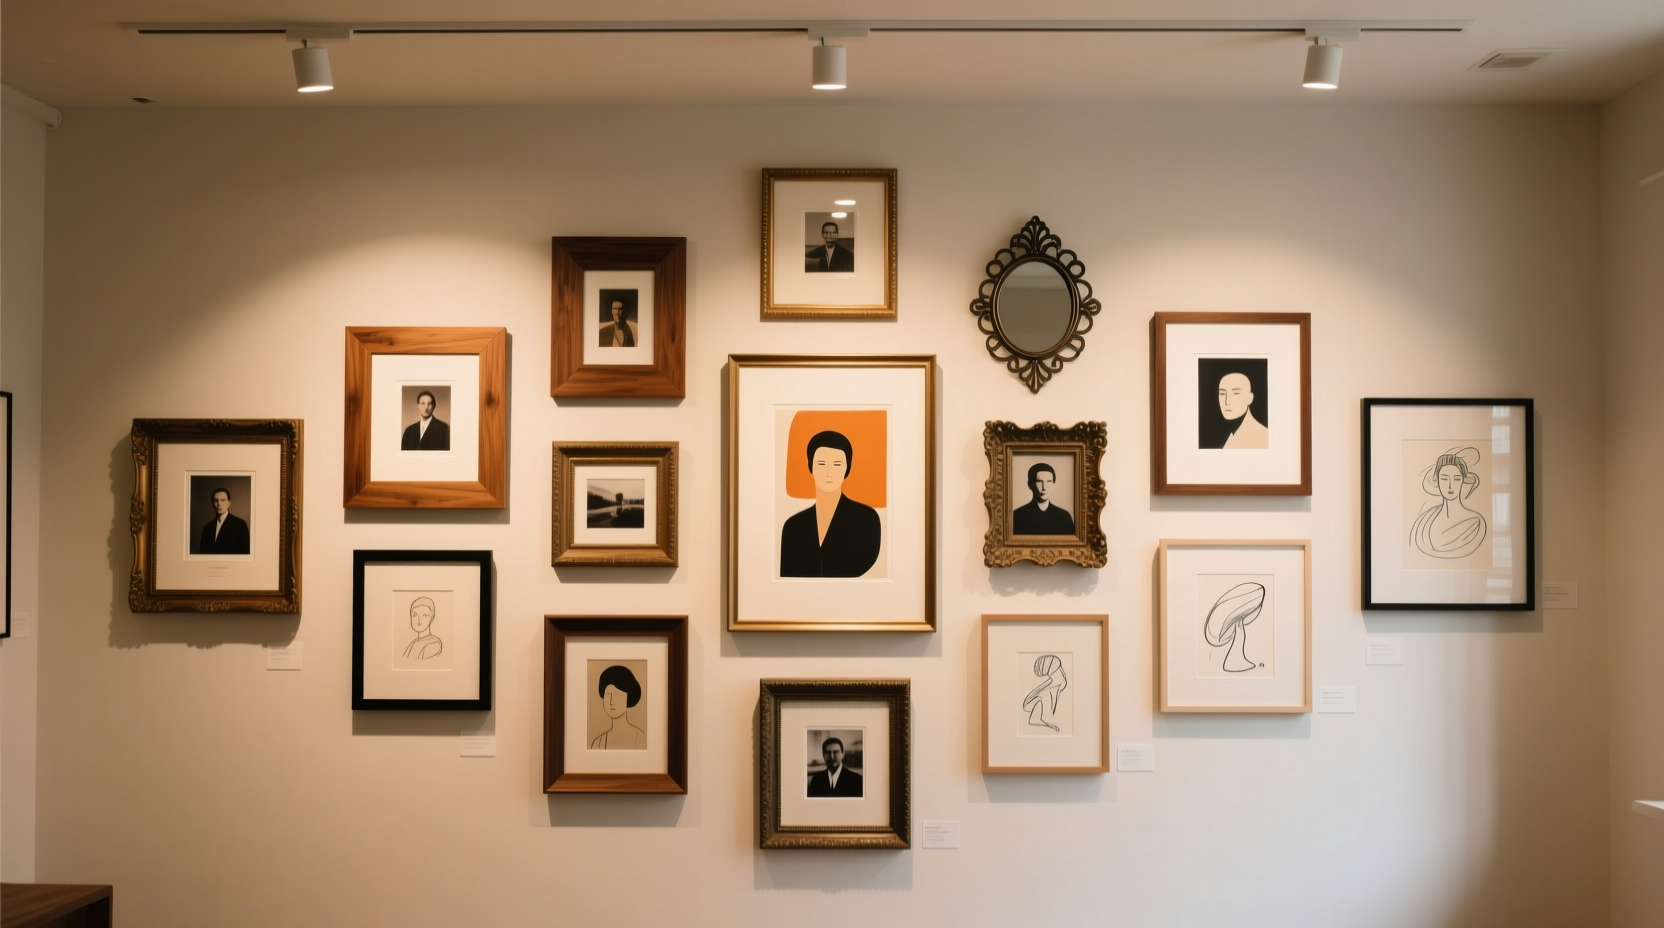
Many people assume a stylish gallery wall requires matching frames—same color, same size, same material. But this approach often results in a static, predictable look. Mismatched frames introduce rhythm, contrast, and character. The goal isn’t to make everything look the same; it’s to create a sense of belonging among varied elements.
Cohesion comes from shared themes, consistent spacing, deliberate color palettes, or recurring shapes—even when the frames themselves differ. Think of it like an outfit: a navy blazer, white shirt, and olive chinos are all different, but together they form a coordinated ensemble. Your gallery wall should follow the same logic.
“Eclecticism in framing allows for storytelling. Each frame becomes part of a larger emotional and aesthetic journey.” — Lena Torres, Interior Stylist & Gallery Curator
Plan Your Layout Before Hanging Anything
Jumping straight to hammering nails leads to frustration and misaligned clusters. Instead, plan your layout on the floor or use paper templates on the wall. Here’s how:
- Collect all frames and lay them out on the floor. Step back and assess the composition.
- Group by theme or size. You might cluster family photos, travel prints, or abstract art together—even if their frames vary.
- Trace each frame onto kraft paper and label the back with its contents and orientation.
- Tape paper templates to the wall using painter’s tape. Adjust until the spacing and balance feel right.
- Mark nail points on the templates, then remove them before installing hardware.
This method eliminates guesswork and protects your walls from unnecessary holes. It also gives you freedom to experiment without commitment.
Recommended Spacing Guidelines
Consistent spacing between frames creates visual order. For most gallery walls, maintain 2 to 3 inches between each frame edge. Larger walls or high-ceiling spaces may accommodate up to 4 inches, while tighter groupings (like a salon-style cluster) work best at 2-inch intervals.
| Wall Size | Frame Count | Spacing | Center Height |
|---|---|---|---|
| Small (3–5 ft wide) | 3–5 frames | 2 inches | 57–60 inches from floor |
| Medium (6–8 ft wide) | 6–9 frames | 2–3 inches | 57–60 inches from floor |
| Large (9+ ft wide) | 10+ frames | 3–4 inches | 57–60 inches from floor |
Balance Visual Weight Across the Composition
Visual weight refers to how much attention an element draws. A large black frame carries more weight than a small silver one, even if they contain similar images. To avoid a lopsided look, distribute heavier pieces evenly throughout the layout.
Use these strategies to achieve balance:
- Alternate sizes: Place a large frame next to two smaller ones to balance the area.
- Distribute dark frames: Avoid clustering all dark or metallic frames in one corner.
- Mix orientations: Combine vertical and horizontal pieces to add rhythm.
- Incorporate negative space: Let breathing room around certain frames highlight their importance.
Think of your gallery wall like a scale: if one side feels “heavier,” adjust by adding a bold piece or repositioning existing frames.
Real Example: The Entryway Transformation
Sophie, a graphic designer in Portland, inherited a mix of frames from her grandmother—ornate gold, simple black, and rustic wood—but struggled to hang them together. She grouped the pieces by color tone: warm-toned photos in gold and wood frames on the left, cooler monochrome prints in black frames on the right. She anchored the arrangement with a large central photograph in a vintage brass frame and flanked it with smaller mismatched pieces spaced 2.5 inches apart. The result was balanced, personal, and surprisingly elegant—a welcoming first impression for guests.
Create Unity Through Thematic or Color-Based Grouping
When frames vary widely, unity must come from elsewhere. Two of the most effective unifiers are theme and color.
Theme-Based Grouping
Organize frames by subject matter:
- Family portraits
- Travel snapshots
- Botanical prints
- Children’s artwork
Even with mismatched frames, grouping similar themes creates instant coherence. Labeling each section subtly (e.g., with a small engraved plaque) can enhance the storytelling aspect.
Color as a Unifier
If your images span different subjects, use color to tie them together. For example:
- Select only frames with warm undertones (gold, walnut, bronze).
- Mat all pieces in the same shade (e.g., cream, charcoal, or sage green).
- Edit photos to share a common filter or tone (e.g., sepia, black-and-white, or muted pastels).
This doesn’t mean altering the authenticity of your images—just enhancing their harmony within the collective display.
“Color consistency across disparate frames acts like a silent thread—it holds the chaos together without being obvious.” — Marcus Lee, Exhibition Designer at Modern Frame Co.
Step-by-Step Guide to Installing Your Mismatched Gallery Wall
Follow this timeline to install your gallery wall confidently and efficiently:
- Week 1: Gather and Assess
Collect all frames, clean glass, replace damaged backing, and verify hanging hardware is secure. - Week 2: Design the Layout
Use paper templates to map the wall arrangement. Take photos of different configurations to compare. - Day of Installation: Prep Tools
Gather level, measuring tape, pencil, hammer, picture hooks, and a helper (for large walls). - Install Anchors or Hooks
Based on template markings, install appropriate hangers—use wall anchors for heavy frames. - Hang Frames in Sequence
Start from the center and work outward. Double-check alignment with a level. - Final Review
Step back several feet. Adjust any frame that feels off-balance or misaligned.
Allow 3–4 hours for a medium-sized wall. Rushing increases the risk of errors and crooked lines.
Do’s and Don’ts of Styling Mismatched Frames
| Do’s | Don’ts |
|---|---|
| Choose a dominant frame style to act as the anchor (e.g., mostly black with a few wood accents) | Use too many ornate or busy frames—this creates visual clutter |
| Stick to a consistent mat width (e.g., 2 inches) across all pieces | Place all large frames at the top or bottom—this unbalances the eye |
| Include non-frame elements like mirrors, shelves, or small sculptures | Ignore wall architecture—avoid placing frames over switches, vents, or crown molding |
| Update the wall seasonally with swap-in art or photos | Hang frames too high—always center at eye level |
Frequently Asked Questions
Can I mix metal and wooden frames in the same gallery wall?
Yes—metal and wood can coexist beautifully if they share a common tone. For example, pair warm brass with walnut, or cool silver with ash wood. Avoid mixing warm and cool finishes unless intentionally contrasting them in a balanced way.
How do I keep a gallery wall from looking chaotic?
Control chaos with structure: maintain consistent spacing, limit the number of frame styles (3–4 max), and use a unifying factor like color, theme, or matting. Also, avoid overcrowding—leave space for the eye to rest.
What if I don’t have enough art to fill a large wall?
You don’t need to cover every inch. Use a central cluster of mismatched frames surrounded by negative space. Alternatively, incorporate oversized single pieces, mirrors, or textured wall objects (like woven baskets or plates) to complement framed items without overwhelming the wall.
Checklist: Creating a Stylish Mismatched Gallery Wall
- ☐ Collect all frames and assess condition
- ☐ Define a unifying theme, color, or frame finish
- ☐ Measure wall space and determine center point
- ☐ Create paper templates of each frame
- ☐ Arrange templates on the wall using consistent spacing
- ☐ Mark hook positions and install hardware
- ☐ Hang frames starting from the center
- ☐ Step back and evaluate balance and alignment
- ☐ Make final adjustments as needed
- ☐ Document the layout for future reference or reassembly
Conclusion: Turn Eclecticism Into Elegance
A gallery wall made of mismatched frames isn’t a compromise—it’s a celebration of individuality. When approached with intention, such a display becomes more authentic and expressive than any perfectly matched set. The beauty lies in the imperfections, the history behind each frame, and the story they tell together.
Whether you’re working with heirlooms, thrift-store finds, or a lifetime of collected memories, you now have the tools to arrange them with confidence and style. Start small, plan thoroughly, and trust your eye. Your wall doesn’t need perfection—it needs personality.


 浙公网安备
33010002000092号
浙公网安备
33010002000092号 浙B2-20120091-4
Comments
No comments yet. Why don't you start the discussion?