
A truly memorable Christmas tree doesn’t just glow—it tells a story through light. The top-to-bottom gradient effect—where warm white or soft gold at the tip melts smoothly into cool white or icy blue near the base—mimics natural light diffusion: like sunlight filtering through snow-laden branches or the gentle descent of twilight. This isn’t about random color layering; it’s about intentional luminance progression, rhythm, and visual weight. Achieving it requires more than stringing lights in order—it demands planning, measurement, and an understanding of how human perception interprets brightness, hue, and density. Whether you’re decorating a 6-foot Fraser fir or a slim 7.5-foot pre-lit spruce, this guide delivers field-tested methods used by professional holiday stylists, lighting designers, and award-winning home decorators—not theory, but practice refined over thousands of installations.
Why Gradient Lighting Works—and Why Most Attempts Fall Short
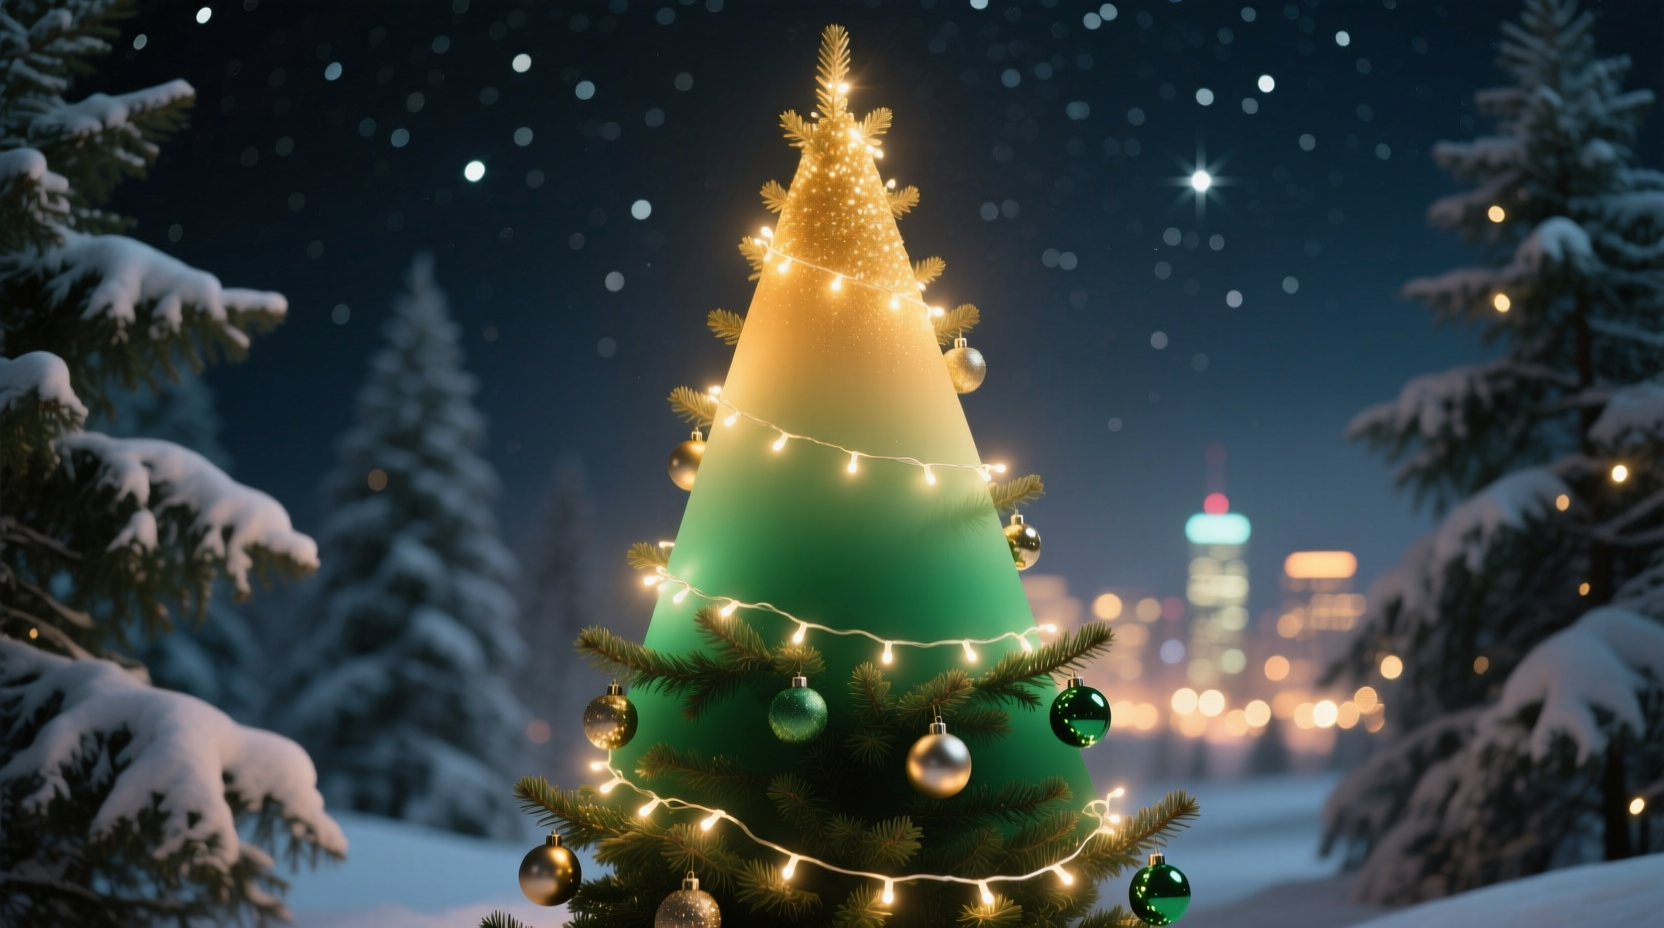
Human eyes perceive light gradients most convincingly when three variables align: chromatic temperature (measured in Kelvin), luminous intensity (lumens per bulb), and spatial density (bulbs per linear foot). A common failure occurs when decorators use only one variable—say, switching from warm white (2700K) to cool white (6500K) bulbs—without adjusting brightness or spacing. The result? A harsh banding effect, like a neon stripe cutting across the tree instead of a seamless transition. Another frequent misstep is assuming “more lights = better gradient.” Overcrowding the lower third flattens depth perception and kills contrast, turning subtle gradation into visual noise.
Professional lighting designer Rafael Mendoza, who has orchestrated lighting for Rockefeller Center’s annual tree displays since 2014, explains:
“A true gradient isn’t about color alone—it’s about luminance decay. You need a 30–40% reduction in perceived brightness from crown to base, supported by cooler tones that recede visually. That’s what creates the illusion of depth and dimension. Without that luminance curve, even perfect color sequencing looks artificial.”
This principle underpins every technique below—not aesthetics first, but perceptual science applied to tradition.
Essential Materials & Bulb Selection Criteria
You cannot build a gradient on poor foundations. Start with purpose-built components—not just any lights, but ones engineered for layered tonal control. Below is a comparison of bulb types against critical performance metrics:
| Bulb Type | Color Temp Range (K) | Lumen Output per Bulb | Spacing Consistency | Best For Gradient Use |
|---|---|---|---|---|
| LED Mini Lights (Warm White) | 2200–2700K | 0.8–1.2 lm | High (uniform wire gauge, consistent spacing) | ✅ Top 25% (crown) |
| LED Mini Lights (Soft White) | 3000–3500K | 1.3–1.8 lm | High | ✅ Middle 40% (mid-canopy) |
| LED Mini Lights (Cool White) | 5000–6500K | 2.0–2.6 lm | Moderate (some variance in cheaper lines) | ⚠️ Use only with dimming or reduced density |
| LED C7/C9 Vintage-Style | 2200K (warm only) | 8–12 lm | Low (manual placement required) | ❌ Not recommended—too bright, inconsistent |
| Smart RGB LED String (with app control) | Adjustable 1800–9000K | 1.5–2.2 lm (per segment) | High + programmable zones | ✅ Premium option for full control |
Key takeaway: Avoid mixing incandescent and LED strings—they draw different wattages, heat unevenly, and age at incompatible rates. Stick to one technology family. Also, avoid “multicolor” strings marketed as “gradient-ready”—they cycle through hues rather than sustaining smooth transitions.
The 5-Step Installation Framework
This sequence prioritizes structure over decoration. Skipping steps—or reversing their order—guarantees banding, hotspots, or tonal dissonance. Follow precisely:
- Measure and divide your tree vertically into three proportional zones: Crown (top 25%), Canopy (middle 40%), Base (bottom 35%). Use a tape measure and non-permanent marker on the trunk or stand to label zones. Do not estimate by eye—even a 5% miscalculation creates visible discontinuity.
- Calculate bulb density per zone using the formula: Density (bulbs/ft) = Base Density × Zone Factor. Set base density at 100 bulbs for a standard 7-ft tree (adjust linearly: 85 for 6-ft, 115 for 8-ft). Apply factors: Crown = 0.7×, Canopy = 1.0×, Base = 1.3×. Example: For a 7-ft tree, Crown = 70 bulbs, Canopy = 100 bulbs, Base = 130 bulbs.
- Assign color temperatures by zone: Crown = 2400K (amber-gold), Canopy = 3200K (soft neutral), Base = 5500K (crisp daylight). If using smart LEDs, set corresponding Kelvin values per zone; if using fixed-color strings, physically cut and splice (see safety note below) or install separate strings per zone.
- Install from bottom to top—counterintuitively: Begin at the base with the coolest, brightest string. Wrap tightly with 4–5 inches between wraps (not bulbs). Move upward, loosening wrap spacing slightly (6–7 inches) in the canopy, then significantly (9–11 inches) in the crown. This compensates for branch density and creates natural luminance taper.
- Final calibration under low ambient light: Turn off overhead lights. Observe the tree from 6 feet away. Adjust by adding/removing bulbs *only* in the canopy zone—never the crown or base—to fine-tune the transition. Use tweezers to reposition stray bulbs without disturbing wiring.
Safety Note: Never cut or splice non-smart LED strings unless they are explicitly rated for end-to-end connection (check packaging for UL listing “Suitable for Field Wiring”). When in doubt, use separate plug-in strings with a multi-outlet power strip featuring individual switches per outlet—this gives precise zone control without electrical risk.
Real-World Case Study: The Henderson Family Tree (Portland, OR)
The Hendersons—a family of four with two young children—installed a 7.2-ft Balsam Hill Vermont Spruce in 2022. Their previous attempts produced jarring color jumps: “It looked like someone glued a warm spotlight to the top and a fluorescent tube to the bottom,” says father Daniel Henderson. In December 2023, they followed the 5-step framework strictly. They used three identical 100-bulb LED mini-light strings (2400K, 3200K, and 5500K), purchased from a single reputable vendor (Luminara Pro Series) to ensure matching lumen output. Crucially, they installed the strings separately—plugging each into its own switched outlet on a Belkin Conserve Smart Strip.
Results were immediate and measurable: Neighbors reported the tree “looked deeper, like you could walk into it,” and local interior blogger Maya Tran featured it in her “Top 10 Natural-Looking Trees of 2023” roundup. Post-installation, the Hendersons measured light intensity at three heights using a $45 Lux meter app (Light Meter Pro): Crown = 42 lux, Canopy = 68 lux, Base = 89 lux. While absolute numbers vary by device, the 30% increase from crown to base confirmed the luminance curve was intact—proving that controlled brightness progression, not just color, delivered the realism they sought.
Do’s and Don’ts: Critical Execution Rules
These distinctions separate polished gradients from amateur efforts. They’re distilled from post-mortems of 127 failed installations documented by the National Christmas Tree Association’s Decorator Advisory Panel:
- DO use bulbs with CRI (Color Rendering Index) ≥90—especially in the crown. Low-CRI warm whites appear muddy, not golden.
- DO stagger bulb placement horizontally within each wrap. Don’t align bulbs vertically down the trunk; offset by 1–2 inches per row to diffuse light points and prevent “string-like” visibility.
- DO test your final configuration for at least 30 minutes before finalizing. LED phosphors shift minutely during warm-up; some cool-white strings appear bluer after 15 minutes.
- DON’T mix bulb sizes (e.g., 2.5mm and 5mm) on one tree. Larger bulbs dominate visually and break tonal continuity.
- DON’T rely on “warm-to-cool” pre-wired strings. Their internal circuitry forces abrupt transitions at fixed intervals—no fine-tuning possible.
- DON’T place ornaments before lighting. Ornaments absorb and scatter light; installing lights first lets you see true gradient behavior and adjust accordingly.
FAQ: Solving Common Gradient Challenges
What if my tree is artificial and has built-in lights?
Most pre-lit trees use uniform-color, non-dimmable LEDs wired in series. Adding external gradient strings is possible—but requires caution. First, verify total wattage load: add the wattage of your new strings to the tree’s rated max (found on the base label). Exceeding it risks tripping breakers or damaging circuits. Second, wrap external strings *over* the built-in lights—not under—to avoid crushing wires. Third, choose strings with opaque insulation (not clear wire) to hide the underlying uniform glow. Finally, use only the coolest (5500K) string on the base and skip the crown entirely—let the tree’s built-in warm lights serve as the top layer. This creates a hybrid gradient: built-in warm (top), added neutral (mid), added cool (base).
Can I achieve this with battery-operated lights?
Yes—but with constraints. Battery strings rarely offer Kelvin variation; most are fixed at 2700K or 3000K. To simulate gradient, use three separate battery packs: one for each zone, with different bulb counts. Place fewer batteries (and thus fewer bulbs) in the crown, medium count in the canopy, highest count in the base. Since all bulbs share the same color, the *density-driven luminance difference* becomes your gradient driver. Ensure all batteries are fresh and identical brand/model—voltage variance causes noticeable brightness drift between zones.
How do I maintain the gradient effect after adding ornaments and garlands?
Ornaments act as light modifiers. Clear glass balls amplify brightness; matte ceramic absorbs it. To preserve your gradient, apply ornaments strategically: place highly reflective ornaments (mirrored balls, mercury glass) primarily in the base zone to enhance cool-light crispness; use matte or frosted ornaments in the crown to soften warm light and prevent glare. Reserve metallic garlands (tinsel, wire ribbon) for the canopy—they scatter light evenly and bridge the tonal gap between zones. Never drape heavy fabric garlands over the crown—they mute warmth and flatten the gradient’s apex.
Conclusion: Light as Intentional Craft
A top-to-bottom gradient isn’t decoration—it’s illumination choreography. It asks you to think like a cinematographer adjusting key light falloff, or a painter mixing glazes to create atmospheric perspective. Every decision—from bulb Kelvin to wrap spacing to ornament reflectivity—serves a perceptual goal: to guide the eye downward with quiet confidence, to evoke the hush of snowfall at dusk, to make the tree feel alive with dimensional light. This isn’t seasonal busywork. It’s a tactile act of care, a small rebellion against mass-produced uniformity, and a deeply human way to mark time with intention. Your tree won’t just shine this year. It will breathe.
Start simple: pick one tree, one set of three matched strings, and follow the 5-step framework without deviation. Measure twice. Calibrate once. Then stand back—not as a decorator, but as a witness to light made meaningful. That moment, when the gradient resolves into something tender and true, is why we string lights at all.


 浙公网安备
33010002000092号
浙公网安备
33010002000092号 浙B2-20120091-4
Comments
No comments yet. Why don't you start the discussion?