
Creating a gradient effect with strands of colored lights transforms ordinary lighting into an immersive visual experience. Whether you're decorating for a holiday, setting up ambient lighting in a room, or designing a stage backdrop, a smooth color transition can elevate the mood and aesthetic of any space. Unlike single-color strings or random color patterns, a well-executed gradient flows seamlessly from one hue to the next—think sunset tones melting from deep red to soft orange, or ocean shades fading from navy to aqua.
The key lies not just in choosing the right colors but in understanding how light behaves, how human perception interprets color transitions, and how to physically arrange multiple strands to achieve continuity. With thoughtful planning and attention to detail, even basic LED string lights can produce professional-grade results.
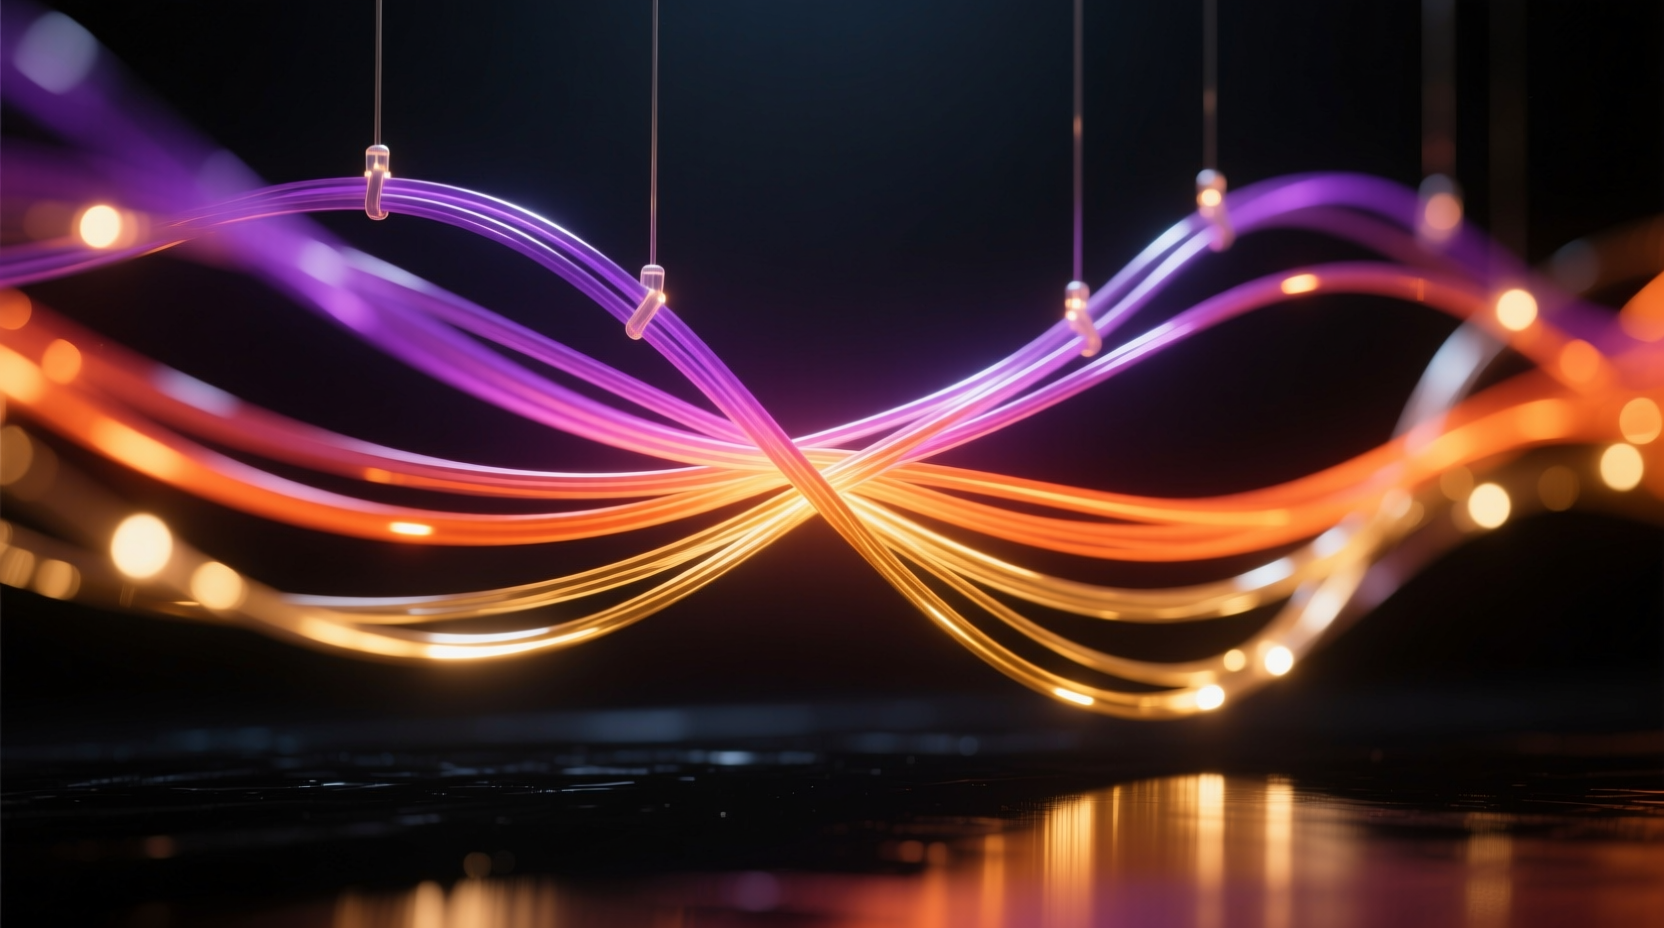
Understanding Color Theory for Light Gradients
Before plugging in the first strand, it's essential to understand how colors interact when emitted as light. Unlike paint, which absorbs wavelengths, light is additive—meaning colors combine to form brighter hues. This changes how gradients work: blending red and green light produces yellow, not a muddy brown.
To build a convincing gradient, select a color family and identify its progression. For example:
- Sunset Gradient: Deep red → crimson → orange → amber → soft white
- Ocean Gradient: Navy blue → royal blue → sky blue → pale aqua → white
- Purple Dream: Magenta → violet → lavender → soft pink → warm white
Use a digital color picker tool or a color wheel app to sample exact hex codes or RGB values that represent smooth transitions. Aim for no more than 5–7 distinct colors in your sequence to maintain clarity without overwhelming the eye.
“Light gradients succeed when they mimic natural transitions—sunrises, skies, water reflections. The brain recognizes these patterns and perceives them as harmonious.” — Lena Reyes, Lighting Designer & Architectural Visual Artist
Choosing the Right Lights and Equipment
Not all string lights are suitable for gradient effects. Consider these factors when selecting your materials:
- Color Consistency: Each bulb in a strand should emit the same hue. Avoid cheap sets where LEDs vary slightly in tint.
- Bulb Spacing: Uniform spacing (typically 4–12 inches apart) ensures even distribution of color across the gradient.
- Power Source: Battery-operated lights may dim over time, disrupting the gradient. Plug-in strands provide consistent brightness.
- Dimmability: Dimmable LEDs allow fine-tuning of intensity, helping blend adjacent colors smoothly.
- Flexibility: Choose wire types that can be bent or shaped without breaking, especially if wrapping around objects.
Recommended Types of Lights
| Type | Best For | Limitations |
|---|---|---|
| RGB LED Strips (Cuttable) | Precise gradients, indoor installations | Require controller; less durable outdoors |
| Fixed-Color String Lights (Mini Bulbs) | Outdoor displays, curtain effects | Limited to preset colors |
| Smart Color-Changing Lights | Dynamic gradients, reprogrammable setups | Higher cost; complex setup |
| Fairy Lights with Warm Base | Soft pastel gradients, bedroom decor | Lower brightness; shorter runs |
Step-by-Step Guide to Building Your Gradient Display
Follow this structured process to install a seamless multi-strand gradient. This method works whether you're hanging lights vertically, draping them horizontally, or arranging them in a wave pattern.
- Plan Your Layout
Sketch your intended display area—wall, ceiling, staircase, etc. Mark where each color will begin and end. Use painter’s tape to label zones on the wall if needed. - Select and Label Strands
Pick out your colored strands according to the gradient order. Label each with a small tag (e.g., “Red,” “Orange”) to avoid confusion during setup. - Test Brightness Levels
Turn on all strands side by side. If some appear brighter than others, adjust distance from viewing point or use diffusers (like tracing paper sleeves) to balance output. - Anchor the First Strand
Begin with the darkest or most intense color at one end. Secure it firmly using clips or adhesive hooks. Do not stretch tightly—allow slight sag for a natural drape. - Connect Adjacent Colors
Place the next strand directly beside or overlapping slightly with the previous one. Overlapping by 6–12 inches helps blend the transition zone. - Minimize Gaps Between Strands
If there’s a physical gap between the end of one strand and the start of the next, the gradient will break visually. Either choose longer strands or use extension wires to close the space. - Adjust Viewing Distance
Stand back at normal viewing distance (6–10 feet). Look for harsh edges or sudden jumps in color. Reposition strands as needed to soften transitions. - Secure All Wires Neatly
Use zip ties or cord channels to keep power cords organized. Tangled wires distract from the visual flow of the gradient.
Real-World Example: A Backyard Wedding Arch
Jamie was tasked with decorating a wooden arch for her sister’s evening wedding reception. She wanted a romantic, ethereal look using only string lights—no flowers. Her solution: a vertical gradient running down both sides of the arch.
She selected six strands: magenta, deep purple, medium purple, lavender, blush pink, and warm white. Starting at the top of each post, she hung the magenta strand, then layered each subsequent color below it, allowing about 8 inches of overlap between each. By staggering the connections so they weren’t aligned on both sides, she avoided visible breaks.
The result? Guests described the arch as “glowing like twilight” and “softly pulsing with emotion.” The gradient created depth and warmth, drawing eyes upward while framing the couple perfectly. Jamie later noted that testing the layout on the ground first saved hours of adjustment during final installation.
Pro Tips for Seamless Transitions
Achieving a flawless gradient isn’t just about color order—it’s also about execution. These advanced techniques help eliminate common pitfalls.
- Mix Warm and Cool Whites Strategically: Cool white mimics daylight and enhances blues; warm white adds glow to reds and oranges. Use them as bookends or bridges between saturated hues.
- Use Diffusion Materials: Sheer fabric, rice paper lanterns, or acrylic tubes placed over strands soften individual bulbs, turning discrete points into continuous ribbons of light.
- Layer Multiple Planes: Install two layers—one behind the other—to create depth. Slightly offsetting the rear layer blurs hard edges and enriches the gradient effect.
- Control Ambient Light: Turn off overhead lights or use blackout curtains. Competing light sources wash out subtle color shifts.
- Consider Motion: If viewers will walk past the display, test the gradient from multiple angles. Some transitions may look smooth head-on but jagged from the side.
Checklist: Pre-Installation Review
- ☐ Selected 5–7 colors in logical gradient order
- ☐ Tested all strands for consistent brightness and color
- ☐ Measured total length needed vs. available strand lengths
- ☐ Planned overlap zones (6–12 inches between colors)
- ☐ Prepared mounting hardware (hooks, clips, tape)
- ☐ Verified power access and outlet locations
- ☐ Conducted dry run on floor or mock surface
Troubleshooting Common Issues
Even careful planning can encounter hiccups. Here’s how to fix frequent problems:
- Harsh Color Jumps: Insert a transitional strand (e.g., rose gold between red and orange) or increase overlap between existing strands.
- Uneven Brightness: Replace older strands showing dimming. Alternatively, move brighter strands further from the viewer or add translucent covers.
- Gaps in the Line: Use compatible extension cords or purchase additional short strands in neutral tones (white or clear) to fill spaces invisibly.
- Crowded Connection Points: Distribute plug locations across different outlets. Use a surge protector with spaced-out ports to prevent clumping.
- Flickering or Failure: Check for loose bulbs, damaged wires, or overloaded circuits. Never daisy-chain more than three strands unless rated for it.
Frequently Asked Questions
Can I mix different brands of string lights in one gradient?
Yes, but with caution. Different manufacturers may produce slightly different shades of the same named color (e.g., “blue” can range from icy to cobalt). Always test side by side before installing. Stick to one brand if possible for consistency.
How do I make a gradient with smart lights that change color?
Program each segment of the smart strip to display a fixed color in gradient order. Use apps like Philips Hue, LIFX, or Wiz to assign specific hues to zones. Set transitions to “instant” rather than “fade” to preserve sharp boundaries within the gradient flow.
Is it possible to create a circular gradient?
Absolutely. Arrange strands in a loop—such as around a mirror or ceiling perimeter—starting with red, moving through yellow, green, blue, and back to red. Ensure the final connection visually matches the start by using intermediate tones or masking the junction with décor.
Final Thoughts and Creative Inspiration
A gradient made from colored light strands is more than decoration—it’s an emotional cue. It guides attention, sets rhythm, and evokes nature’s most beautiful moments. From holiday mantels to retail window displays, the technique applies widely and scales easily.
Don’t limit yourself to traditional rainbows. Try monochromatic gradients (different saturations of one hue), temperature-based shifts (cool blue to warm amber), or even abstract sequences inspired by art or music. The only rule is continuity: every step in the progression should feel inevitable, like notes in a melody.
With patience and precision, your gradient won’t just catch the eye—it will hold it, inviting people to pause, admire, and feel something deeper than what simple lights usually offer.


 浙公网安备
33010002000092号
浙公网安备
33010002000092号 浙B2-20120091-4
Comments
No comments yet. Why don't you start the discussion?