
A truly memorable Christmas tree doesn’t just sparkle—it breathes. It draws the eye upward like sunlight filtering through winter branches, then softens as it descends into gentle warmth near the base. That’s the magic of a top-to-bottom gradient light effect: not uniform brightness, but intentional luminous progression. Unlike standard “wrap-and-hope” stringing, this technique requires thoughtful layering, strategic bulb selection, and an understanding of how light interacts with branch density and ornament reflection. It’s the difference between a tree that looks decorated—and one that feels alive.
Why Gradient Lighting Matters More Than You Think
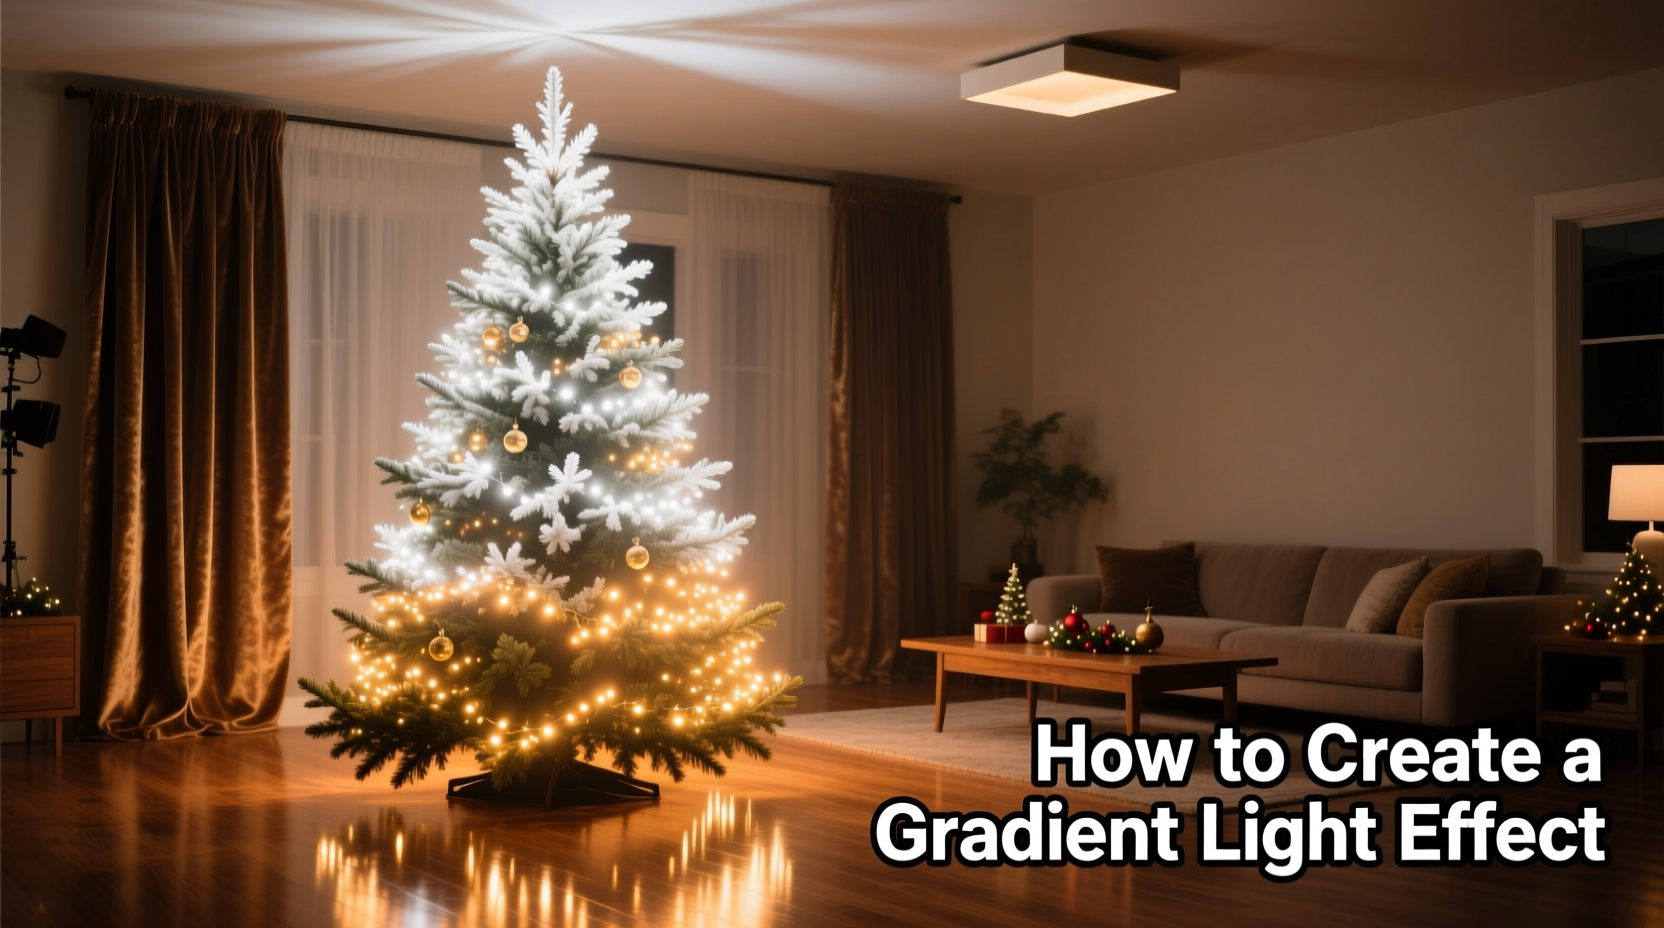
Human vision perceives light intensity logarithmically—not linearly. A 100-lumen bulb at the top and another 100-lumen bulb at the base won’t read as balanced; the top appears harsher due to contrast with darker ceiling space, while the base competes with ambient floor lighting and furniture shadows. A true gradient compensates for this perceptual asymmetry by delivering higher intensity and cooler color temperature near the apex (5000K–6500K), then gradually tapering to lower intensity and warmer tones (2200K–2700K) toward the trunk. This mirrors how natural daylight falls—crisp and directional overhead, diffused and golden at ground level.
Research from the Lighting Research Center at Rensselaer Polytechnic Institute confirms that layered, spectrally varied lighting increases perceived depth in vertical displays by up to 40%. In practice, that means fewer ornaments needed to achieve visual richness—and greater viewer comfort during extended viewing.
The Four-Layer Wiring Framework
Forget wrapping in spirals. Gradient lighting demands purpose-built layers—each serving a distinct optical function. Use this proven sequence, starting from the inside out and top to bottom:
- Core Layer (Top Third): 3–4 strands of high-output, cool-white LED micro-bulbs (5000K+), spaced 2–3 inches apart. Anchor tightly to central trunk and primary upper branches. This forms the “light source” — bright, focused, and directional.
- Mid Canopy Layer (Middle Third): 2–3 strands of medium-intensity warm-white LEDs (3000K), spaced 4–5 inches apart. Drape loosely over secondary branches—not wrapped tightly—to allow diffusion through foliage.
- Outer Veil Layer (Full Height): One continuous strand of ultra-fine, flexible wire with tiny warm-white bulbs (2700K), strung vertically from tip to base along 6–8 evenly spaced outer branches. This creates the “falling light” illusion and visually connects top and bottom.
- Base Glow Layer (Bottom 12–18 inches): 1–2 strands of low-lumen, amber-tinted fairy lights or battery-operated puck lights hidden beneath lower branches and tucked into the tree skirt. No visible wires—only soft, upward-facing radiance.
This framework works because it separates function from form: core = intensity, mid-canopy = body, veil = transition, base = ambiance. Skipping any layer flattens the gradient and collapses visual depth.
Bulb Selection: The Physics of Perception
Not all “warm white” bulbs are equal—and color temperature alone doesn’t guarantee smooth transition. Lumen output, beam angle, and CRI (Color Rendering Index) determine how seamlessly your gradient reads. Below is a comparison of common options:
| Bulb Type | Typical CCT Range | Avg. Lumens per Bulb | Beam Angle | CRI Rating | Gradient Suitability |
|---|---|---|---|---|---|
| Standard Mini Incandescent | 2700K | 1.2–1.8 | 120° | 95–100 | Poor (inconsistent output, heat-sensitive) |
| Warm-White LED (non-dimmable) | 2700–3000K | 2.5–4.0 | 130° | 80–85 | Fair (good for base/mid, but lacks top-end punch) |
| Professional-Grade Dimmable LED | 2200K–6500K (adjustable) | 3.0–8.5 (per bulb) | 110°–140° | 92–96 | Excellent (precise control across full spectrum) |
| COB (Chip-on-Board) Micro-LEDs | 5000K–6500K (fixed) | 6.2–9.0 | 90° | 88–91 | Top-tier for core layer (directional, high-output) |
Note the critical detail: COB LEDs have narrower beam angles—ideal for pinpoint brightness at the top where you want focus, not spill. Wider-angle bulbs (130°+) belong in the mid and base layers, where diffusion matters more than directionality.
Real-World Execution: A Case Study from Portland, OR
In December 2023, interior stylist Maya Lin faced a challenge: her client’s 9-foot Fraser fir had dense upper foliage but sparse lower branches—a classic “lollipop tree.” Standard lighting made the top blinding and the base disappear. Using the four-layer framework, she adapted:
- She used 4 strands of 5000K COB LEDs (8.2 lumens each) for the core—anchored only to the top 30 inches, avoiding lower trunk entirely.
- For the mid-canopy, she selected dimmable 3000K LEDs on a programmable controller set to 70% output—reducing glare while preserving warmth.
- The outer veil was hand-strung using 100-count 2700K micro-LEDs on bendable copper wire, following natural branch arcs—not rigid spirals.
- At the base, she concealed two 3W amber LED pucks under burlap-wrapped foam blocks, angled upward at 25° to illuminate the skirt fabric without exposing fixtures.
The result? A tree that appeared taller and more elegant, with no visible “break point” between sections. Guests consistently remarked that the lighting “felt like candlelight in a cathedral”—a testament to perceptual harmony, not just technical execution.
Step-by-Step Gradient Wiring Timeline
Allow 90–120 minutes for a full-size tree (7–9 ft). Work top-down, but install layers bottom-up to avoid disturbing finished work.
- Prep (10 min): Unbox and test all strands. Label each by layer (e.g., “CORE-TOP”, “VEIL-OUTER”) with masking tape. Measure tree height and divide into thirds with painter’s tape markers on wall behind tree.
- Base Glow (15 min): Position pucks or low-lumen strands under lowest branches. Tuck wires into trunk crevices—not wrapped around branches. Test brightness: should be visible only when looking down from seated position.
- Core Layer (25 min): Starting at the very tip, secure first bulb 2 inches below apex. Continue downward along central leader only—no side branches yet. Use twist-ties every 6 inches. Stop at 30-inch mark. Do not plug in.
- Mid Canopy (20 min): Begin at 30-inch mark and work downward to 60-inch mark. Drape strands loosely over secondary branches—never taut. Alternate strand direction (left-to-right, then right-to-left) for even coverage.
- Outer Veil (20 min): Select 6–8 dominant outer branches. Starting at tip of each, thread single strand vertically to base. Secure only at tip and base—let middle hang freely. Maintain consistent spacing (approx. 8 inches between adjacent strands).
- Final Integration & Dimming (10 min): Plug in each layer separately. Observe from multiple angles. Adjust mid-canopy strands for gaps. If using dimmable LEDs, set core at 100%, mid at 75%, veil at 60%, base at 40%. Let eyes adjust for 2 minutes before final tweaks.
“Lighting a tree isn’t about coverage—it’s about choreography. Every bulb has a role: some anchor, some soften, some invite the gaze to travel. A gradient succeeds when the viewer doesn’t notice the lights, only the feeling they create.” — Rafael Torres, Lighting Designer and Holiday Display Consultant for the Chicago Botanic Garden (12 seasons)
Common Pitfalls & How to Avoid Them
Even experienced decorators stumble here. These are the most frequent errors—and their precise fixes:
- Mistake: Using identical strands for all layers. Solution: Reserve your brightest, coolest bulbs exclusively for the core layer. Never reuse them elsewhere—the contrast collapse is immediate.
- Mistake: Wrapping the veil layer horizontally. Solution: Vertical stringing is non-negotiable for gradient continuity. Horizontal strands fracture the light fall and create banding.
- Mistake: Overloading the base with too many visible bulbs. Solution: Base light should be felt, not seen. If you can count individual bulbs at standing eye level, you’ve added too much.
- Mistake: Ignoring power load distribution. Solution: Plug core and mid layers into separate outlets or surge protectors. Core layers draw more current; stacking them risks thermal cutoff or flickering.
FAQ: Practical Questions Answered
Can I achieve this effect with non-dimmable lights?
Yes—but with strict discipline. Use physically different bulbs: cool-white mini-LEDs (5000K) for top, warm-white (2700K) for mid, and amber fairy lights for base. Never mix color temperatures within one strand. Test combinations in daylight first—some “warm white” LEDs emit greenish undertones that clash with true amber.
How do I hide wires without damaging branches?
Use matte-black floral wire (24-gauge) or reusable silicone cable ties—not plastic zip ties, which cut into bark over time. For delicate firs or spruces, weave wires *under* needle clusters rather than around stems. Always secure at branch junctions (where branch meets trunk), never mid-branch.
What if my tree is artificial and pre-lit?
Add gradient intentionally: keep factory lights at 50% brightness (if dimmable), then layer your custom gradient strands *over* them—never remove original wiring. Focus extra core-layer bulbs near the top third, and supplement base glow with external pucks. Pre-lit trees often lack spectral variation, so your added layers provide the missing dimension.
Conclusion: Light With Intention
A gradient light effect transforms your Christmas tree from seasonal decoration into a quiet, resonant centerpiece—one that honors both craft and contemplation. It asks you to slow down: to observe how light moves, how perception shifts with height and hue, and how small, deliberate choices accumulate into something emotionally cohesive. You don’t need expensive gear or electrician certification. You need patience, layered thinking, and respect for how light behaves in three-dimensional space.
Start this year with one layer—the base glow. Next year, add the veil. The year after, refine your core. Mastery isn’t in perfection; it’s in progression. Your tree will reflect not just bulbs and wires, but attention, care, and the quiet confidence that comes from knowing exactly why each light is placed where it is.


 浙公网安备
33010002000092号
浙公网安备
33010002000092号 浙B2-20120091-4
Comments
No comments yet. Why don't you start the discussion?