
A well-lit Christmas tree can transform a room into a festive sanctuary. But beyond simply wrapping strands around the branches, a deliberate lighting strategy—such as a gradient effect from top to bottom—can elevate your tree from ordinary to extraordinary. This technique mimics natural light transitions, drawing the eye upward and creating depth and warmth. Whether you're aiming for a soft fade from warm white to cool white or a bold shift from red to green, mastering this method brings sophistication to your holiday decor.
The key lies in planning, layering, and understanding how light behaves on different parts of the tree. Unlike random stringing, a gradient requires intentional placement, color coordination, and often multiple sets of lights. When done right, it gives the illusion that light is cascading down like falling snow or glowing up like embers from a hearth. It’s not just about brightness—it’s about storytelling with illumination.
Understanding Gradient Lighting: More Than Just Color
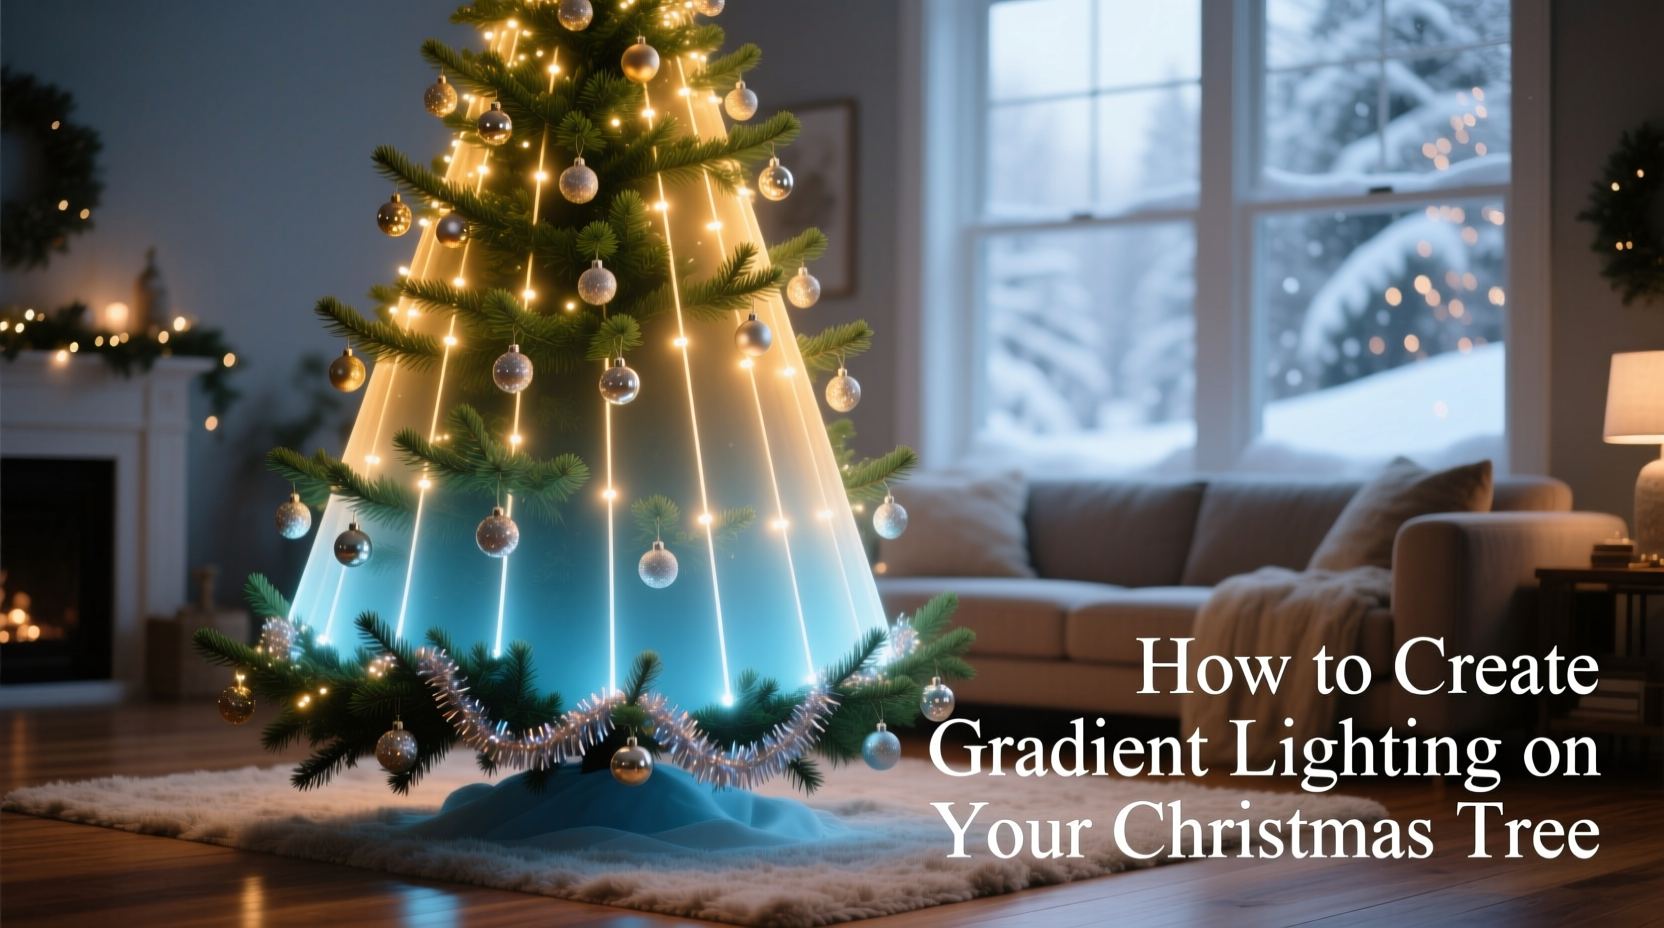
Gradient lighting refers to a gradual transition in color, intensity, or temperature across a surface. In the context of a Christmas tree, this means designing your lights so they change smoothly from the topmost tip to the lowest bough. This can be achieved through:
- Color gradients: Shifting from one hue to another (e.g., gold at the top to deep red at the base).
- Temperature gradients: Moving from warm white (yellowish) at the top to cool white (bluish) at the bottom, or vice versa.
- Brightness gradients: Using dimmer lights at the top and brighter ones below, or fading intensity downward.
Each approach evokes a different mood. A warm-to-cool gradient suggests sunrise or starlight descending; a red-to-green transition feels boldly traditional; a dim-to-bright layout adds drama and focus to lower ornaments.
“Lighting isn’t decoration—it’s atmosphere. A gradient effect turns a tree into a living piece of art.” — Daniel Reyes, Holiday Lighting Designer
Step-by-Step Guide to Building the Gradient Effect
Creating a seamless gradient takes more than draping lights haphazardly. Follow this structured process to ensure professional results.
- Assess your tree size and shape. Measure height and note density. Taller trees need more distinct zones; fuller trees hide wires better but require careful spacing.
- Choose your light type. Use LED string lights for energy efficiency, low heat, and precise color control. Opt for either single-color strings (for manual blending) or programmable RGB strips (for automated gradients).
- Determine your gradient direction. Decide whether light should grow warmer, cooler, brighter, or shift in hue from top to bottom. Sketch a simple plan.
- Divide the tree into three vertical sections: Top (crown), middle (body), and bottom (base). Assign a specific light color or intensity to each.
- Install lights section by section. Start at the top plug-in point and work downward. Wrap lights around the trunk first, then spiral outward along major branches.
- Layer multiple strands. Use separate cords for each zone. Conceal excess wiring within inner branches.
- Blend the transitions. Overlap the last few bulbs of one section with the first few of the next to avoid harsh lines.
- Test and adjust. View the tree from multiple angles in both lit and dark rooms. Fine-tune spacing or swap out bulbs if needed.
For example, if using warm white at the top and cool white at the bottom, place warm LEDs in the upper third, a mix in the middle, and cool whites dominating the lower third. The human eye perceives this as a smooth descent in temperature, like candlelight giving way to moonlight.
Choosing the Right Lights and Tools
Not all Christmas lights are created equal when it comes to gradients. Here’s what to look for:
| Light Type | Best For | Limitations |
|---|---|---|
| Warm White LEDs | Top sections, cozy ambiance | Limited color range |
| Cool White LEDs | Bottom sections, modern look | Can appear sterile if overused |
| Multicolor Fixed Strings | Festive gradients (e.g., red to green) | Less control over individual bulb placement |
| Programmable RGB LEDs | Precise gradients, dynamic effects | Higher cost, steeper learning curve |
| Dimmable Lights | Brightness-based gradients | Requires compatible dimmer switch or controller |
Additional tools that help:
- Zip ties or floral wire – Secure lights without damaging branches.
- Light stakes or clips – Hold strands in place on outer limbs.
- A power strip with surge protector – Safely manage multiple light strings.
- Remote-controlled timers – Automate on/off cycles to preserve bulb life.
Design Strategies for Maximum Impact
A successful gradient doesn't exist in isolation. It interacts with tinsel, ornaments, tree color, and room lighting. Consider these design principles:
Complement, Don’t Compete
If your gradient shifts from gold to crimson, choose ornaments in similar tones. Avoid neon or clashing colors that distract from the light flow. Matte finishes often work better than reflective ones, which can scatter light unpredictably.
Use Depth to Enhance the Illusion
Wrap lights deeper into the tree near the trunk, allowing some bulbs to peek through outer branches. This creates a sense of internal glow, reinforcing the idea that light originates from within and radiates outward.
Balance Light Density
Too many lights in one area disrupts the gradient. As a rule of thumb, use 100 lights per foot of tree height. For a 7-foot tree, that’s roughly 700 bulbs. Distribute them evenly across zones while maintaining the intended color ratio.
Incorporate Secondary Lighting
Add battery-powered fairy lights inside garlands or under ribbon bows to subtly reinforce the gradient. These micro-lights can echo the main color scheme without overwhelming it.
“The best tree lighting feels effortless—but it’s always engineered.” — Lena Choi, Interior Stylist & Seasonal Decor Consultant
Real Example: A Family Living Room Transformation
The Thompson family had used the same pre-lit artificial tree for years, plugging it in and calling it done. Last holiday season, inspired by online displays, they decided to upgrade their setup with a custom gradient. Their 8-foot flocked tree stood in a corner with limited ambient light, making visibility crucial.
They purchased three sets of 300-count warm white LEDs and two sets of cool white. After dividing the tree into thirds, they installed warm whites in the top 3 feet, overlapped both types in the middle 2 feet, and finished with cool whites in the lower 3 feet. They wrapped lights clockwise in spirals, starting at the trunk and moving outward every 6 inches.
The result was striking: from a distance, the tree appeared to glow like a winter lantern, with light gently cooling as it reached the floor. Guests consistently commented on its “professional” appearance. The family now treats the lighting process as part of their annual tradition, involving the kids in testing color blends and adjusting placements.
Checklist: Preparing Your Gradient-Lit Tree
Follow this checklist to ensure no step is missed:
- ☐ Measure tree height and sketch a lighting plan
- ☐ Purchase sufficient LED strings in desired colors/temperatures
- ☐ Test all lights before installation
- ☐ Divide tree into top, middle, and bottom sections
- ☐ Begin wrapping from the top, working downward
- ☐ Overlap color zones slightly for smooth transitions
- ☐ Conceal cords and plugs within inner branches
- ☐ Step back and view from multiple angles
- ☐ Adjust spacing or replace flickering bulbs
- ☐ Add timer for consistent daily operation
Frequently Asked Questions
Can I create a gradient with a pre-lit tree?
Yes, but with limitations. Most pre-lit trees come with uniform lighting. To add a gradient, wrap additional strands over the existing ones, focusing new colors on specific zones. Use removable clips to avoid damage.
How do I prevent my gradient from looking patchy?
Ensure even spacing between bulbs (typically 4–6 inches apart) and maintain consistent spiral direction. Avoid clustering one color too tightly. If using fixed-color strings, blend zones by interweaving ends rather than ending one set abruptly.
Are smart lights worth it for gradient effects?
For complex or changing gradients, yes. Smart LED strings (like Philips Hue or Govee) allow you to program exact color temperatures and fade patterns via an app. You can schedule shifts throughout the evening or sync with music. While more expensive upfront, they offer long-term versatility across seasons.
Final Thoughts: Light With Intention
A Christmas tree lit with a gradient effect does more than illuminate a room—it sets a tone, evokes emotion, and becomes a centerpiece of memory-making. This technique separates thoughtful decorators from those who simply plug in a cord. It requires patience, planning, and a bit of creativity, but the payoff is undeniable.
Every element—from bulb choice to wrapping technique—contributes to the final impression. By treating lighting as a design layer rather than an afterthought, you honor the craftsmanship of the season. Whether you opt for a subtle warmth shift or a vibrant color journey, the goal remains the same: to make the tree feel alive with light.
Start small if needed. Even a two-tone transition between warm white and ivory can make a noticeable difference. As your confidence grows, experiment with dimming curves, motion effects, or seasonal changes. With modern LEDs, your tree can evolve year after year.


 浙公网安备
33010002000092号
浙公网安备
33010002000092号 浙B2-20120091-4
Comments
No comments yet. Why don't you start the discussion?