
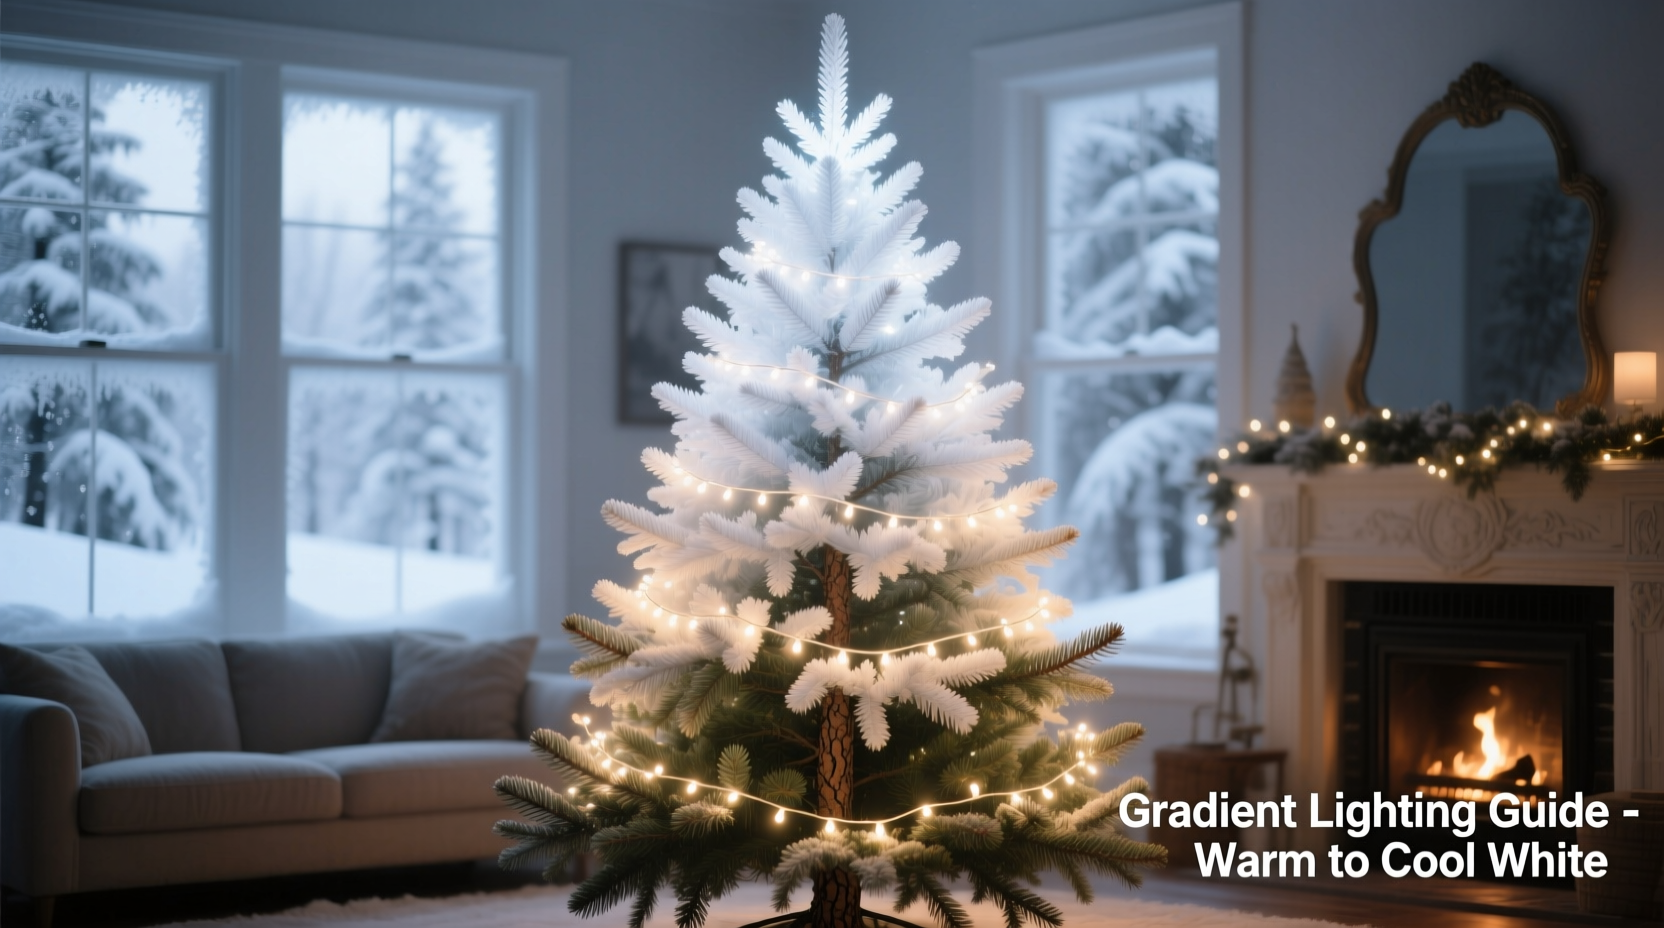
A well-lit Christmas tree does more than illuminate a room—it sets the tone for the entire holiday experience. While traditional string lights serve their purpose, a growing number of decorators are turning to gradient lighting techniques to add depth, dimension, and visual intrigue. By blending warm white and cool white LED lights in a deliberate pattern, you can transform an ordinary tree into a luminous centerpiece that mimics natural light transitions—like sunrise fading into daylight or dusk melting into night.
This technique leverages color temperature contrast to guide the eye and evoke emotion. Warm white (2700K–3000K) offers a cozy, golden glow reminiscent of candlelight, while cool white (5000K–6500K) delivers a crisp, energizing brightness similar to midday sun. When layered correctly, these tones create a dynamic gradient that enhances the tree’s form, highlights ornaments, and adds a modern yet timeless elegance.
Understanding Light Temperature and Its Impact
Before arranging lights, it's essential to understand what \"warm\" and \"cool\" white actually mean. Contrary to intuition, these terms don’t refer to heat but to the color appearance of the light, measured in Kelvin (K). Lower Kelvin values appear yellowish or amber; higher values lean toward blue-white.
- Warm White (2700K–3000K): Evokes comfort and intimacy. Ideal for living rooms, bedrooms, and spaces meant for relaxation.
- Natural White (3500K–4100K): A balanced midpoint—clean but not harsh. Often used in kitchens or workspaces.
- Cool White (5000K–6500K): Mimics daylight. Enhances clarity and alertness, best suited for task lighting or modern displays.
On a Christmas tree, warm white traditionally dominates because it aligns with nostalgic visions of holiday warmth. But introducing cool white strategically can elevate the design by creating contrast and simulating ambient gradients found in nature. The key is balance—too much cool white can make a tree feel sterile, while all warm white may lack visual interest.
“Lighting is the silent storyteller of holiday decor. A gradient blend of temperatures guides mood and attention without overwhelming the senses.” — Lila Monroe, Interior Lighting Designer
Planning Your Gradient: Design Principles
Creating a successful gradient isn’t random—it follows principles of visual flow and spatial layering. Think of your tree as a three-dimensional canvas. The goal is to transition smoothly from one light temperature to another, either vertically, radially, or in zones.
The most effective gradients follow a vertical progression: warm at the base, transitioning to cool at the top. This mirrors natural light patterns—earth-bound warmth rising into cooler atmospheric tones. Alternatively, a radial approach places warm lights deep within the branches and cool lights on the outer tips, producing a glowing “halo” effect.
Choosing the Right Lights
Not all LED strings are created equal. For a seamless gradient, ensure consistency in bulb size, spacing, and diffuser quality. Mismatched strands disrupt the illusion of continuity.
| Feature | Warm White Recommendation | Cool White Recommendation |
|---|---|---|
| Bulb Type | Mini LED, frosted coating | Mini LED, clear or soft white lens |
| Wire Color | Green or brown (blends with foliage) | Same as warm set for consistency |
| Lumen Output | 200–300 lumens per strand | 250–350 lumens per strand (slightly brighter) |
| Dimmability | Essential for control | Required if mixing intensities |
Opt for high-quality, low-voltage LED strings with UL certification. Dimmable options allow fine-tuning during setup and throughout the season. Consider smart LEDs if you want programmable transitions, though manual control is sufficient for static gradients.
Step-by-Step Installation Guide
Follow this sequence to achieve a polished gradient effect that looks intentional and professional.
- Prepare the Tree: Fully assemble and fluff your tree. Let artificial trees settle for 24 hours after shaping to avoid shifting once lights are in place.
- Determine Ratio: Use a 60/40 split—60% warm white, 40% cool white. For a 7-foot tree, this might mean three strands of warm white and two of cool white.
- Start with Warm Base: Begin wrapping warm white lights from the bottom third of the tree. Run cords up the central pole and distribute evenly around the trunk, spiraling outward. Keep density consistent—about 100 bulbs per foot of height.
- Layer Midsection: In the middle third, alternate between warm and cool strands, slightly increasing cool white presence. Overlap gently to avoid visible seams.
- Top with Cool White: Use cool white exclusively in the top third. Focus on outer tips and crown to create a bright “cap.” This draws the eye upward and gives the impression of light emerging from within.
- Test and Adjust: Turn off room lights and evaluate the gradient. Dim the warm whites slightly if the transition feels abrupt. Reposition any clumped or sparse sections.
- Add Depth (Optional): Tuck a few warm white micro-lights deep into inner branches near the trunk for a glowing core effect.
The result should be a smooth transition from rich amber at the base to a silvery brilliance at the peak. Viewed from multiple angles, the gradient should maintain coherence without jarring shifts.
Real-World Example: The Urban Loft Tree
In a downtown Chicago loft with floor-to-ceiling windows and minimalist décor, interior stylist Marcus Tran faced a challenge: his client wanted a traditional Christmas tree that didn’t clash with the modern aesthetic. The space was flooded with natural light during the day and city glare at night, making standard warm-only lighting look flat.
Marcus implemented a vertical gradient using five strands of 100-count LEDs: three warm white (2700K), two cool white (5500K). He began with dense warm lighting from the floor to four feet up, then blended in cool white from the middle to the top. The final layer—a single cool white strand wrapped tightly around the uppermost branches—created a crisp crown that mirrored the icy skyline.
The effect transformed the tree into a focal point that felt both festive and architectural. Guests described it as “a sunset captured in evergreen form.” The gradient softened the industrial edges of the space while maintaining its sleek identity.
Tips for Maintaining the Effect
Once installed, a gradient lighting scheme requires minimal upkeep—but small adjustments can preserve its impact over the season.
- Check Connections Daily: Loose plugs can cause partial outages that break the gradient illusion.
- Dust Gently: Use a soft brush or compressed air to remove dust from bulbs and wires. Buildup scatters light and dulls color accuracy.
- Control Brightness: Use dimmer switches or smart hubs to adjust intensity based on time of day. Lower settings enhance warmth in the evening.
- Avoid Sun Exposure: Direct sunlight can bleach wire coatings and degrade plastic diffusers, altering light output.
Common Mistakes to Avoid
Even experienced decorators can misstep when blending light temperatures. These pitfalls undermine the gradient effect:
- Uneven Distribution
- Clumping all cool white on one side creates imbalance. Always distribute by zone, not quadrant.
- Overusing Cool White
- Too much cool light overwhelms the warmth, making the tree feel clinical. Stick to the 60/40 rule unless designing for a specific modern theme.
- Mixing Bulb Styles
- Frosted warm bulbs with clear cool bulbs create inconsistent diffusion. Match finish types across both sets.
- Ignoring Power Sources
- Daisy-chaining too many strands risks voltage drop, especially with LEDs. Use separate circuits or a power strip with surge protection.
Checklist: Achieving the Perfect Gradient
Use this checklist before, during, and after installation:
- ☐ Choose high-quality, dimmable LED strings in matching styles
- ☐ Confirm bulb count and length based on tree size (approx. 100 bulbs per foot)
- ☐ Fluff and shape the tree completely before wiring
- ☐ Start with warm white from the base, working upward in thirds
- ☐ Blend temperatures gradually in the middle section
- ☐ Finish with cool white on upper branches and crown
- ☐ Test lighting at night in actual room conditions
- ☐ Adjust density or dimming for smooth transition
- ☐ Inspect daily for burnt-out bulbs or loose connections
- ☐ Clean gently and store strands separately after use
FAQ
Can I use colored lights with this gradient technique?
Yes, but sparingly. Colored lights compete with the temperature gradient. If desired, use pastel or muted tones only on ornaments or outer tips. Reserve the main structure for white variations to maintain clarity.
Is this method suitable for pre-lit trees?
Most pre-lit trees use a single light temperature, limiting gradient potential. However, you can enhance them by adding supplemental strands. Wrap warm white around lower branches and cool white toward the top, weaving carefully around existing lights.
How do I store the lights to keep them organized for next year?
Label each set by temperature and position (e.g., “Warm – Base,” “Cool – Top”). Use reusable twist ties or spools to prevent tangling. Store in separate compartments within a tree storage bag or plastic bins.
Final Thoughts and Call to Action
A gradient lighting effect elevates holiday decorating from routine to artistry. It demonstrates attention to detail, an understanding of light behavior, and a desire to create atmosphere rather than just illumination. By thoughtfully combining warm and cool whites, you’re not just lighting a tree—you’re crafting an experience.
This season, go beyond tradition. Experiment with transitions, document your results, and refine your approach. Whether you live in a rustic cabin or a high-rise apartment, the interplay of warm and cool light can reflect your unique environment and taste.


 浙公网安备
33010002000092号
浙公网安备
33010002000092号 浙B2-20120091-4
Comments
No comments yet. Why don't you start the discussion?