
Minimalist holiday design isn’t about subtraction—it’s about intentionality. When you strip away the clutter of traditional decor, what remains is clarity, calm, and quiet celebration. A ribbon-and-lights-only Christmas tree embodies this philosophy: no plastic pine, no tangled garlands, no storage headaches. Just two materials—curated, layered, and lit with purpose—transforming negative space into warmth. This approach appeals not only to urban dwellers with tight square footage or renters restricted by lease terms, but also to those seeking emotional resonance over excess. It’s sustainable by default (no cut trees, no synthetic branches), adaptable across seasons (swap ribbons for spring pastels or autumn rusts), and deeply personal—the rhythm of your wrapping, the cadence of your light placement, the choice of metallic sheen or matte texture all become quiet acts of self-expression.
The Philosophy Behind the Ribbon-and-Lights Tree
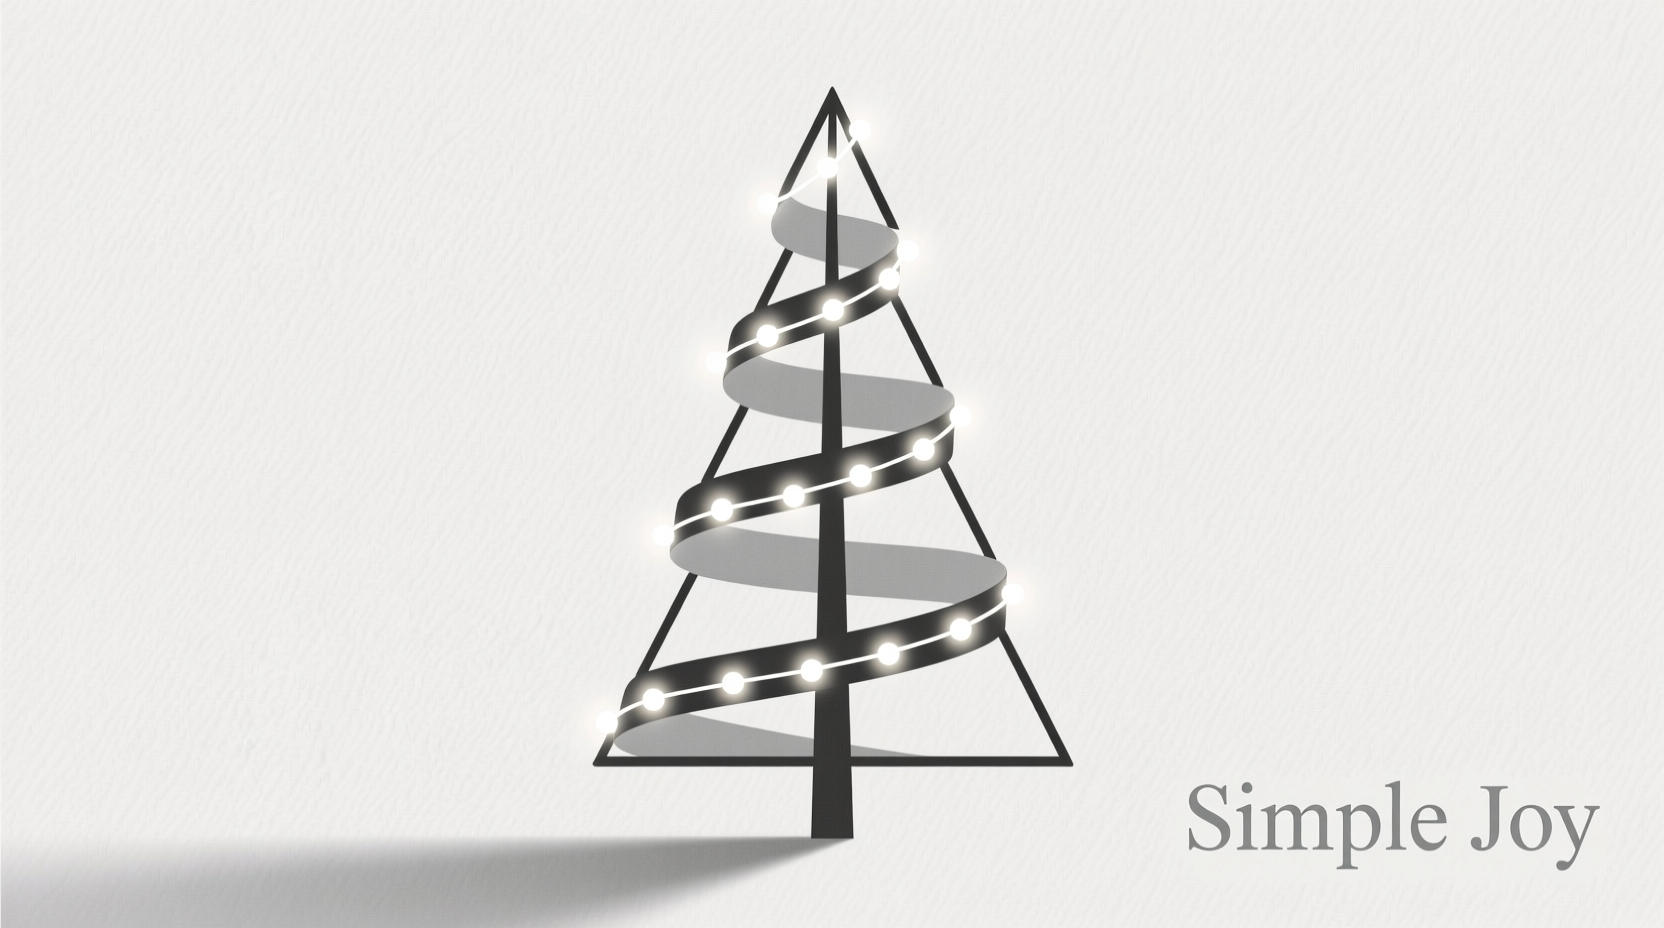
A minimalist tree challenges assumptions about what a “tree” must be. Botanically, it’s absent. Culturally, it’s redefined. Design-wise, it’s rooted in Japanese ma (the art of intentional emptiness) and Scandinavian hygge (cozy authenticity through simplicity). It rejects the pressure to accumulate and instead invites presence—to notice how light catches the edge of satin, how a single loop of velvet ribbon holds weight in stillness, how negative space becomes its own kind of ornamentation.
This isn’t austerity. It’s precision. Every element serves dual functions: structure and symbolism. The ribbon provides vertical rhythm, visual weight, and tactile contrast; the lights deliver warmth, dimension, and temporal magic—flickering like candlelight, steady like starlight, or softly pulsing like breath. Together, they form a silhouette that reads instantly as “tree” without literal representation—a triumph of suggestion over replication.
Materials: Curating Quality Over Quantity
With only two components, material integrity becomes non-negotiable. Inferior ribbon frays, sags, or loses luster under light; cheap lights flicker, overheat, or cast harsh, unflattering tones. Invest deliberately.
Ribbon selection hinges on three criteria:
- Width: 1.5–2.5 inches creates optimal visual mass without overwhelming scale. Narrower ribbons (under 1\") read as delicate lines—not structural anchors.
- Stiffness: Medium-body satin, grosgrain, or wired-edge velvet holds shape when wrapped vertically. Avoid limp polyester or overly stiff craft ribbon that resists gentle curves.
- Finish: Matte textures absorb light softly; metallics (brushed gold, antique silver) reflect ambient glow without glare. Avoid high-gloss plastics—they scream “craft store,” not “curated.”
Lights demand equal scrutiny:
- Use only UL-listed, low-voltage LED string lights (20–50 bulbs per strand). Warm white (2200K–2700K) mimics candlelight; avoid cool white (4000K+), which disrupts cozy ambiance.
- Choose lights with memory wire or flexible copper wiring—no rigid plastic cords that resist clean vertical runs.
- Opt for battery-operated or plug-in strands with a built-in timer (6/12-hour auto-off). Safety and convenience are foundational to minimalism.
| Material | Ideal Choice | Avoid |
|---|---|---|
| Ribbon | 2\" matte silk-blend satin with wired edges; 100% cotton grosgrain (3/4 oz weight) | Plastic-wrapped craft ribbon; ultra-thin polyester; heavily coated metallics |
| Lights | Warm white micro-LEDs (2mm bulbs), copper wire base, 30–40 ft length, dimmable | Large incandescent bulbs; plastic-coated cords; non-dimmable cool-white strings |
| Anchor System | 3M Command™ Picture Hanging Strips (medium weight); tension rod + curtain clip system | Nails in drywall; duct tape; adhesive hooks rated below 3 lbs |
Step-by-Step Assembly: Building Structure Through Rhythm
This method creates a freestanding, wall-mounted silhouette—no stand, no base, no support frame. The ribbon itself becomes architecture.
- Measure & Mark Your Space: Decide height (typically 5–7 feet for visual impact) and width (base width = ⅓ of height). Lightly mark top center point and base corners on wall using painter’s tape.
- Install Anchor Points: Place two heavy-duty Command™ strips at top center (for ribbon start) and one at each base corner (for ribbon ends). Press firmly for 30 seconds; wait 1 hour before loading.
- Begin the Central Spine: Unroll 12–15 feet of ribbon. Starting at the top anchor, pull ribbon taut down to the left base anchor. Loop once around the anchor, then bring ribbon back up diagonally toward center—creating a gentle “V” shape. Repeat symmetrically to the right base anchor. This establishes the primary triangular framework.
- Add Vertical Rhythm: From the top anchor, hang additional ribbon lengths straight down at 4–6 inch intervals—like spokes on a wheel. Vary lengths slightly (e.g., 62\", 64\", 61\") to avoid robotic uniformity. Secure each end at the base anchors or with discreet clips.
- Weave the Lights: Starting at the top, drape lights along the central spine first—nestling bulbs into ribbon folds where fabric naturally cups light. Then follow vertical ribbons, looping lights loosely (not tightly wound) every 8–10 inches. Let bulbs rest *on* ribbon, not buried beneath it.
- Refine the Silhouette: Step back. Gently adjust ribbon tension: tighten where lines sag; loosen where folds look forced. Tuck stray wire ends behind ribbon. Trim excess ribbon ends at 45° angles for clean termination.
Real Example: Maya’s Studio Apartment Tree
Maya, a graphic designer in Portland, lives in a 420-square-foot studio with floor-to-ceiling windows and strict no-nail policies. Last December, she replaced her 4-foot artificial tree (which took 45 minutes to assemble and required a dedicated closet for storage) with a 68-inch ribbon-and-lights tree anchored to her window frame using tension rods and curtain clips. She chose charcoal-gray 2\" cotton grosgrain and warm white micro-LEDs with a soft fade timer.
\"It took me 22 minutes to install—and I did it while listening to a podcast,\" she shared. \"What surprised me was how much people commented on its ‘calm energy.’ My neighbor brought over cinnamon rolls just to sit near it. It doesn’t shout ‘Christmas!’—it hums. And when January came, I swapped the ribbon for oatmeal linen and kept the lights year-round as ambient wall art. That’s the real win: it didn’t disappear after New Year’s. It evolved.\"
“True minimalism in holiday design isn’t about removing joy—it’s about removing distraction so joy has room to settle. A ribbon-and-lights tree succeeds because it asks nothing of the viewer except presence.” — Lena Torres, Interior Designer & Author of Quiet Spaces: Designing for Intentional Living
Lighting Nuances: How Bulbs Shape Mood
Lights do more than illuminate—they modulate emotion. The placement, density, and quality of light transform the same ribbon structure into entirely different experiences.
Density matters: For intimacy (bedroom, reading nook), use 1 light bulb per 8 inches of ribbon length. For statement impact (living room focal point), increase to 1 per 4 inches—but never overload; gaps between bulbs create breathing room and prevent visual noise.
Bulb type changes perception:
- Micro-LEDs (2mm): Discreet, even glow. Ideal for subtle elegance.
- Fairy lights with frosted bulbs: Soft diffusion. Best for bedrooms or meditation corners.
- Copper wire string lights: Warm, organic feel. The visible wire adds subtle texture.
Timing enhances ritual: Set timers to activate at dusk—not 5 p.m. in winter, but precisely when natural light fades in your space. This synchronizes the tree with circadian rhythm, making its glow feel earned, not imposed.
FAQ
Can I use this method on a real tree?
Yes—but with refinement. Wrap ribbon vertically around the trunk and major branches first, then weave lights *over* the ribbon (not under). Avoid horizontal ribbon bands—they break the minimalist vertical line. Keep ribbon color tonal (e.g., forest green ribbon on a pine tree) to maintain cohesion.
How do I store ribbon and lights for next year?
Roll ribbon loosely around a 3-inch cardboard tube (like wrapping paper core), securing with a single fabric-covered elastic band—not tape or rubber bands that leave marks. Store lights coiled in a labeled, ventilated fabric pouch (not plastic bins, which trap moisture). Keep both in a cool, dark closet—never attic or garage where temperature swings degrade fibers and LEDs.
What if my space has no wall for mounting?
Use a freestanding solution: secure a 6-foot black steel pipe (1\" diameter) vertically in a weighted base (e.g., filled concrete planter). Wrap ribbon spirally from base to tip, then weave lights along the spiral path. Finish with a matte black cap on the pipe top to hide hardware. This maintains purity of form while adding architectural strength.
Conclusion: Your Tree Is Already Waiting
You don’t need permission to simplify. You don’t need clearance from tradition to redefine celebration. The minimalist Christmas tree made of ribbon and lights exists not as a compromise, but as a declaration—that beauty resides in restraint, that warmth can be woven, and that light, when placed with care, transforms absence into abundance. It asks little of your time, less of your budget, and nothing of your values. It fits in studios and lofts, apartments and dorm rooms, nursing homes and tiny houses—not because it’s small, but because it’s sovereign in its simplicity.
Start today. Measure your wall. Choose one ribbon. Select one strand of lights. Follow the steps—not perfectly, but patiently. Notice how the first loop of fabric changes the air in the room. Watch how the first bulb glows like a held breath. This isn’t decoration. It’s devotion—quiet, deliberate, luminous.


 浙公网安备
33010002000092号
浙公网安备
33010002000092号 浙B2-20120091-4
Comments
No comments yet. Why don't you start the discussion?