
In today’s connected households, multiple devices—laptops, smartphones, tablets, smart TVs—generate and store vast amounts of data. From family photos and work documents to music libraries and videos, accessing files across devices efficiently is essential. A private local network enables seamless, high-speed file sharing without relying on the internet or cloud services. It enhances privacy, reduces latency, and keeps your data under your control. This guide walks through the process of building a secure, reliable local network tailored for file sharing in a home environment.
Understanding Local Networks and File Sharing
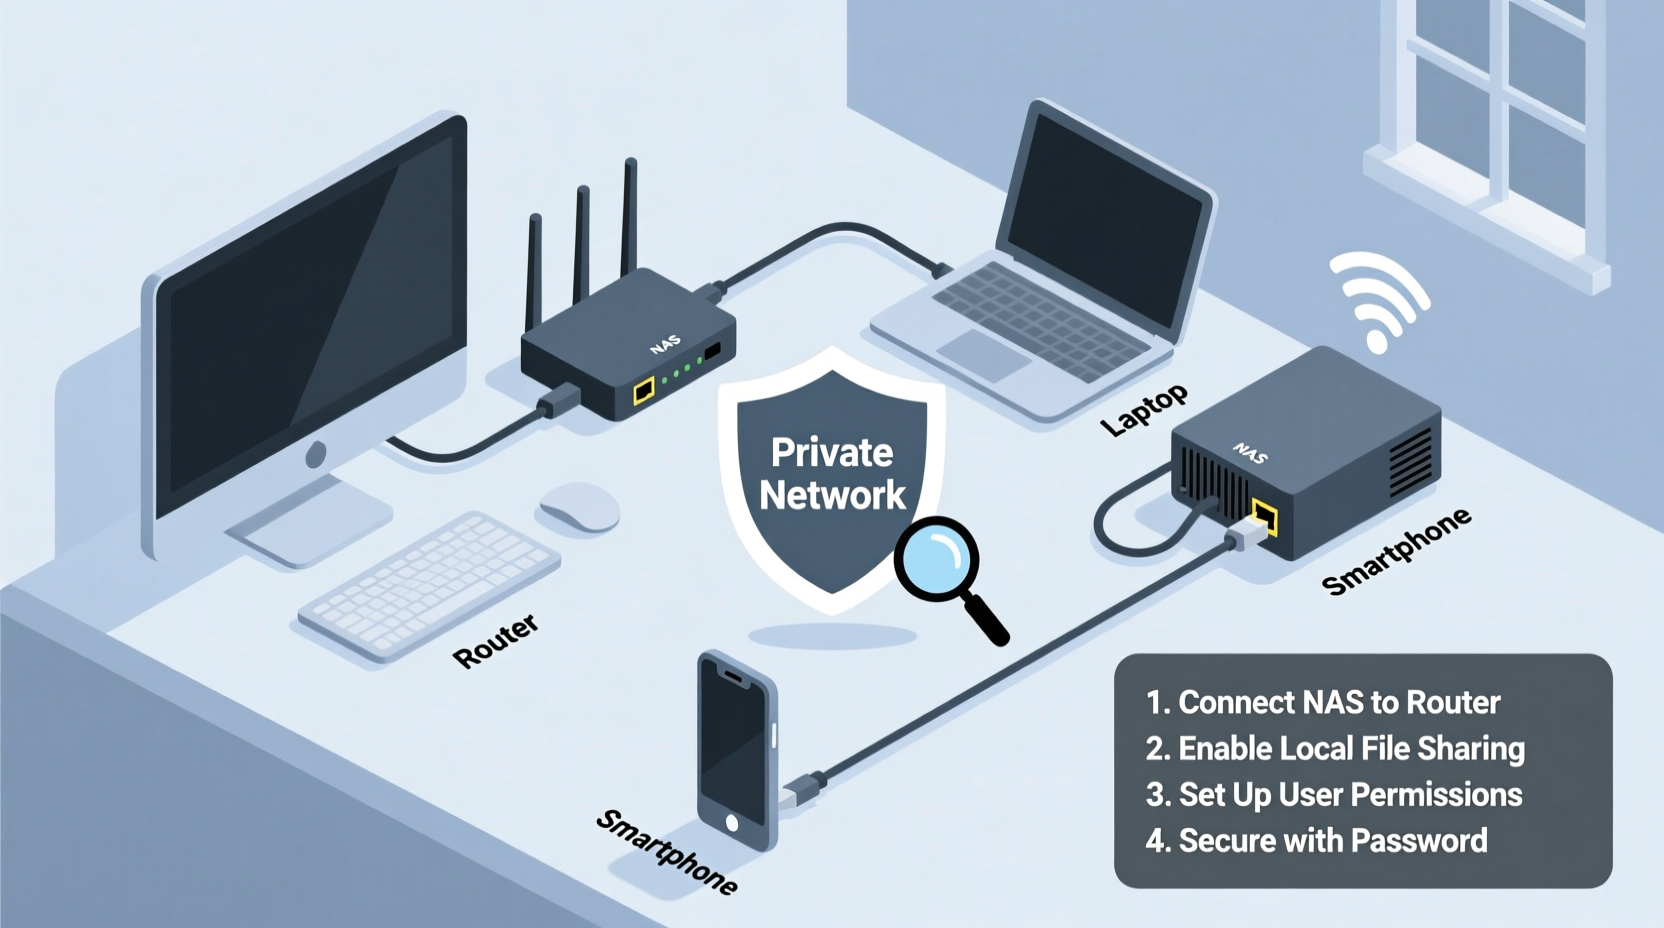
A local area network (LAN) connects devices within a limited physical space, such as a home or office, using wired Ethernet or Wi-Fi. When configured properly, it allows devices to communicate directly, enabling fast and secure file transfers. Unlike cloud-based solutions, which require internet access and may expose data to third parties, a private LAN operates entirely within your premises.
File sharing over a LAN works by designating one or more devices as servers or shared folders. Other devices on the same network can then access these resources through protocols like SMB (Server Message Block) on Windows, AFP (Apple Filing Protocol) on macOS, or NFS (Network File System) on Linux. The key advantages include:
- Speed: Transfer files at gigabit speeds when using Ethernet.
- Privacy: Data never leaves your network unless you choose to send it.
- Offline Access: No internet required; works during outages.
- Cost Efficiency: Eliminates recurring fees associated with cloud storage.
“Home networks are often underestimated, but they’re powerful tools for managing digital life securely.” — Dr. Marcus Lin, Network Security Researcher, MIT Computer Science Lab
Planning Your Home Network Setup
Before connecting cables or adjusting router settings, assess your household's needs. Consider the number of devices, types of files being shared, and desired performance levels. Planning ensures scalability and avoids bottlenecks later.
Assess Your Equipment Needs
The foundation of any local network is networking hardware. Most homes already have a wireless router provided by an ISP, but its capabilities may limit performance. For optimal file sharing, consider upgrading or supplementing with dedicated equipment.
| Component | Purpose | Recommended Specs |
|---|---|---|
| Router | Distributes internet and manages internal traffic | Gigabit ports, dual-band Wi-Fi 5/6, DHCP enabled |
| Switch (optional) | Adds more Ethernet ports for wired connections | Unmanaged Gigabit switch with 5–8 ports |
| NAS Device (optional) | Centralized storage accessible 24/7 | At least 2-bay RAID support, 2GB+ RAM |
| Cables | Wired connection between devices | Cat 6 or higher for Gigabit speeds |
Define Your Network Topology
Decide whether to use a star topology (all devices connect to a central router or switch), which is standard and easy to manage. If you have several desktops, media centers, or a home server, prioritize wired connections for stability and speed. Reserve Wi-Fi for mobile devices like phones and tablets.
Step-by-Step Guide to Setting Up the Network
Follow this structured approach to build a functional, secure local network optimized for file sharing.
- Connect and Configure the Router
Plug in your router and access its admin interface via a web browser (typically http://192.168.1.1 or http://192.168.0.1). Log in using the default credentials (check the device label). Change the admin password immediately. Set a unique SSID (network name) and strong WPA3 encryption key if supported; otherwise, use WPA2. - Assign Static IP Addresses (Optional but Recommended)
To ensure consistent access to shared devices, assign static IPs to computers or NAS units. In your router’s DHCP settings, reserve specific IP addresses based on MAC addresses. For example:- Media PC: 192.168.1.10
- Laptop: 192.168.1.11
- NAS: 192.168.1.20
- Enable File and Printer Sharing
On Windows: Go to Control Panel > Network and Sharing Center > Change advanced sharing settings. Turn on “Network discovery” and “File and printer sharing.” Disable password-protected sharing only if all users are trusted.
On macOS: Open System Settings > General > Sharing. Enable “File Sharing” and add folders to share. Set user permissions accordingly.
On Linux: Use Samba to configure shares via GUI tools like GNOME Files or command line (smb.conf). - Create Shared Folders
Choose directories to share—such as Documents, Photos, or Media—and set appropriate permissions. Avoid sharing system drives or sensitive locations. Use descriptive names like “Family_Photos” or “Shared_Documents.” - Test Connectivity
From another device, attempt to access the shared folder. On Windows, open File Explorer and type\\\\[IP_ADDRESS]in the address bar (e.g.,\\\\192.168.1.10). On macOS, go to Finder > Go > Connect to Server and entersmb://192.168.1.10. Authenticate if prompted. - Optimize Performance
Ensure all wired devices use Gigabit Ethernet. Update firmware on routers and switches. Disable legacy Wi-Fi modes (like 802.11b/g) to reduce interference and improve throughput.
Security Best Practices for a Private Network
While a local network isn’t exposed to the public internet, vulnerabilities still exist—especially if guest Wi-Fi is enabled or IoT devices are poorly secured. Protect your network with proactive measures.
- Disable WPS (Wi-Fi Protected Setup): Known vulnerability allows brute-force attacks.
- Use Strong Encryption: Always use WPA2 or WPA3. Avoid WEP, which is easily cracked.
- Segment the Network: Create a separate VLAN or guest network for smart home devices to isolate them from file-sharing systems.
- Regular Firmware Updates: Check manufacturer websites quarterly for updates.
- Firewall Configuration: Enable the built-in firewall on each device and restrict unnecessary inbound connections.
Mini Case Study: The Chen Family’s Seamless Media Hub
The Chens wanted a way to stream movies from their desktop PC to their living room TV and let both parents access work documents from their laptops. They installed a Netgear Nighthawk router with Gigabit ports, connected their desktop and a WD My Cloud NAS via Cat 6 cables, and set up Wi-Fi for tablets and phones.
They created two shared folders: “Movies_Library” (read-only for all) and “Work_Files” (restricted to parent accounts). Using static IPs, they ensured stable access. By disabling WPS and setting up a guest network for visitors, they maintained security. Now, every weekend, they browse and play HD films on their smart TV without buffering—all hosted locally.
Checklist: Building Your File-Sharing Network
Use this checklist to ensure no step is missed during setup:
- ☐ Inventory all devices that will join the network
- ☐ Verify router supports Gigabit Ethernet and modern Wi-Fi standards
- ☐ Upgrade to a managed switch if more than four wired devices are used
- ☐ Connect critical devices (PCs, NAS) via Ethernet
- ☐ Assign static IP addresses to shared-resource devices
- ☐ Enable file sharing and configure permissions per device OS
- ☐ Test cross-device access using IP-based connections
- ☐ Secure the network: change defaults, enable encryption, disable WPS
- ☐ Set up backups for shared data (external drive or cloud sync)
- ☐ Document IP assignments and share paths for household members
Frequently Asked Questions
Can I share files between Windows and Mac on the same network?
Yes. Both operating systems support the SMB protocol. On macOS, ensure SMB is selected in Sharing preferences. On Windows, make sure network discovery is on. You can access Mac shares from Windows using \\\\[Mac_IP], and vice versa via smb://[Windows_IP].
Is a NAS better than sharing folders from a personal computer?
A NAS offers significant advantages: it runs 24/7, consumes less power than a full PC, includes redundancy (RAID), and often supports remote access securely. However, if you already have a desktop always powered on, simple folder sharing may suffice initially.
Why is my file transfer speed slow even on Ethernet?
Possible causes include outdated network drivers, mismatched link speeds (e.g., one device running at 100 Mbps instead of 1 Gbps), or background processes consuming bandwidth. Check connection status in Network Settings, update drivers, and close large downloads during transfers.
Conclusion: Take Control of Your Digital Ecosystem
Creating a private local network for file sharing transforms how families and individuals manage digital content. It eliminates dependency on external services, accelerates access to large files, and strengthens data ownership. With basic networking knowledge and careful configuration, anyone can build a robust, secure environment tailored to their lifestyle.
Start small—connect two devices and share a folder. Then expand to include centralized storage, automated backups, and media streaming. As your confidence grows, so will the utility of your home network. Don’t wait for the next cloud subscription hike or storage cap. Build your private infrastructure today and enjoy faster, safer, and truly personal file sharing.


 浙公网安备
33010002000092号
浙公网安备
33010002000092号 浙B2-20120091-4
Comments
No comments yet. Why don't you start the discussion?