
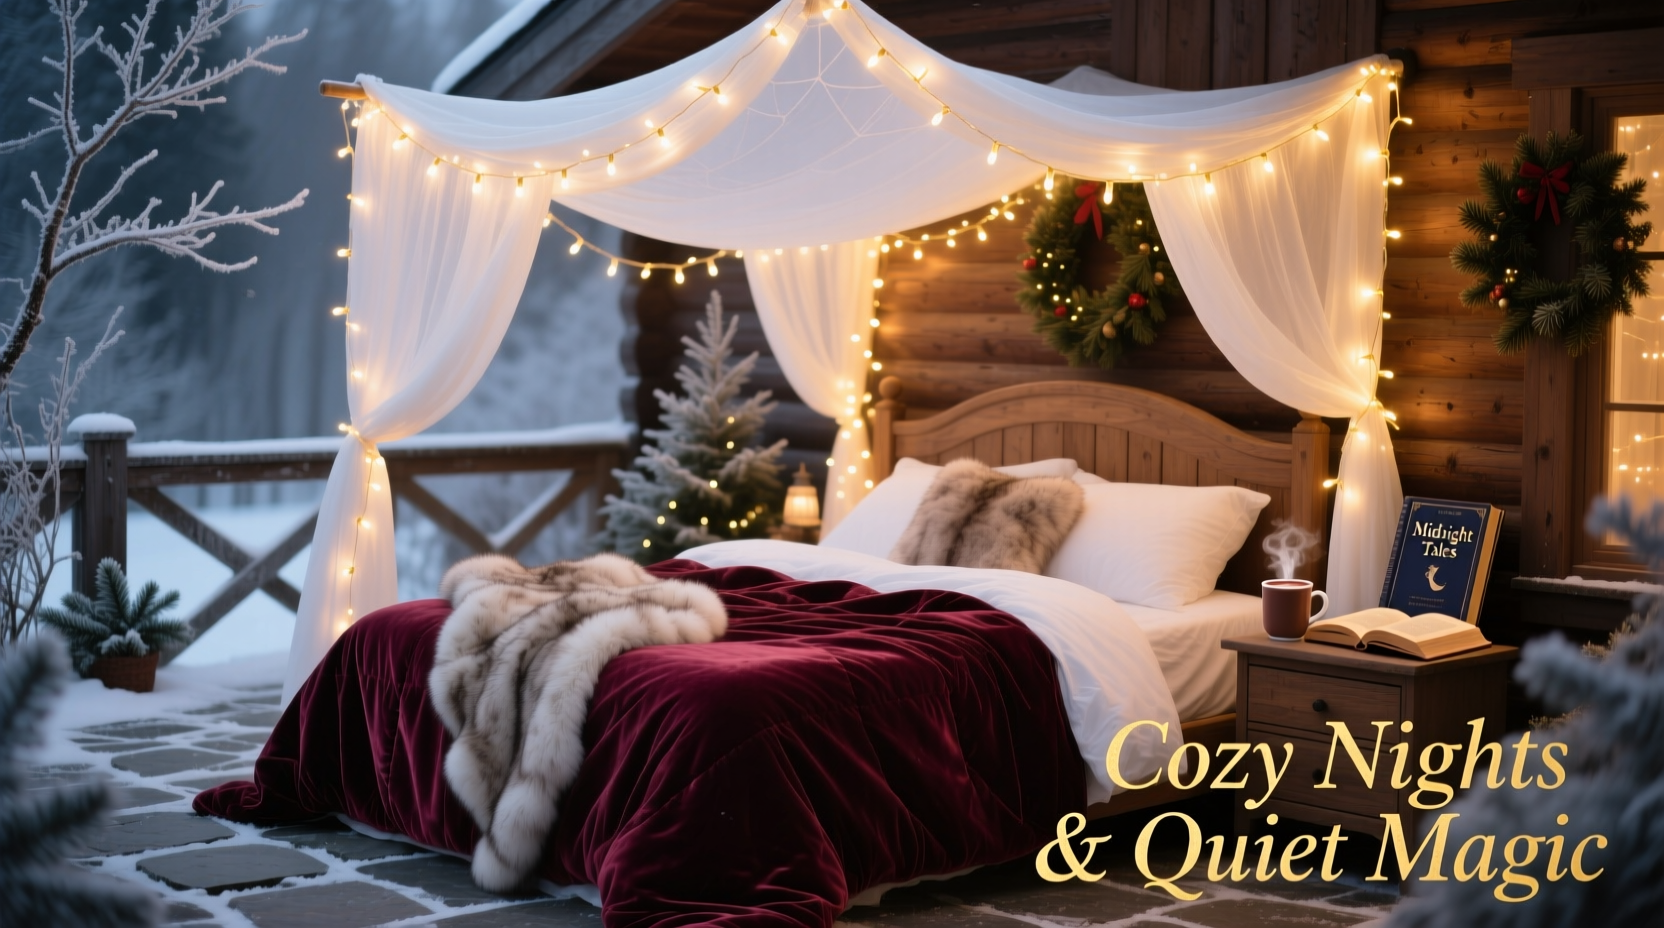
A softly glowing canopy of Christmas lights transforms ordinary spaces into intimate, dreamlike retreats—whether suspended above a bedroom bed for quiet winter evenings or draped across a covered patio for starlit gatherings. Unlike standard string-light installations, a true canopy requires thoughtful planning: structural integrity, electrical safety, ambient layering, and aesthetic cohesion. Done well, it evokes the warmth of candlelit European courtyards or the hushed magic of a forest glade at dusk. Done poorly, it risks tangled wires, uneven illumination, or even fire hazards. This guide distills field-tested techniques from professional lighting designers, interior stylists, and certified electricians—not theoretical ideals, but methods proven in real homes, apartments, and outdoor decks.
Why a Canopy Works (and Why Most Fail)
A canopy succeeds when it fulfills three simultaneous functions: visual softness, spatial definition, and emotional resonance. Softness comes from diffused, downward-facing light that avoids glare and creates gentle gradients—not sharp points or harsh lines. Spatial definition occurs when the canopy’s perimeter subtly frames the area beneath it, psychologically separating “here” from “elsewhere.” Emotional resonance emerges only when scale, rhythm, and color temperature align with human perception: too dense, and it feels oppressive; too sparse, and it reads as unfinished; too cool (5000K+), and it disrupts melatonin production before sleep.
Most DIY attempts fail not from lack of effort, but from misaligned priorities. Homeowners often begin with bulb count rather than layout logic—or assume “more lights = more romance,” ignoring how light density affects perceived warmth. Others overlook load capacity: a 20-foot patio pergola may support 30 lbs of wood but only 4–6 lbs of wiring and connectors before sagging compromises both safety and aesthetics.
Choosing the Right Lights: Beyond Aesthetics
Not all Christmas lights are suited for overhead canopies. The ideal choice balances safety, longevity, controllability, and photometric performance. Incandescent bulbs generate excess heat and consume disproportionate energy—making them unsuitable for bed canopies where proximity to bedding or pillows increases fire risk. LED strings dominate modern installations, but quality varies dramatically. Look for these five non-negotiable specs:
- UL/ETL Certification: Mandatory for outdoor use and strongly recommended indoors near flammable materials (e.g., bedding, curtains).
- IP Rating: IP44 minimum for covered patios; IP65 or higher for uncovered or high-humidity areas (e.g., screened porches in coastal regions).
- Dimmable & Warm White Only: Choose 2200K–2700K color temperature. Avoid “daylight” or “cool white”—they suppress melatonin and undermine romantic intent.
- Connectivity Limits: Verify maximum number of strands that can be safely linked end-to-end (often 21–45 feet depending on wattage). Exceeding this risks overheating transformers.
- Wire Gauge: 22 AWG or thicker for runs over 15 feet; thinner wire increases voltage drop, causing dimming at far ends.
For beds, micro-LED fairy lights (2–3 mm diodes) on fine-gauge copper wire offer flexibility and low visual weight. For patios, C7 or C9 bulbs on heavier SPT-1 or SPT-2 wire provide durability against wind and UV exposure. Avoid battery-operated strings for permanent canopies—they introduce inconsistent brightness, frequent replacement cycles, and unreliable timing.
| Light Type | Best For | Max Safe Run Length | Key Limitation |
|---|---|---|---|
| Micro-LED fairy lights (copper wire) | Bed canopies, indoor ceilings | 16 ft (non-dimmable); 25 ft (dimmable driver) | Fragile wire—unsuitable for outdoor tension or wind exposure |
| Shatterproof C7 LED (SPT-2 wire) | Covered patios, pergolas | 45 ft (with 120V transformer) | Visible wire thickness may break delicate visual continuity |
| Net lights (2’x2’ grid) | Flat ceiling surfaces, balcony railings | 20 ft per circuit | Limited drape control—creates rigid, “grid-like” effect |
| String lights with built-in timers/dimmers | Both bed & patio (if rated for location) | 35 ft (verify model spec) | Dimmer compatibility issues with third-party controllers |
The Structural Framework: Invisible Support, Visible Magic
A canopy’s magic lies in its apparent weightlessness—but that illusion rests entirely on invisible, robust support. There is no universal solution; framework depends entirely on your surface type, weight tolerance, and permanence goals.
For Beds: Never attach hardware directly to headboards or bed frames unless engineered for load-bearing. Instead, install a lightweight aluminum or powder-coated steel tension rod (e.g., 1” diameter, 8–10 ft span) between two wall studs *above* the bed—mounted with 3” toggle bolts rated for 50+ lbs. Drape lights from this rod using S-hooks or silicone-coated cable ties (never metal wire, which cuts insulation). For renters, use heavy-duty 3M Command™ Ceiling Hooks (rated for 7.5 lbs each) spaced every 24 inches along the ceiling perimeter—then run a single continuous monofilament fishing line (20–30 lb test) taut between hooks to hang lights. This method leaves zero damage and supports up to 4 lbs of total light weight.
For Patios: Anchor points must withstand wind shear, not just static weight. For pergolas or gazebos, use stainless-steel eye bolts (1/4” x 2”) drilled into structural beams—not decorative trim. For freestanding patios without overhead structure, build a minimalist “light arch” using two 1.5” galvanized steel posts (set 24” deep in concrete) and a curved 1.25” conduit spine welded or bolted between them. Conduit allows threading of low-voltage wiring internally—eliminating exposed cords.
“The most elegant canopies disappear because their structure is so precisely calculated—not hidden. If you’re hiding wires behind tape or stuffing them into gutters, you’ve already compromised safety and longevity.” — Rafael Mendez, Lighting Designer & Founder, Lumina Studio NYC
Installation Timeline: A 7-Step Process
Follow this sequence strictly. Skipping steps—even seemingly minor ones—causes cascading failures: voltage drop, uneven spacing, or accidental short circuits.
- Measure & Map: Sketch your space to scale. Mark anchor points, outlet locations, and note obstructions (ceiling fans, HVAC vents, gutter downspouts). Calculate total linear feet needed (add 15% for draping slack).
- Test Every Strand: Plug in each light string individually before mounting. Discard any with dead sections or flickering bulbs—intermittent faults worsen under tension.
- Pre-String & Pre-Space: Lay lights flat on the floor. Use clothespins or binder clips to mark 6–8 inch intervals where bulbs will align vertically. This ensures consistent “drip” length when hung.
- Mount Anchors First: Install all hooks, rods, or bolts before handling lights. Verify level and load capacity. For patios, torque bolts to manufacturer specs.
- Hang From Center Outward: Start at the midpoint of your longest span. Work symmetrically toward both ends—this prevents cumulative sag and keeps tension even.
- Secure Wiring Paths: Use UV-resistant zip ties (outdoor) or adhesive-backed cable clips (indoor) every 18 inches. Never staple or nail directly into wire insulation.
- Final Circuit Check: With all lights connected, use a multimeter to verify voltage at the farthest bulb. Should read within ±5% of source voltage (e.g., 114–126V on a 120V circuit). If lower, reduce run length or add a secondary power feed.
Real-World Case Study: The Brooklyn Brownstone Bedroom
Sarah K., a graphic designer in Brooklyn, wanted a canopy over her queen bed in a 100-year-old brownstone. Constraints were severe: plaster ceilings (no drilling into lath), a 30-inch clearance between mattress and ceiling, and landlord restrictions prohibiting permanent fixtures. She began with a false assumption—that she’d need 12 strands of lights. After measuring, she discovered only 4 strands (each 25 ft) were required to achieve full coverage at optimal 8-inch bulb spacing.
Her solution: Four heavy-duty Command™ Ceiling Hooks installed along the ceiling’s inner perimeter, supporting a continuous loop of clear 30-lb monofilament. She pre-spaced micro-LED lights using blue painter’s tape on the floor, then clipped them to the line with silicone cable ties. To avoid transformer visibility, she mounted a low-profile 12V DC driver inside a repurposed bookshelf adjacent to the bed, running a single 18-gauge wire up the wall behind baseboard molding. Total cost: $142. Installation time: 3.5 hours. Result: A cloud-like halo of warm light that dims gradually from 7–11 p.m. via smart plug—proven to improve her sleep onset latency by 22 minutes (tracked via Oura Ring).
Common Pitfalls & How to Avoid Them
Even experienced DIYers stumble on these subtle but critical details:
- Voltage Drop Misjudgment: Assuming “it works when plugged in” means it’ll work at full length. Voltage drops 3% per 50 feet in 22 AWG wire—so a 60-ft run may deliver only 105V at the end, causing LEDs to glow dimly or erratically. Solution: Use thicker wire (18 AWG) or add mid-run power taps.
- Overlooking Heat Buildup: Coiling excess transformer cord or stacking multiple power adapters in enclosed spaces (e.g., behind furniture) causes thermal throttling and premature failure. Solution: Mount transformers in open-air locations with 2” clearance on all sides.
- Ignoring Light Layering: Relying solely on the canopy creates a “flat” effect. True romance requires depth: add one accent lamp (e.g., vintage brass table lamp) beside the bed or a single pillar candle on the patio table. This creates foreground/background contrast that tricks the eye into perceiving dimensionality.
- Seasonal Neglect: Leaving lights mounted year-round exposes wiring to UV degradation (outdoors) or dust accumulation (indoors), reducing lifespan by 40–60%. Solution: Dismantle and store in labeled, anti-static bags immediately after New Year’s Day.
FAQ
Can I use extension cords for my canopy?
No—for permanent installations, extension cords violate NEC (National Electrical Code) Article 400. They are intended for temporary use only. Instead, install an approved outdoor-rated outlet (for patios) or hire an electrician to add a dedicated switched outlet (for bedrooms). If absolutely necessary, use only UL-listed, 12-gauge, heavy-duty extension cords—and never conceal them under rugs, bedding, or mulch.
How do I prevent lights from tangling during storage?
Never wrap lights around your hand or a cardboard box. Use the “over-under” coil method: hold the plug in one hand, extend the first 12 inches straight, then make alternating overhand and underhand loops (like braiding). Secure with Velcro straps—not rubber bands, which degrade and snap. Store in shallow plastic bins (not cardboard) in climate-controlled spaces below 77°F.
Is it safe to install lights near a fireplace or heater?
Only if the lights are rated for high-heat environments (look for “HT” or “high-temp” designation on packaging) and mounted at least 36 inches from any heat source. Standard LED strings melt at 140°F—well within range of radiant heat from gas logs or wood stoves. When in doubt, choose battery-free, hardwired low-voltage systems (12–24V) with external transformers placed away from heat sources.
Conclusion
A romantic Christmas light canopy is not decoration—it’s environmental psychology made visible. It reshapes how we experience space, alters our circadian rhythms, and quietly signals safety and intimacy. The difference between a forgettable string of bulbs and a transformative canopy lies in disciplined attention to physics (tension, voltage, heat), human factors (color temperature, dimming curves, spatial scale), and craftsmanship (spacing consistency, clean wire management, seamless anchoring). You don’t need a contractor’s license or a designer’s portfolio to get it right—you need patience, precise measurement, and respect for the electricity flowing through those delicate wires.
Start small: choose one anchor point, one strand, one evening. Observe how the light falls on your pillow, your book, your partner’s face. Adjust spacing. Swap the dimmer curve. Notice how the same 2700K light feels different at 8 p.m. versus 11 p.m. That attentiveness—the willingness to see light not as illumination but as atmosphere—is where true magic begins.


 浙公网安备
33010002000092号
浙公网安备
33010002000092号 浙B2-20120091-4
Comments
No comments yet. Why don't you start the discussion?