
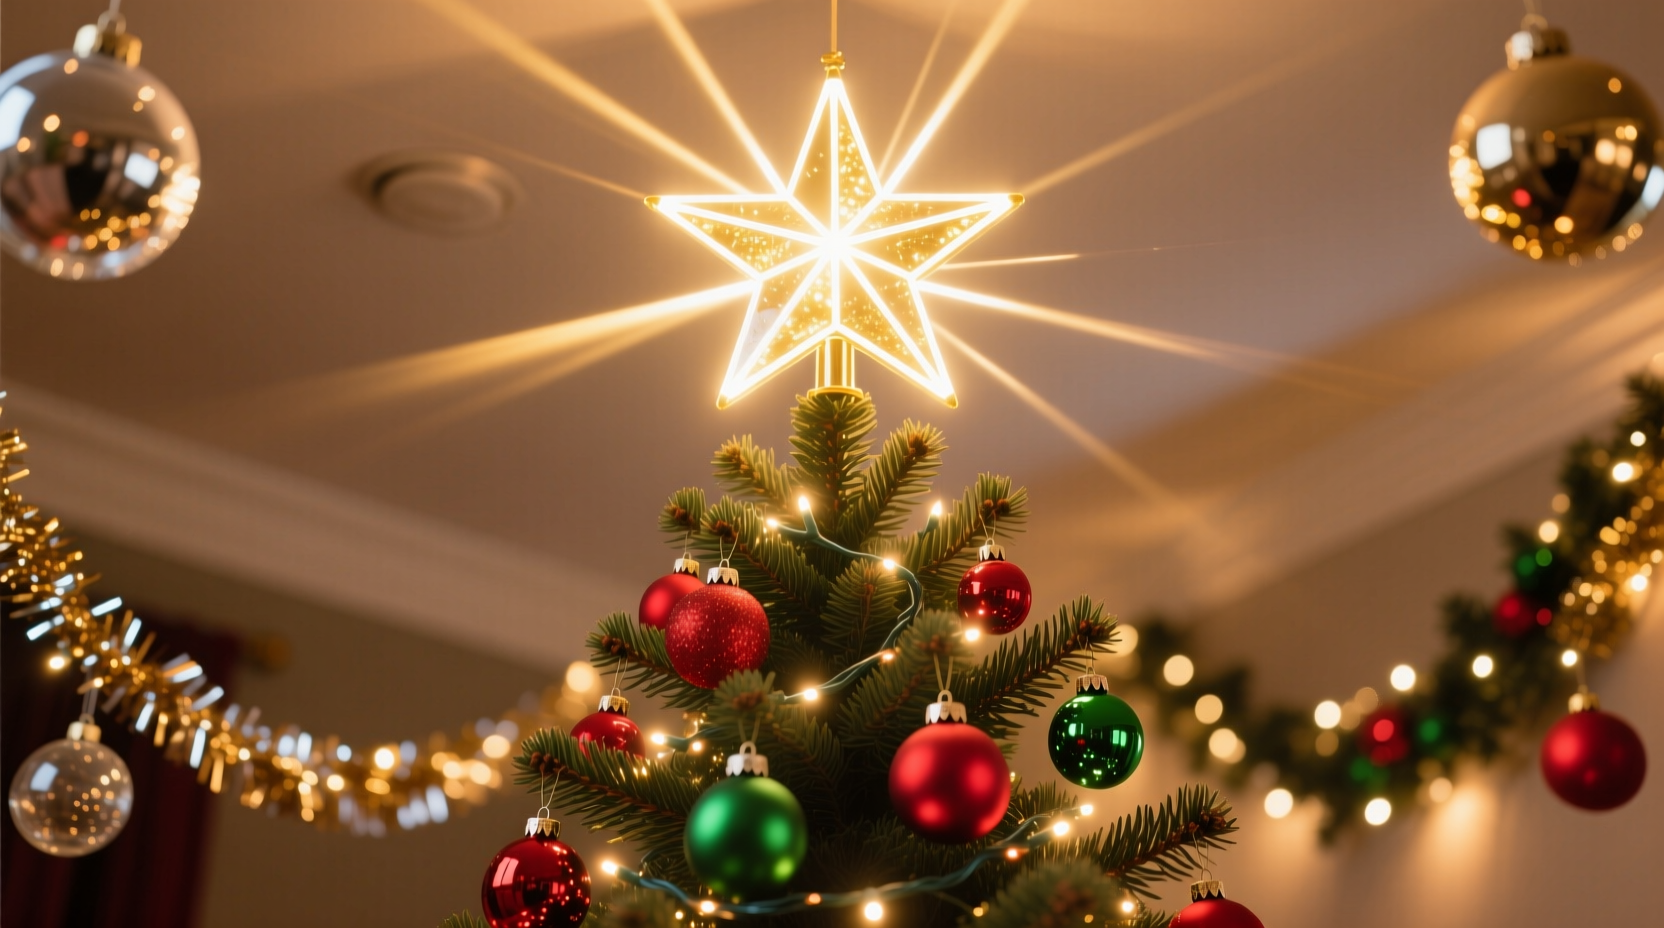
A starburst lighting effect transforms the crown of your Christmas tree from a simple topper into a radiant focal point—evoking the celestial glow of a winter solstice sky or the dramatic flare of a vintage Hollywood spotlight. Unlike traditional stars or angels, this effect uses light itself as the ornament: dozens of slender, evenly spaced light strands radiating outward like sunbeams, converging just above the treetop. When lit, it creates dimension, movement, and a sense of upward energy that draws the eye—and lifts the entire room’s ambiance. This isn’t about buying a pre-made kit; it’s about thoughtful execution, electrical awareness, and intentional design. Done right, it lasts for years, enhances any tree style (from minimalist firs to lush Nordmanns), and becomes the signature detail guests remember.
Why Starburst Works Where Other Toppers Fall Short
Most tree toppers serve one function: visual closure. A star declares “finished.” An angel adds reverence. But a starburst delivers something deeper—optical resonance. Light radiating *outward* from a central point mirrors natural phenomena (sunlight through clouds, auroral rays) and triggers subconscious comfort. Interior designers and lighting technicians confirm its psychological impact: studies in environmental psychology show radial light patterns increase perceived spaciousness and reduce visual clutter. In practice, a well-executed starburst also solves real-world problems. It camouflages awkward trunk gaps where branches thin out. It eliminates the need for heavy, top-heavy ornaments that risk branch breakage. And because it’s composed entirely of flexible, low-heat LED strands, it adapts seamlessly to trees of varying heights and densities—unlike rigid wireframes or ceramic toppers that demand precise proportions.
Crucially, this effect doesn’t compete with your tree’s theme—it elevates it. A monochrome silver-and-white tree gains ethereal depth; a rustic pine with burlap ribbons gains unexpected glamour; even a bold red-and-green scheme gains sophistication when framed by cool, directional light. As lighting designer Marcus Lin, who has styled holiday displays for The Plaza Hotel and the Chicago Botanic Garden, explains:
“People think ‘topper’ means ‘object.’ But light is the most powerful topper of all—especially when it’s organized radially. A starburst doesn’t sit *on* the tree. It *belongs* to the space around it. That’s why it feels timeless, not trendy.” — Marcus Lin, Architectural Lighting Designer & Holiday Display Consultant
Essential Materials & Smart Sourcing Tips
You don’t need specialty gear—but you do need deliberate choices. Below is a curated list of what works, why it matters, and where to find it without overpaying.
| Item | Why It Matters | Recommended Specs | Budget-Friendly Source Tip |
|---|---|---|---|
| LED Mini Light Strands | Low heat = safe near dry foliage; consistent brightness prevents dimming at outer ends | 100–150 lights per 16.4 ft strand; warm white (2700K) or pure white (4000K); UL-listed for indoor use | Buy last-season clearance (January sales) — same quality, 40–60% off. Look for “commercial grade” packaging; these have thicker wires and better insulation. |
| Sturdy Central Hub | Anchors all strands securely and hides wiring cleanly | 3-inch diameter wooden embroidery hoop (sanded smooth) OR heavy-duty plastic ring (e.g., irrigation pipe coupler, 3” ID) | Hardware stores sell PVC couplers for under $2. Avoid flimsy craft-store rings—they warp under weight. |
| Concealed Wiring | Prevents visible cords and reduces tripping hazard | Flat, black 18/2 low-voltage wire (not standard lamp cord); 2–3 ft length | Use leftover wire from smart-home installations or buy spools online—$8 for 50 ft beats $12 for 3 ft at big-box stores. |
| Secure Fasteners | Must hold tension without damaging branches or melting | Clear, UV-resistant fishing line (20–30 lb test) + small-gauge brass brads (3/8”) for hub attachment | Fishing line is cheaper and less visible than zip ties. Brass brads won’t rust if stored outdoors next year. |
| Adjustable Tree Stand | Allows fine-tuning height after installation | Stand with 1–2 inch vertical adjustment range and wide base (min. 24” diameter) | Rent or borrow—most people only need it for final positioning. Saves $45+ on a one-time-use item. |
The 7-Step Installation Process (With Safety First)
This sequence prioritizes electrical safety, structural integrity, and visual precision. Follow it in order—skipping steps compromises both safety and aesthetics.
- Prepare the Hub: Sand the wooden hoop or clean the PVC ring thoroughly. Drill four evenly spaced 1/8-inch pilot holes around the rim (at 12, 3, 6, and 9 o’clock positions). These will anchor the primary support lines.
- Attach Support Lines: Cut four 48-inch lengths of fishing line. Thread each through a pilot hole and tie a double surgeon’s knot on the underside. Pull taut and secure with a dab of clear-drying craft glue—this prevents slippage under tension.
- Position the Hub: Place the hub horizontally 6–8 inches above your tree’s highest branch. Use your adjustable stand to raise/lower the tree until the hub floats at the ideal height. Mark this height with painter’s tape on the trunk.
- Anchor the Hub: Gently bend four sturdy upper branches upward and outward. Loop each fishing line around a branch tip, then pull downward and tie tightly to the trunk’s main stem—just below the lowest branch. This creates gentle, even tension radiating from center to perimeter.
- String the Lights: Take one light strand. Starting at the plug end, feed the first 6 inches *through the center of the hub*, then drape the rest outward along one support line. Repeat for all strands (use 8–12 strands for standard 7–9 ft trees). Keep strands untwisted and parallel—not spiraled.
- Secure Strand Ends: At the outer tip of each strand, wrap the last 3 inches tightly around its support line using more fishing line. Trim excess. Do *not* staple or use hot glue—heat damage risks short circuits.
- Final Wiring Integration: Gather all plug ends at the hub’s center. Connect them to a single UL-listed multi-outlet adapter (with built-in surge protection). Route the main power cord down the trunk interior, exiting near the base. Conceal with boughs or ribbon.
Real-World Case Study: The 2023 Downtown Chicago Apartment Tree
When interior stylist Lena Ruiz redesigned her 550-square-foot loft for a holiday open house, she faced two constraints: a narrow 6.5-ft Fraser fir in a tight corner, and a strict building code prohibiting anything heavier than 2 lbs at the tree’s apex. Her client wanted “drama, not clutter.” Lena opted for a starburst—but adapted the method. She used only eight 100-light strands (reducing total weight to 1.3 lbs), substituted lightweight aluminum rings for the hub (cut from scrap HVAC ductwork), and routed all wiring through a hollow brass curtain rod mounted discreetly behind the tree. The result? A luminous, weightless crown that appeared to float 10 inches above the needles. Guests consistently described it as “like standing under a frozen waterfall.” More importantly, the building inspector approved it on-site—because every component met electrical and fire-safety standards, and zero modifications were made to the tree’s structure. Lena’s key insight: “The starburst isn’t about adding mass. It’s about redirecting attention—using light to imply volume where there’s none.”
Pro Styling & Troubleshooting Guide
Even perfect installation can fall flat without refinement. These are the subtle adjustments professionals use to elevate the effect from “nice” to “unforgettable.”
- Angle Precision: After initial setup, step back 8 feet and observe. Adjust each strand so its outer third rises at a consistent 22–25 degree angle—not flat, not steep. This mimics natural light dispersion and avoids a “spiderweb” look.
- Layering Depth: Use two light temperatures: warm white (2700K) for inner 4–6 strands, cool white (4000K) for outer 4–6. The contrast creates perceived depth—like atmospheric perspective in painting.
- Branch Integration: Gently tuck 2–3 inches of each strand’s inner section *between* upper branches—not over them. This anchors the light source visually and diffuses glare.
- Troubleshooting Flicker: If strands flicker only when all are plugged in, your multi-outlet adapter is overloaded. Swap for one rated at 15A (1800W) minimum—even if total wattage seems low. LED inrush current can trip lower-rated units.
- Wind-Proofing (for outdoor trees): Add micro-weights: thread 1/4-inch steel washers onto the outer 2 inches of each strand before securing. They’re invisible but prevent flutter in breezes.
FAQ: Practical Questions Answered
Can I use battery-operated lights for the starburst?
No—battery packs lack the stable, continuous voltage needed for uniform brightness across 8–12 strands. Voltage sag causes outer bulbs to dim significantly, breaking the radial illusion. Additionally, battery swaps mid-season risk misalignment during reinstallation. Stick with hardwired, UL-listed LEDs.
How do I store the starburst for next year without tangling?
After unplugging, unthread each strand from its support line *without cutting*. Coil each strand separately using the “over-under” method: loop clockwise, then counter-clockwise, alternating every 6 inches. Secure each coil with twist-ties labeled “S1,” “S2,” etc. Store the hub, support lines, and adapter in a rigid plastic box (like a tool organizer) with compartments—never a soft bag.
Will this work on an artificial tree with hinged branches?
Yes—with one modification. Skip drilling the hub. Instead, use heavy-duty removable adhesive hooks (e.g., Command™ Outdoor Large Hooks) on the top 3–4 hinge joints. Attach support lines to the hooks, then drape strands as usual. The hooks leave no residue and hold up to 7.5 lbs each—more than enough for lightweight LED strands.
Conclusion: Your Tree’s Most Meaningful Moment Starts at the Top
The starburst lighting effect is more than decoration. It’s a quiet act of intention—a decision to invest time in craftsmanship rather than convenience, to prioritize safety without sacrificing beauty, and to treat the treetop not as an afterthought but as the emotional apex of your seasonal space. Unlike disposable toppers, this effect grows richer with each year: you’ll refine angles, experiment with color temperatures, learn how your specific tree responds to tension and light. It becomes part of your family’s holiday language—something children point to and say, “That’s *our* light.” There’s deep satisfaction in knowing exactly how each strand is secured, why each angle matters, and how the whole system breathes safely within your home’s electrical ecosystem. You’re not just lighting a tree. You’re shaping light, honoring tradition through technique, and creating a moment of stillness that radiates outward—just like the effect itself.


 浙公网安备
33010002000092号
浙公网安备
33010002000092号 浙B2-20120091-4
Comments
No comments yet. Why don't you start the discussion?