
A Christmas tree is more than a holiday centerpiece—it’s a canvas for creativity. While traditional red-and-green or all-white trees have their charm, a growing number of decorators are turning to gradient designs for a modern, elegant twist. One of the most visually striking approaches is the ombre effect: a seamless transition from dark at the base to light at the top. This technique adds depth, dimension, and sophistication to your holiday decor, transforming your tree into a work of art.
The ombre effect mimics natural gradients found in sunsets, skies, or even forest canopies. When applied to a Christmas tree, it creates a sense of movement and balance that draws the eye upward. Whether you’re using ornaments, lights, ribbons, or a combination, the key lies in careful planning and thoughtful layering. Done well, an ombre tree becomes a conversation starter—subtle yet unforgettable.
Understanding the Ombre Concept for Holiday Decor
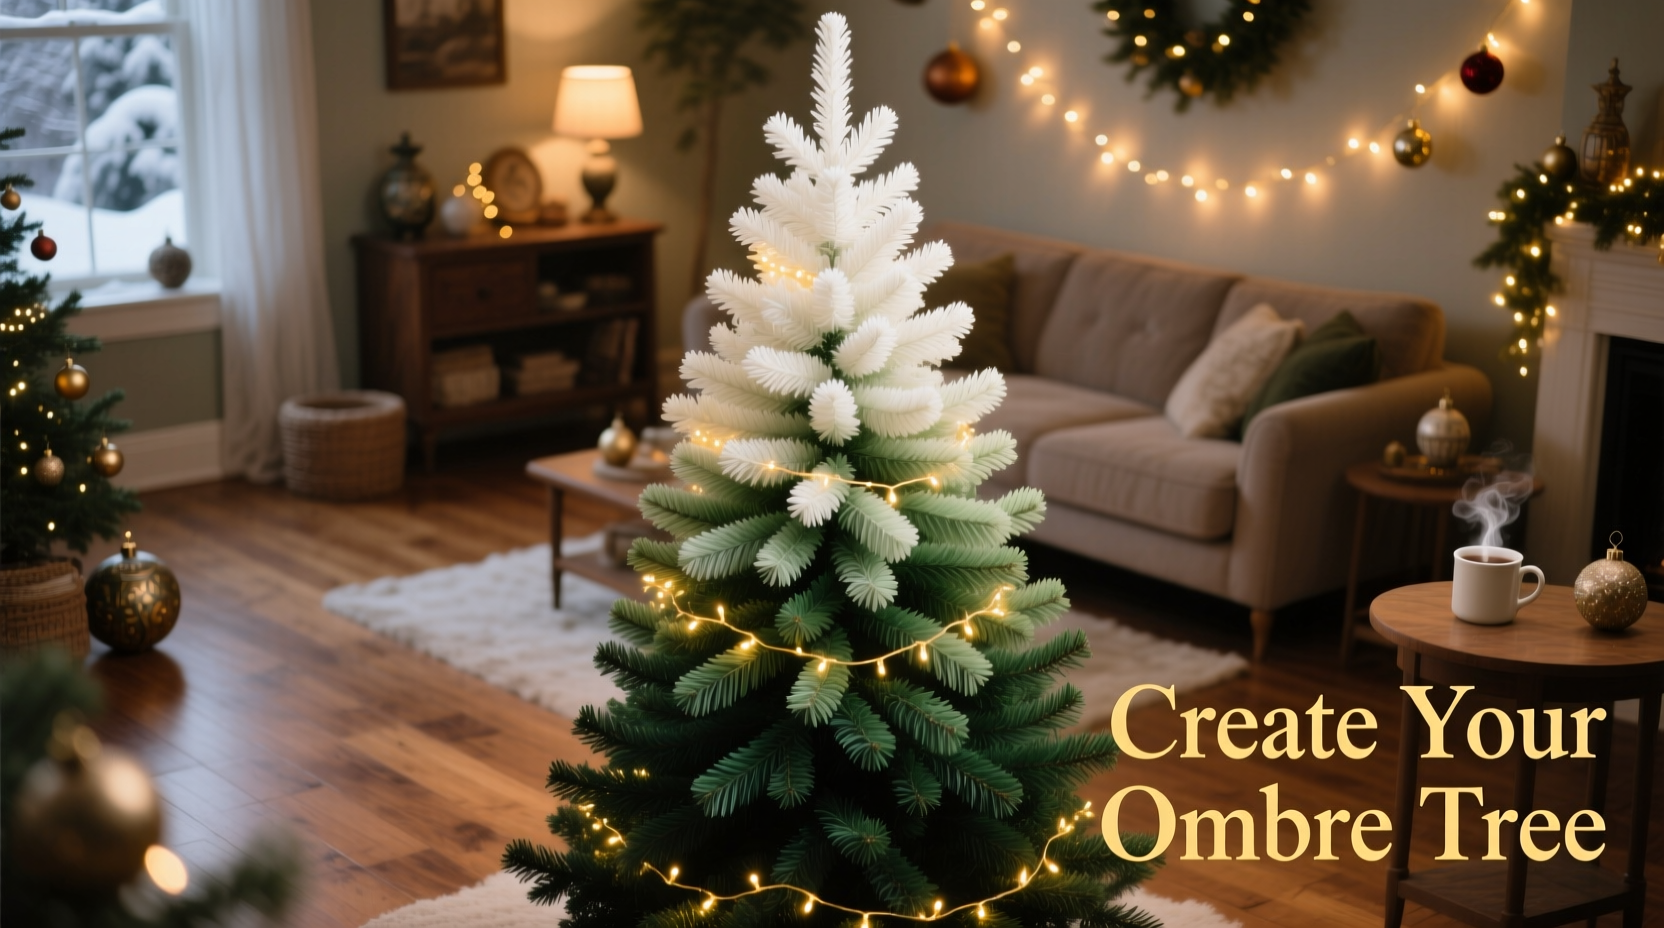
Ombre, derived from the French word for \"shade\" or \"shadow,\" refers to a gradual blending of one color into another. In fashion and design, it's commonly used to create smooth transitions between hues. Applied to a Christmas tree, this means selecting a color family—such as green, silver, blue, or gold—and arranging decorations so they shift progressively from rich, saturated tones at the bottom to pale, almost translucent shades at the top.
The most effective ombre trees follow a vertical logic: heavier, darker elements ground the design, while lighter accents lift the eye. This not only enhances visual harmony but also gives the illusion of height, making even a modest tree appear taller and more stately.
To execute this successfully, choose a spectrum within a single color family. For example:
- Forest Green → Sage → Silver-Green → White
- Navy Blue → Steel Blue → Icy Blue → Frosted White
- Bronze → Champagne → Pearl → Opal
Sticking to one palette prevents visual clutter and ensures the gradient feels intentional rather than chaotic. The transition should feel effortless—like morning light creeping up a mountainside.
Step-by-Step Guide to Building Your Ombre Tree
Creating an ombre Christmas tree isn’t about luck—it’s about structure, patience, and precision. Follow these steps to achieve a polished, professional result.
- Choose Your Base Color Family
Select a primary hue and identify its lightest and darkest variations. Stick to no more than five distinct shades to maintain cohesion. - Prepare Your Tree
Use a full, well-shaped tree with evenly spaced branches. Artificial trees with hinged branches offer better control over ornament placement. Fluff each branch thoroughly to create volume and space for layering. - Start with Lighting
Begin by stringing warm white or clear LED lights from the trunk outward. Ensure consistent coverage throughout. If you want a cooler tone, use daylight-white bulbs to complement icy finishes. Avoid colored lights—they’ll interfere with your ombre palette. - Divide the Tree into Zones
Mentally split the tree into three sections: lower (bottom third), middle (center third), and upper (top third). This helps you assign colors systematically. - Ornament in Sequence
Start at the base with your darkest ornaments. Place them deeper into the interior branches to anchor the design. Move upward, gradually introducing lighter shades. Use larger, heavier ornaments at the bottom; smaller, delicate ones near the top. - Incorporate Texture Gradually
Alongside color, vary texture: matte at the base, glossy in the middle, glittery or frosted at the top. This reinforces the luminous progression. - Add Finishing Ribbons or Garlands
Use wide satin or velvet ribbon in your darkest shade, starting at the base. Spiral it upward, switching to lighter fabrics as you go. Alternatively, drape beaded garlands that fade from opaque to translucent. - Crown with a Light Topper
Finish with a star, angel, or bow in your lightest shade—white, silver, or crystal. Avoid oversized or dark toppers that weigh down the apex.
Proportions Matter: Ornament Distribution Chart
| Tree Section | Color Shade | Ornament Size | Texture & Finish | Suggested Quantity (for 6-ft tree) |
|---|---|---|---|---|
| Lower Third | Deep Forest, Navy, Burgundy | Large (3–4 inch) | Matte, Velvet, Wood | 18–22 ornaments |
| Middle Third | Emerald, Teal, Rose Gold | Medium (2.5–3 inch) | Satin, Metallic | 14–18 ornaments |
| Upper Third | Seafoam, Lilac, Champagne | Small (1.5–2.5 inch) | Glitter, Frosted Glass, Crystal | 10–14 ornaments |
| Apex (Top 6 inches) | White, Silver, Clear | Tiny or Topper Only | Reflective, Iridescent | 1 large topper + 4–6 mini accents |
Material Selection: What Works Best for Each Zone
The materials you choose impact how light interacts with your tree. A successful ombre relies not just on color, but on how surfaces reflect or absorb light.
In the lower section, opt for dense, light-absorbing materials like velvet, felt, or ceramic. These give weight and richness. Mid-level ornaments benefit from semi-reflective finishes—metallic spray, brushed gold, or iridescent coatings—that catch the light without overwhelming. At the top, prioritize transparency and sparkle: glass, acrylic, mirrored beads, or sequined fabric.
If using themed ornaments (snowflakes, stars, pinecones), keep shapes consistent across the gradient. A mismatched silhouette disrupts the eye’s journey. For example, if you start with snowflake-shaped dark blue ornaments, continue with lighter snowflakes—not switch to bells or balls halfway up.
“An ombre tree succeeds when every element supports the gradient—not competes with it. It’s not about individual pieces; it’s about the collective glow.” — Clara Mendez, Interior Stylist & Holiday Design Consultant
Avoiding Common Mistakes
Even experienced decorators can misstep when attempting an ombre tree. Here are frequent pitfalls and how to avoid them:
- Skipping the mock-up: Placing ornaments without testing the sequence leads to jarring jumps in tone. Always lay them out first.
- Overloading the top: Too many large or dark ornaments at the crown kills the lift. Keep the upper third airy and minimal.
- Mixing too many colors: Adding red baubles or gold stars “for contrast” breaks the gradient. Stay within your chosen family.
- Poor light distribution: Dark spots hide the ombre effect. Ensure lights penetrate deep into branches, especially at the base.
- Ignoring branch density: Slim or sparse trees struggle to hold layered ornaments. Choose a full-profile tree for best results.
Real Example: Sarah’s Coastal Winter Ombre Tree
Sarah, a designer from Portland, wanted a tree that reflected her coastal home and love for winter mornings. She chose a blue-to-white ombre scheme inspired by ocean depths fading into mist.
She began with a pre-lit 7-foot artificial tree using warm white LEDs. Her ornament palette moved from navy glass orbs at the base to seafoam resin teardrops in the middle, then to frosted ice-blue bubbles and finally clear crystal prisms at the top. She added hand-wrapped oyster-shell garlands at the base and spiraled iridescent tinsel strands upward, switching to fine silver mesh near the crown.
The result? A tree that looked like light filtering through water. Guests described it as “calming” and “ethereal.” Sarah credits her success to strict adherence to the five-shade rule and spending two hours laying out ornaments on her dining table before hanging a single one.
Essential Checklist for Your Ombre Tree Project
Before you begin decorating, gather and confirm the following:
- ☐ Full, well-fluffed artificial or real tree
- ☐ String lights (warm or cool white, 700+ bulbs for 6–7 ft tree)
- ☐ 4–5 shades of ornaments in one color family
- ☐ Assorted sizes: large at base, small at top
- ☐ Textural variety: matte, satin, glitter, frosted
- ☐ Ribbon or garland in matching gradient
- ☐ Lightweight, light-colored tree topper
- ☐ Time block: allow 3–5 hours for careful placement
- ☐ Reference layout: test color order on a table first
Frequently Asked Questions
Can I use a real tree for an ombre effect?
Yes, but with caution. Real trees shed needles and may discolor over time, which can disrupt the gradient. Use durable, shatterproof ornaments and avoid placing heavy items on fragile branches. Consider applying a light anti-static spray to reduce dust buildup that dulls finishes.
How do I maintain the ombre look if my tree has gaps?
Fill sparse areas with floral picks or mini wreaths in transitional shades. For example, if jumping from deep green to pale mint leaves a gap, insert sage or eucalyptus-toned sprays to bridge the difference. Also, rotate the tree during setup to view it from all angles and correct imbalances.
Is it possible to do ombre with multiple colors?
Stick to one color family for true ombre. However, you can blend adjacent families subtly—like green into aqua or burgundy into plum—if the transition remains smooth and gradual. Avoid sharp contrasts like red to blue or purple to yellow, as these create bands, not blends.
Final Touches and Year-Round Inspiration
Once your tree is complete, view it at different times of day. Natural daylight reveals true color values, while evening lighting emphasizes shimmer and depth. Take photos from multiple angles—what looks balanced up close might appear uneven from across the room.
Consider adding a subtle scent to enhance the experience. Use a diffuser nearby with pine, cedar, or frosted apple notes—avoid strong fragrances that clash with the visual subtlety of the ombre.
And don’t limit this idea to December. The ombre principle applies beautifully to other seasonal displays: pastel gradients for Easter, sunset hues for Thanksgiving, or monochrome grays for a modern winter tablescape. Mastering this technique opens doors to year-round design elegance.
Conclusion: Bring Your Vision to Life
An ombre Christmas tree is more than decoration—it’s storytelling through color and light. By moving from dark to light, you echo nature’s rhythms, evoke emotional uplift, and craft a focal point that feels both grounded and aspirational. This isn’t about perfection; it’s about intention. Every ornament placed with care contributes to a greater whole.
Start small if needed. Even a partial gradient—dark green below, white above, with a few transitional pieces—can make a dramatic difference. Gather your supplies, trust your eye, and embrace the process. When you step back and see that seamless flow of color rising like dawn, you’ll know you’ve created something truly special.


 浙公网安备
33010002000092号
浙公网安备
33010002000092号 浙B2-20120091-4
Comments
No comments yet. Why don't you start the discussion?