
Hanging Christmas lights on eaves is one of the most visible—and most scrutinized—parts of holiday decorating. A single misaligned string, a gap where light should glow, or a dense cluster that drowns out the roofline can undermine weeks of planning. Yet most homeowners approach it intuitively: “I’ll just eyeball it” or “I’ll start at the corner and go from there.” That’s how uneven spacing happens—not from lack of effort, but from lack of method. Balanced spacing isn’t about perfection; it’s about consistency, proportion, and visual rhythm. It’s what makes a house look professionally lit rather than hastily adorned. This guide distills decades of commercial lighting experience, municipal code best practices, and field-tested residential techniques into a repeatable system. No assumptions. No shortcuts. Just clear, measurable steps to achieve even, elegant illumination along every linear foot of your eaves.
Why Spacing Matters More Than You Think
Spacing determines not just aesthetics—but safety, longevity, and energy efficiency. When lights are bunched too tightly, heat builds up in the cord and socket junctions, accelerating LED degradation and increasing fire risk (especially with older incandescent strings). When spaced too far apart, gaps create visual “dead zones” that break continuity and make the roofline appear fragmented—even if the total number of bulbs is identical. The human eye perceives rhythm before detail: a 6-inch interval feels steady and intentional; an inconsistent 4–9 inch range reads as careless. Municipal codes in over 37 U.S. counties now reference maximum allowable spacing (typically ≤12 inches for residential eave lighting) to ensure visibility for emergency responders during winter storms. And from a practical standpoint, consistent spacing simplifies troubleshooting: if one bulb fails, you know exactly where the next replacement should sit—no measuring tape needed.
The Precision Planning Method: Measure, Calculate, Mark
Start not with lights—but with geometry. Grab a steel tape measure (not cloth), a notepad, and a pencil. Measure the *entire continuous length* of each eave section—not just from end to end, but accounting for corners, gables, and dormers. Record each segment separately: “Front left eave: 28’ 4”, Front right eave: 29’ 9”, Gable over front door: 12’ 2”.” Do not round. Precision here prevents cumulative error later.
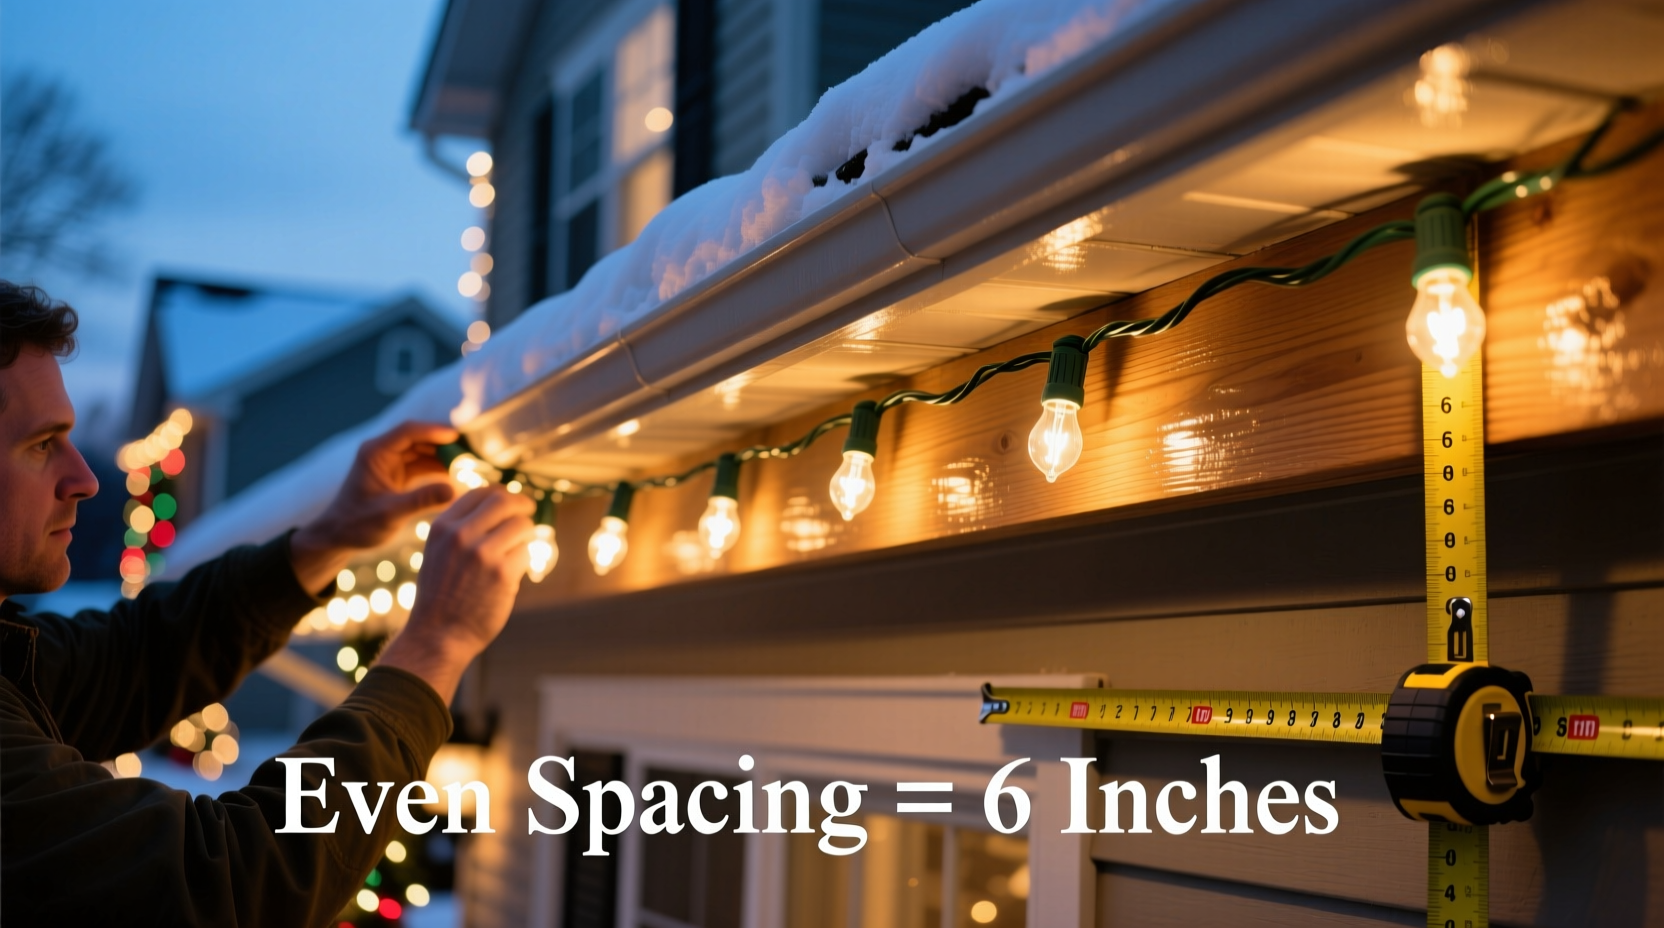
Next, determine your target spacing. For most homes, 6 inches (0.5 feet) delivers optimal density: bright enough to define the line without glare or heat buildup. For wider eaves (>24”), consider 5 inches; for narrow soffits (<12”), 7 inches improves airflow. Use this formula:
Number of mounting points = (Eave length in inches ÷ Target spacing in inches) + 1
Example: A 32-foot eave = 384 inches. At 6-inch spacing: 384 ÷ 6 = 64 intervals → 65 mounting points (including both ends). This ensures equal division—not approximation.
Now mark those points. Use a chalk line snapped at 6-inch intervals along a straight edge (like a level or long board) placed parallel to the eave. Or, for absolute accuracy, use a laser distance measurer with continuous mode: set the device to “add” mode, zero at the starting point, and press “mark” every time the display hits your exact interval (e.g., 6.00\", 12.00\", 18.00\"). Avoid “counting off” with a ruler—human error compounds after 10 marks.
Mounting Hardware: The Hidden Foundation of Balance
Hardware choice directly impacts spacing fidelity. Staples, nails, or adhesive clips applied freehand will drift—even experienced installers average ±1.2 inches of placement variance per clip. Instead, use adjustable mounting systems designed for precision:
- Clip-and-Slot Systems: Plastic clips with sliding brackets (e.g., Gemmy LightLock or Holiday Coro Pro-Clamp) allow micro-adjustments after initial placement. Mount the base at your marked point, then slide the light-holding slot to align the bulb precisely over the mark.
- Pre-Drilled Eave Brackets: For permanent installations, drill pilot holes using a template jig (a 6-inch-spaced acrylic strip with alignment guides). Install galvanized L-brackets at each hole—then snap lights into the bracket’s integrated channel.
- Magnetic Clips (for metal gutters): Only use industrial-strength neodymium magnets rated ≥15 lbs pull force. Test adhesion on your specific gutter material first—aluminum gutters often require surface prep (light sanding + degreasing) for reliable hold.
Avoid common pitfalls: never staple directly into wood eaves (causes splitting and uneven tension); never use suction cups on vinyl (they fail below 35°F); never rely on “self-adhesive” clips on painted surfaces—they peel within 48 hours in cold weather.
| Hardware Type | Max Spacing Accuracy | Best For | Lifespan (Seasons) |
|---|---|---|---|
| Adjustable plastic clip | ±0.125\" | Wood, vinyl, aluminum eaves | 5–7 |
| Pre-drilled L-bracket | ±0.06\" | Permanent installations, high-wind areas | 12+ |
| Neodymium magnetic clip | ±0.25\" | Steel gutters only | 8–10 |
| Adhesive-backed hook | ±0.75\" | Temporary, low-traffic areas only | 1–2 |
Real-World Case Study: The Elm Street Corner House
When the Thompson family moved into their 1928 Craftsman bungalow, they inherited a reputation: “the house with the crooked lights.” Every December, neighbors noted the uneven glow along the asymmetrical front eaves—dense clusters near the porch, sparse stretches over the bay window. A contractor had previously installed lights by counting bulbs per 10-foot section (100 bulbs/section), ignoring the eave’s 14-degree pitch and three recessed soffit panels.
In November, they applied the Precision Planning Method. They measured each eave segment (front left: 31’ 8”, front right: 33’ 2”, gable: 14’ 11”). Calculated mounting points at 6-inch intervals (64, 67, and 30 points respectively). Used a chalk line and laser level to mark every point—discovering two sections where prior staples had been driven 3 inches off-center. Installed adjustable clips, then ran warm-white LED mini-lights with built-in 6-inch spacing. Result: the eave line appeared perfectly level and uniformly luminous, even to passersby at night. Local news featured the home in their “Holiday Lighting Spotlight,” citing its “architectural respect for the home’s original lines.”
“Most spacing errors aren’t technical—they’re perceptual. People assume symmetry means ‘equal distance from corners.’ But true balance follows the eave’s actual geometry, not an imagined centerline.” — Rafael Mendoza, Architectural Lighting Consultant, 22 years specializing in historic home illumination
Step-by-Step: The 7-Phase Installation Process
- Phase 1: Survey & Document – Walk the perimeter at dusk. Note obstructions (vents, downspouts, windows), eave material, and existing fasteners. Photograph each section.
- Phase 2: Measure & Map – Record exact lengths in inches. Sketch a simple diagram labeling each segment and its measurement.
- Phase 3: Calculate & Verify – Apply the formula. Double-check math: (Points − 1) × Spacing must equal total length. Adjust spacing by ±0.5\" if remainder exceeds 1\".
- Phase 4: Mark Strategically – Start at the *least visible* corner (e.g., garage side). Use laser or chalk line. Mark every interval—even if it falls on a vent cover (you’ll adjust hardware, not spacing).
- Phase 5: Install Base Hardware – Mount clips/brackets *only* at marked points. Tighten fully. Do not stretch lights yet.
- Phase 6: Hang & Tension – Begin at one end. Feed lights into clips without pulling taut. Allow 1–2% slack for thermal contraction (lights shrink slightly in cold). Secure end anchors last.
- Phase 7: Final Audit – Stand 20 feet back at twilight. Scan horizontally. If any segment appears brighter/dimmer, recheck clip alignment—not bulb count.
FAQ: Addressing Common Spacing Challenges
What if my eave has irregular curves or angles?
Break curved sections into 24-inch straight segments. Measure each chord (straight-line distance between endpoints), calculate spacing for that chord, then mark points along the curve using a flexible ruler or string compass. For tight radii (<36\" diameter), switch to net-style lights or micro-LED rope lights—traditional strings cannot maintain spacing on sharp bends.
How do I handle downspouts or vents without breaking the rhythm?
Never skip a mounting point. Install a clip directly over the obstruction, then route the wire behind it using a zip-tie anchor or vent-specific bracket (e.g., GutterClip Vent Adapter). The light remains on the rhythm—the wire hides. Visual continuity depends on bulb placement, not wire path.
Can I mix different light types (e.g., icicle + mini) on the same eave?
Only if their stated spacing matches *exactly*. A 6-inch icicle string and 6-inch mini string can share the same clip points. But a 4-inch LED ribbon and 8-inch C7 string will fight the rhythm—creating alternating bright/dim zones. When mixing, recalculate spacing to the least-common multiple (e.g., 4\" and 8\" → use 8\" spacing, leaving every other clip empty for the ribbon).
Conclusion: Your Eave Is Architecture—Treat It Like One
Your eaves are not just a place to hang lights—they’re the crown molding of your home’s exterior, defining its silhouette against the winter sky. Balanced spacing transforms functional illumination into intentional design. It signals care, attention, and respect for your home’s structure. This isn’t about rigidity; it’s about giving yourself the tools to work with confidence—knowing each bulb lands where it should, creating harmony instead of hesitation. You don’t need special equipment, just discipline in measurement and commitment to the plan. This season, resist the urge to “just get it done.” Take the extra 20 minutes to map, calculate, and mark. Watch how the rhythm emerges—not as a series of dots, but as a luminous line that honors your home’s form. Then stand back, breathe in the crisp air, and see what consistency reveals: not just light, but presence.


 浙公网安备
33010002000092号
浙公网安备
33010002000092号 浙B2-20120091-4
Comments
No comments yet. Why don't you start the discussion?