
No two faces are perfectly symmetrical—research shows that facial asymmetry is not only normal but present in nearly every individual. While subtle differences contribute to character and uniqueness, they can sometimes complicate makeup application, leading to uneven or unbalanced results. The goal isn’t to erase natural asymmetry but to use strategic cosmetic techniques to create the illusion of balance and harmony. Whether one eye sits slightly higher, your brows differ in shape, or your cheekbones vary in prominence, understanding how to correct and enhance with precision can transform your entire look. This guide breaks down actionable methods, tools, and mindset shifts to help you achieve a polished, cohesive appearance regardless of your facial structure.
Understanding Facial Asymmetry: Why It Matters in Makeup
Facial asymmetry occurs when the left and right sides of the face don’t mirror each other exactly. Differences may include eye size or height, brow arch placement, nose tilt, jawline definition, or lip fullness. These variations are often genetic, developmental, or influenced by lifestyle habits like sleeping position or chewing patterns. While asymmetry is completely normal—and even contributes to facial recognition and attractiveness in moderation—it becomes relevant in makeup when product placement exaggerates rather than minimizes imbalances.
Makeup artists emphasize that correction isn't about achieving mathematical perfection. Instead, it's about optical balancing: guiding light, shadow, color, and line to shift focus and harmonize features. For instance, a slightly drooping eyelid can be lifted visually with winged liner, while a fuller lower lip can be balanced with contouring on the upper lip. The foundation of this process lies in observation and adaptation—not rigid rules.
“Makeup should enhance, not mask. The most effective corrections are subtle adjustments that respect the face’s natural architecture.” — Lila Nguyen, Celebrity Makeup Artist & Educator
Step-by-Step Guide: Creating Visual Symmetry with Makeup
Follow this structured approach to identify asymmetries and apply corrective techniques efficiently. With practice, these steps become intuitive and significantly reduce the need for constant touch-ups.
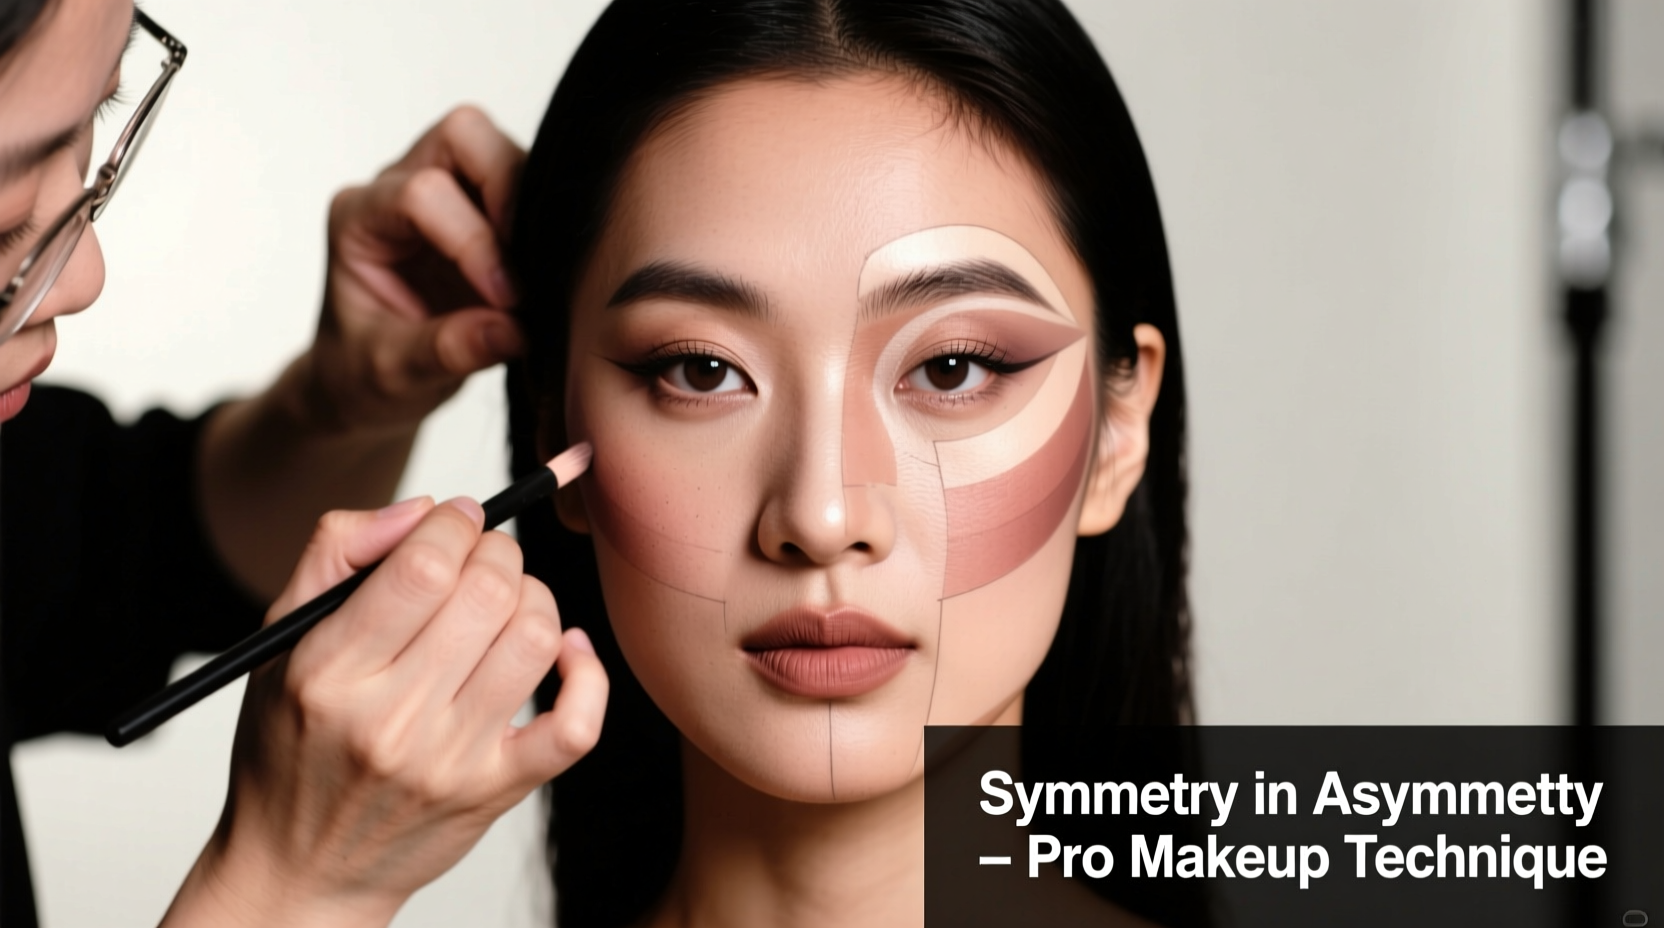
- Assess Your Face in Natural Light: Stand in front of a well-lit mirror with neutral lighting (avoid yellow or blue tones). Look at your face straight on—no angles. Take note of any obvious differences: Are your eyes level? Do both brows start at the same point relative to your nose?
- Map Key Landmarks: Use a clean spoolie or thin brush to lightly mark:
- The inner corner of each eye (should align vertically with the nostril)
- The pupil center (ideal spot for crease depth)
- The outer edge of the iris (guides winged liner length)
- Brow peak (should fall above the outer edge of the iris)
- Start with Skincare and Primer: Apply an even layer of moisturizer and primer to ensure a smooth base. Uneven texture can distort product application and accentuate imbalance.
- Foundation First, Then Assess: Apply foundation and concealer before re-evaluating symmetry. Sometimes minor discoloration or redness distracts the eye more than structural differences.
- Correct Before Color: Use contour, highlight, and concealer to adjust proportions. For example, if one cheekbone appears flatter, deepen the hollow slightly on the opposite side to create equilibrium.
- Work Features One at a Time: Complete both eyes before moving to brows, then lips. This prevents over-correction from constant comparison.
- Check in Multiple Lights and Angles: Review your work under daylight, indoor lighting, and phone flash. Step back from the mirror to see the overall effect.
Do’s and Don’ts: Common Pitfalls and Best Practices
Even experienced users make mistakes when compensating for asymmetry. The following table outlines frequent errors and their solutions.
| Do’s | Don’ts |
|---|---|
| Do use the iris as a guide for eyeshadow placement and liner wings | Don’t extend liner beyond the outer corner of the iris on both eyes equally if one eye is set wider |
| Do blend one side to match the softer edge of the other, rather than forcing identical shapes | Don’t apply the exact same number of eyeshadow layers to both eyes without assessing intensity |
| Do use a lighter highlight on the less prominent cheekbone to bring it forward visually | Don’t over-contour the stronger side, which can look harsh and unnatural |
| Do adjust lip liner based on actual lip shape, not an idealized symmetry | Don’t trace both lips identically if one naturally curves higher |
| Do take photos periodically to train your eye to see imbalances | Don’t rely solely on mirrors; reflections can be misleading |
Tips for Specific Feature Adjustments
Different features require tailored strategies. Here’s how to address common asymmetries:
Eyes at Different Heights
If one eye appears higher, avoid lifting the lower one to match—that can look strained. Instead, subtly adjust the eyeliner and shadow on the higher eye: keep the wing slightly shorter or lower the crease placement by a millimeter. On the lower eye, extend the wing upward just enough to guide the eye upward visually. Use mascara more heavily on the lower eye’s outer lashes to draw attention outward and up.
Uneven Eyelid Size or Hooding
A more hooded lid will naturally show less shadow. Rather than piling on pigment, focus on placing shimmer on the visible portion and deepening the outer V on the less hooded side to balance depth perception. Use tightlining to define the lash line without opening the eye too wide.
Brows That Don’t Match
Never force brows into identical shapes—they follow bone structure and hair growth patterns unique to each side. Instead, define the arch where it feels natural on each side, then use light strokes to mimic symmetry. Fill sparse areas with hair-like strokes, and use a clear brow gel to set them in a unified direction. A tinted gel can help blend color discrepancies.
Lips with Uneven Fullness
Overlining the thinner side slightly helps, but avoid sharp lines. Use a nude liner just outside the natural border and blend immediately with a brush. On the fuller side, apply a slightly deeper shade in the center to minimize perceived volume. Gloss works best on the thinner half to attract light.
Mini Case Study: Achieving Balance with Subtle Adjustments
Sophia, a 28-year-old marketing professional, struggled with her right eye appearing smaller and lower than her left. She’d often spend extra time trying to “fix” it by applying heavier shadow and longer liner, which only made the imbalance worse. After consulting a makeup artist, she changed her approach: instead of altering the smaller eye, she softened the makeup on the larger one. She shortened the wing on the left eye by 2mm and used a matte taupe just below the crease to gently reduce its prominence. On the right eye, she added a pinpoint of highlight to the inner corner and curled lashes more intensely. The result? A much more balanced look that took less time and felt more natural. Photos showed a significant improvement in perceived symmetry—even though the underlying structure hadn’t changed.
Essential Tools and Products for Precision Work
Having the right tools makes a dramatic difference in control and accuracy:
- Angled Brushes: For precise contouring and liner work—especially useful when adjusting one side differently.
- Small Flat Shader Brush: Allows for controlled eyeshadow placement on asymmetrical lids.
- Mirror with Magnification: A dual-sided mirror helps spot tiny differences invisible at arm’s length.
- Concealer Pen with Fine Tip: Ideal for micro-adjustments around brows, lips, and under-eyes.
- Photo Mode on Phone: Use the front camera in natural light to review your work objectively.
“Your phone is your most honest mirror. Learn to trust it.” — Jamal Reed, Editorial Makeup Stylist
FAQ: Common Questions About Symmetrical Makeup
Can I ever achieve perfect symmetry with makeup?
No—and you shouldn’t aim to. Perfect symmetry can appear artificial or unsettling. The human brain prefers slight asymmetry as it reads as more natural and expressive. The goal is visual balance, not mirroring.
Should I always apply the same amount of product to both sides?
Not necessarily. Equal quantity doesn’t mean equal effect. One eye may need less shadow because it’s more open, or one cheek may require less blush due to natural rosiness. Apply based on visual outcome, not measurement.
How long does it take to learn my face’s asymmetry patterns?
With consistent observation, most people identify their key differences within 2–4 weeks. Taking weekly photos and noting what feels “off” accelerates the learning curve. Keep a simple journal: “Left eye liner too long,” “Right brow lifts at end,” etc.
Checklist: Achieve Balanced Makeup in 7 Steps
- ☐ Assess face in natural, front-facing light
- ☐ Identify primary asymmetry (eyes, brows, cheeks, lips)
- ☐ Prep skin evenly with moisturizer and primer
- ☐ Apply base makeup and reassess balance
- ☐ Correct with contour, highlight, or concealer as needed
- ☐ Work one feature at a time, comparing only after completion
- ☐ Final check in multiple lighting conditions and photo mode
Conclusion: Embrace Imperfection, Enhance Harmony
Creating symmetry in an asymmetrical face isn’t about erasing who you are—it’s about refining how you’re seen. Makeup is a tool of expression and empowerment, not a disguise. By learning your face’s unique geometry and applying thoughtful, targeted techniques, you can craft a look that feels confident, cohesive, and authentically you. The most polished results come not from rigidity, but from adaptability: seeing the face as a dynamic canvas rather than a static template. Start small. Focus on one imbalance at a time. Use reflection, photography, and patience to build awareness. Over time, these corrections become second nature, freeing you to enjoy makeup not as a fix, but as an art form.


 浙公网安备
33010002000092号
浙公网安备
33010002000092号 浙B2-20120091-4
Comments
No comments yet. Why don't you start the discussion?