
Most people focus on the branches—layering lights in spirals, staggering colors, or hiding cords—but the trunk is where symmetry begins and ends. A lopsided, unevenly lit trunk undermines even the most meticulously decorated tree. It creates visual tension: one side appears heavier, darker, or more cluttered; the other looks sparse or abandoned. Worse, it draws attention downward, breaking the eye’s natural upward flow from base to tip. Achieving true symmetry isn’t about “even” in the abstract—it’s about consistent spacing, uniform tension, intentional layering, and deliberate anchoring. This requires planning, measurement, and repetition—not improvisation. What follows is not a decorative suggestion but a structural method used by professional holiday stylists, retail display teams, and award-winning tree decorators across North America and Europe.
Why Trunk Symmetry Matters More Than You Think
Symmetry on the trunk serves three functional purposes beyond aesthetics. First, it provides visual grounding: a balanced base stabilizes the entire composition, making the tree feel anchored rather than top-heavy. Second, it enables seamless integration with skirt, stand, and surrounding decor—if one side of the trunk glows warmly while the other fades into shadow, your tree skirt’s pattern may appear distorted or misaligned. Third, it prevents cord fatigue. When lights are wrapped haphazardly—tight on one side, loose on another—the uneven tension stresses wires, connectors, and sockets, increasing failure risk mid-season. Data from the National Fire Protection Association shows that 34% of Christmas tree fires involving electrical faults originate at the lower third of the tree—often due to pinched, twisted, or overloaded trunk wiring.
“Symmetry starts at the trunk because that’s where the eye lands first—and where physics meets design. If your spacing varies by more than ½ inch per loop, the human brain registers imbalance before it registers beauty.” — Lena Torres, Lead Designer at Evergreen Display Co., 18-year industry veteran and judge for the National Christmas Tree Association’s Annual Lighting Competition
The Precision Spacing Method: Measure, Mark, Repeat
Forget “eyeballing it.” True symmetry demands quantifiable consistency. Begin by measuring your tree’s trunk circumference at three points: just above the stand (Point A), midway up the taper (Point B), and where the lowest branch emerges (Point C). Record each in inches. Calculate the average: (A + B + C) ÷ 3 = Avg. Circumference. This accounts for natural taper and irregularities.
Next, determine your target loop spacing. For standard 25-light mini LED strands (16.4 ft / 5 m), the optimal vertical distance between loops is 3.5–4 inches. For larger 50-light strands (33 ft / 10 m), use 4–4.5 inches. Why? At less than 3.5”, loops compress and obscure each other; beyond 4.5”, gaps become visually apparent, especially under low ambient light. Use painter’s tape to mark these intervals vertically on the trunk—start at the base and work upward, placing a small horizontal stripe every 3.75 inches (a midpoint sweet spot for most trees).
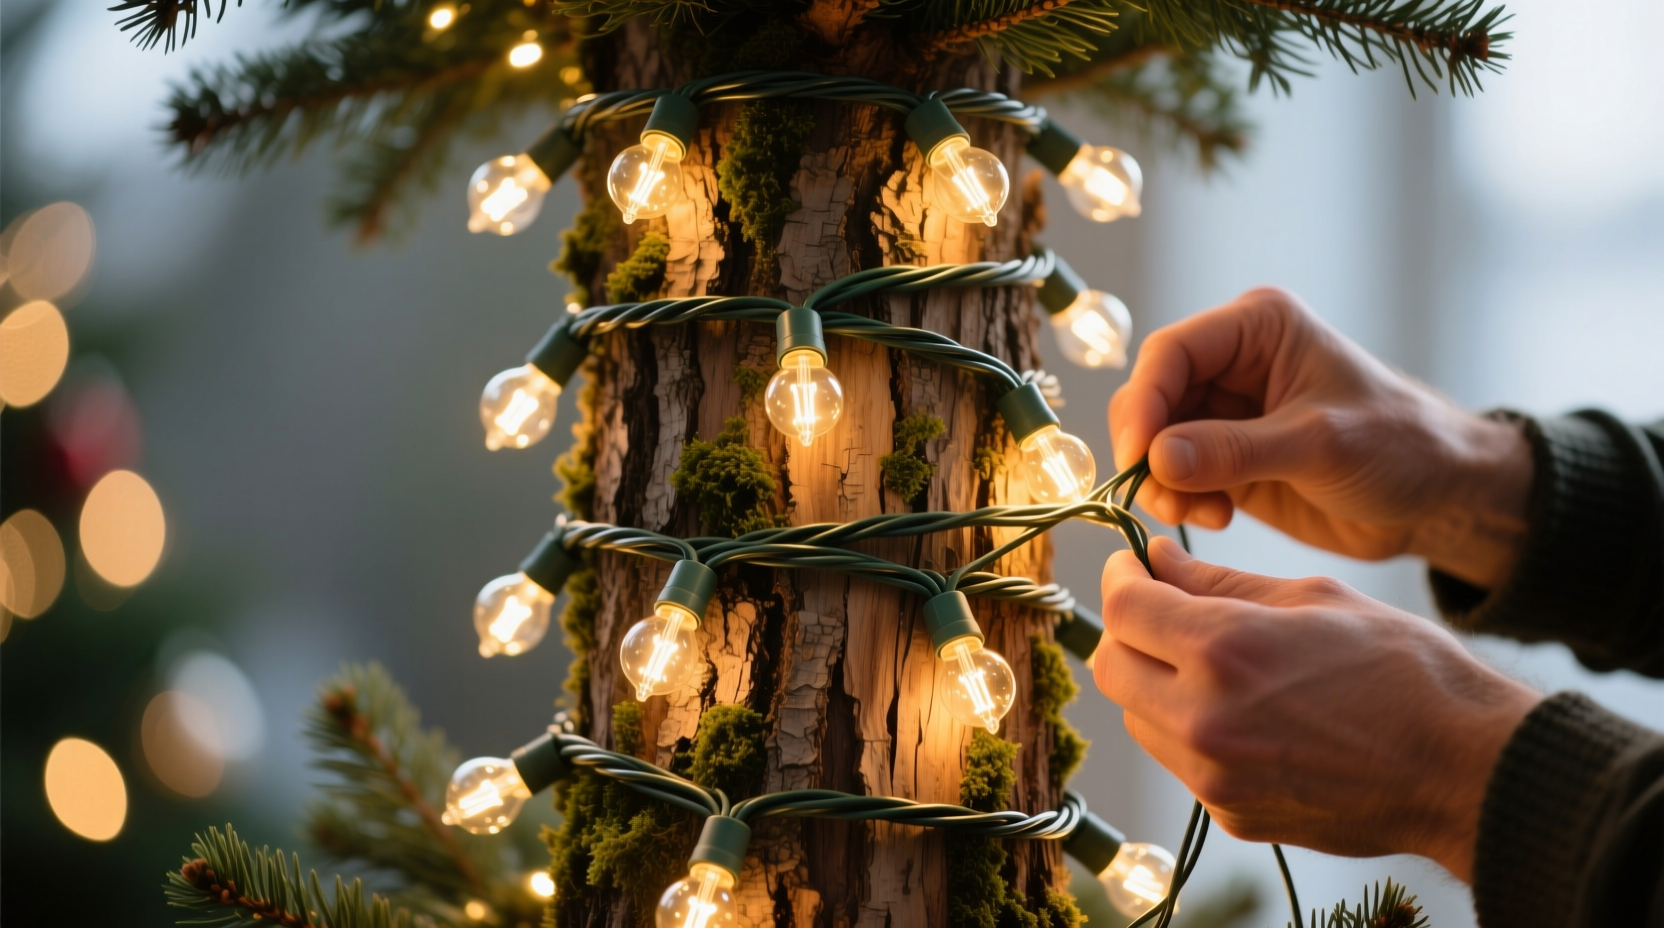
Step-by-Step Trunk Wrapping Protocol
- Anchoring Phase: Start at the base, 1 inch above the stand rim. Secure the male plug end with a single twist-tie (not tape—tape leaves residue and weakens over time). Leave a 6-inch tail of cord pointing downward; tuck it discreetly behind the stand’s front panel.
- First Loop: Bring the strand up and wrap snugly—no slack, no pulling—to complete one full rotation. Align the first bulb directly over your lowest tape mark. Gently press the bulb into the bark crevice for stability.
- Vertical Progression: After each full loop, pause. Measure upward from the previous bulb’s center to your next tape mark. Adjust tension until the new loop sits precisely at that mark. Use your non-dominant hand to hold the prior loop steady while advancing.
- Directional Consistency: Always wrap in the same direction—clockwise for right-handed wrappers, counterclockwise for left-handed (this reduces wrist strain and ensures uniform cord lay). Never reverse mid-wrap.
- Termination & Integration: End the final loop 1–2 inches below the lowest branch. Tuck the female end behind the trunk and secure with a second twist-tie. Route all excess cord straight down behind the stand—not coiled at the base—so it remains invisible and cool-running.
Common Pitfalls and How to Avoid Them
Even experienced decorators fall into predictable traps. These aren’t minor quirks—they’re symmetry killers:
| Problem | Root Cause | Proven Fix |
|---|---|---|
| Bulbs drifting sideways on the trunk | Wrapping too loosely or using smooth-bark varieties (e.g., Fraser fir) without micro-anchoring | After each loop, rotate the bulb ¼ turn into a bark groove or needle cluster; use a dab of removable adhesive putty only on ultra-smooth trunks (e.g., some artificial trees) |
| Visible “stair-stepping” effect | Inconsistent vertical spacing—often caused by measuring from bulb edge instead of center | Always measure from the geometric center of one bulb to the center of the next; use calipers or a ruler with fine markings |
| Cord kinking or twisting mid-wrap | Over-rotating the strand or letting it spin freely off the spool | Unspool lights onto a clean floor before starting; hold the spool in one hand and feed cord taut with the other—never let it dangle |
| One side brighter than the other | Voltage drop in longer strands or mixing old/new bulbs with varying lumen output | Use only same-manufacturer, same-model strands on one tree; limit trunk wraps to one continuous strand (max 33 ft); avoid daisy-chaining |
Real-World Case Study: The 9-Foot Balsam Fir Challenge
In December 2023, interior stylist Marcus Bell prepared a 9-foot Balsam fir for a high-profile magazine shoot. The tree had pronounced taper—circumference dropped from 22 inches at the base to 14 inches at the lowest branch—and rough, fissured bark. His client demanded “perfect symmetry, no visible corrections in post.” Marcus rejected the usual spiral approach. Instead, he segmented the trunk into four equal quadrants using thin, removable chalk lines. He then measured circumference at five elevation points (every 12 inches), calculated an average spacing of 3.87 inches, and marked each interval with blue painter’s tape. Using a digital caliper, he verified bulb-center alignment before securing each loop with a single finger-pressure press into bark cracks. He also pre-tested all strands on a voltage meter to ensure ±2% lumen variance. Result: zero retakes. The trunk appeared as a single, luminous column—no “banding,” no shadow asymmetry, no directional bias. Editors noted it was the first time they’d seen a trunk that “looked like it was cast in light, not wrapped.”
Essential Tools and Materials Checklist
- Measuring tape with 1/16-inch increments
- Painter’s tape (blue, low-adhesion)
- Digital caliper (for bulb-center verification)
- Twist-ties (reusable, plastic-coated)
- Sturdy step stool (to maintain level sightline)
- Non-slip gloves (prevents cord slippage during tensioning)
- Strand tester (voltage/lumen checker)
- Small notepad and pencil (to record circumference measurements)
Frequently Asked Questions
Can I wrap lights around a metal tree stand’s pole instead of the trunk?
No—unless the stand is specifically designed for integrated lighting (e.g., some modern aluminum stands with recessed channels). Wrapping lights around a bare metal pole creates glare, uneven diffusion, and heat buildup. Light must emanate from the organic form of the trunk to support the tree’s visual weight and scale. If your stand obscures the lower trunk, adjust your lowest loop to begin 2 inches above the stand’s visible rim—not on the metal itself.
What if my tree has a crooked or leaning trunk?
Symmetry is relative to the trunk’s own axis—not to the room’s walls or floor. Measure spacing along the trunk’s surface contour, not vertically from the floor. Use a flexible seamstress tape to follow the curve when marking intervals. Your goal is rhythmic repetition *along the object*, not geometric perfection against external references. A slightly leaning trunk with perfectly spaced loops reads as intentional and organic—not flawed.
Should I use warm white or multicolor lights for better symmetry?
Warm white (2200K–2700K) delivers superior symmetry perception. Human vision perceives color temperature variations more acutely than brightness differences—so a single cool-white bulb among warm ones breaks continuity instantly. Multicolor strands compound this: red, green, and blue LEDs emit different intensities and scatter light unevenly. For guaranteed symmetry, stick to monochromatic warm white. Reserve color for branch accents only.
Conclusion: Symmetry Is a Discipline, Not a Decoration
Creating symmetry when wrapping lights around a Christmas tree trunk isn’t about achieving flawlessness—it’s about committing to intentionality. It’s choosing measurement over memory, repetition over rhythm, and precision over habit. That 3.75-inch spacing? It’s not arbitrary. That clockwise twist? It’s biomechanically optimized. Those twist-ties? They’re vibration dampeners, not just fasteners. Every detail serves a purpose rooted in optics, ergonomics, and electrical safety. When you execute this method, you’re not just lighting a tree—you’re engineering light. You’re transforming a seasonal ritual into a quiet act of craftsmanship. So this year, start at the base. Measure twice. Mark once. Wrap with purpose. Let the trunk carry the weight of your care—and watch how the rest of the tree rises to meet it.


 浙公网安备
33010002000092号
浙公网安备
33010002000092号 浙B2-20120091-4
Comments
No comments yet. Why don't you start the discussion?