
Digital photos accumulate faster than any physical photo album ever could. A birthday party, a vacation, a pet’s silly moment—each event spawns dozens, sometimes hundreds, of images. Over time, these files scatter across devices, cloud accounts, and forgotten folders. The result? A chaotic library where finding a single photo feels like searching for a needle in a haystack. Decluttering your digital photos isn’t just about freeing up space—it’s about reclaiming access, memory, and meaning. With a structured approach, you can transform your disorganized collection into a searchable, sustainable archive that lasts for years.
Why Digital Photo Clutter Is Worse Than You Think
Unlike physical clutter, digital clutter is invisible until it becomes unmanageable. Most people don’t realize they have a problem until they need a specific photo—perhaps for a presentation, a gift, or a family record—and can’t locate it. According to a 2023 study by the International Data Corporation, the average smartphone user stores over 4,000 photos, with nearly 30% classified as duplicates, blurry shots, or screenshots. This digital hoarding leads to slower devices, fragmented backups, and emotional frustration when memories are lost in the noise.
The psychological impact is real. When photos aren’t organized, we’re less likely to revisit them. Important moments fade not because we forget, but because we can’t retrieve them. As digital archivist Dr. Lila Chen explains:
“Disorganized photo collections create a false sense of preservation. People think their memories are safe because they’re ‘saved somewhere,’ but without structure, those memories become inaccessible—and functionally lost.” — Dr. Lila Chen, Digital Archiving Researcher, MIT Media Lab
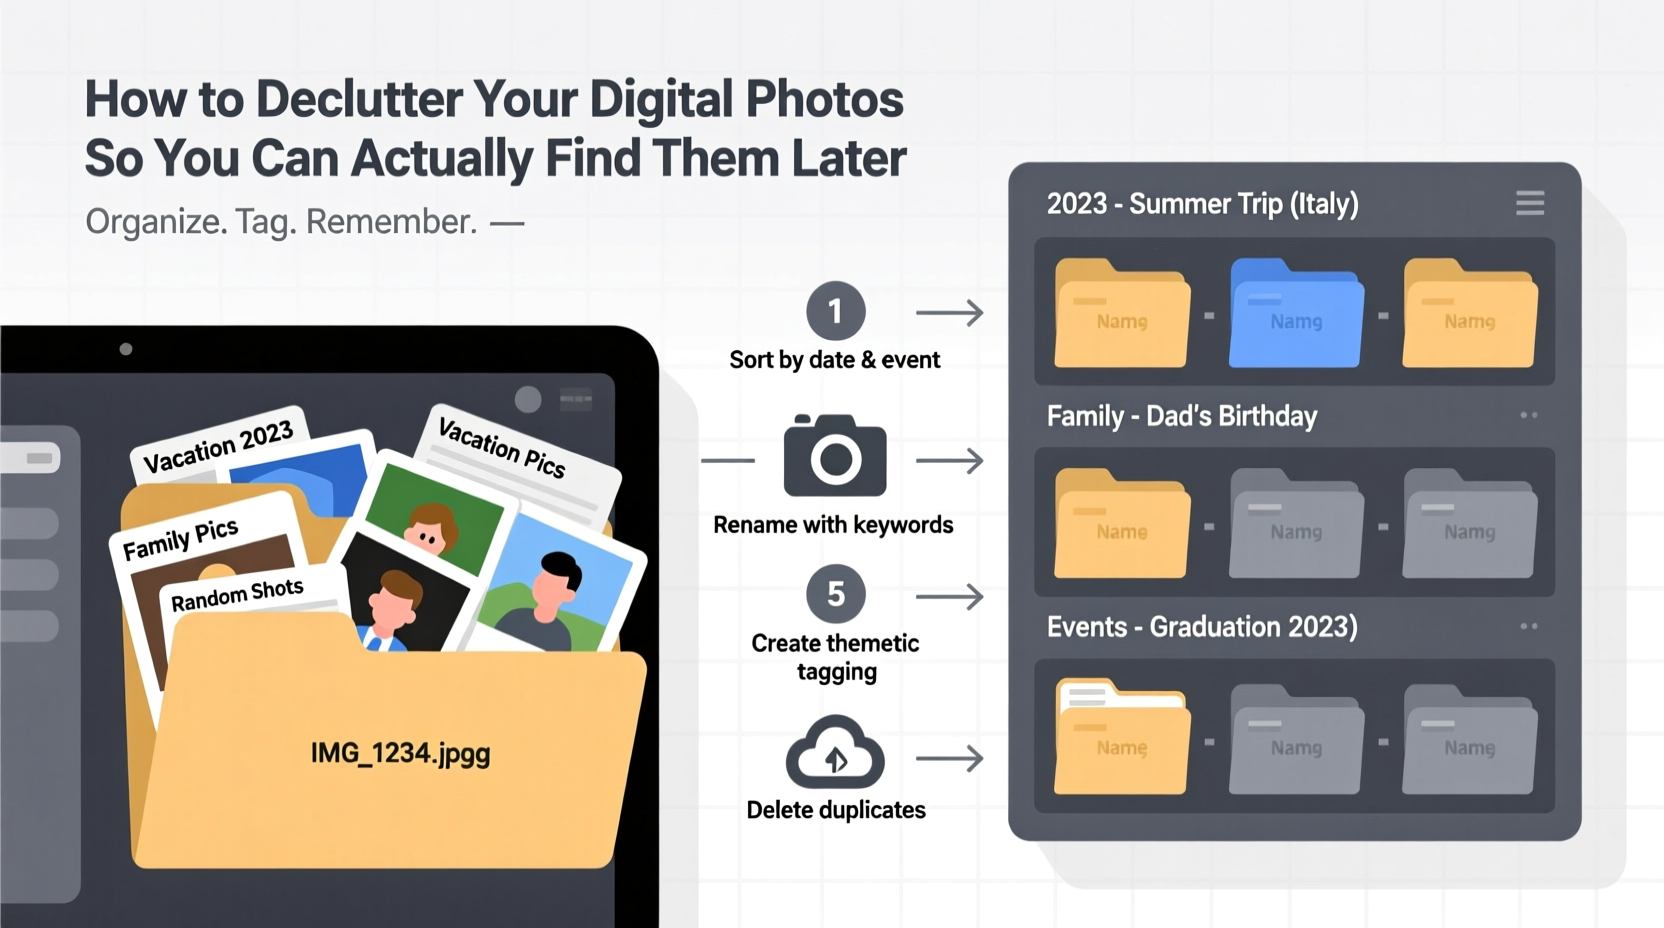
A Step-by-Step Guide to Decluttering Your Photos
Decluttering digital photos requires more than just deleting duplicates. It’s a process of consolidation, curation, and categorization. Follow this six-phase timeline to rebuild your photo library from the ground up.
- Phase 1: Gather Everything (1–2 Days)
Collect all your photos in one place. This includes your phone, laptop, external drives, old computers, and cloud services like Google Photos, iCloud, Dropbox, or OneDrive. Use file transfer tools or cloud sync to move everything into a single master folder on your primary computer. Label it “Photos_Master_Backup” and ensure it’s backed up to at least two locations (e.g., external drive + cloud). - Phase 2: Delete the Obvious (1 Day)
Start removing low-value images: blurry shots, duplicate selfies, accidental triggers, and outdated screenshots. Don’t overthink—trust your gut. If you wouldn’t show it to someone, delete it. Use bulk selection tools to speed this up. On macOS, use Preview; on Windows, File Explorer works well. For advanced users, tools like VisiPics or Duplicate Photo Fixer can detect visual duplicates. - Phase 3: Sort by Year (1–2 Days)
Create top-level folders labeled by year (e.g., “2020,” “2021”). Move all remaining photos into these folders based on capture date. Most operating systems allow sorting by “Date Modified” or “Date Taken.” Use metadata instead of filenames—this avoids errors caused by manual renaming. - Phase 4: Organize Within Years (2–3 Days)
Inside each yearly folder, create subfolders for major events or themes: “Family Reunion July 2022,” “Japan Trip,” “Work Conference 2021,” “Daily Life – Summer.” Avoid overly granular categories (e.g., “Monday Morning Coffee”) unless they hold special significance. Aim for 5–10 key folders per year. - Phase 5: Add Metadata & Keywords (Ongoing, 30 Min/Week)
Enhance searchability by adding descriptive metadata. Use free tools like Adobe Bridge (free version), XnView, or built-in OS features to tag photos with keywords: names of people, locations, occasions. For example, a photo from a wedding might include tags: “wedding,” “Sarah & James,” “June 2023,” “outdoor ceremony,” “California.” - Phase 6: Set Up Automated Backups (1 Hour)
Protect your work. Enable automatic syncing between your master folder and a cloud service. Use redundancy: one local backup (external drive) and one offsite (cloud). Services like Backblaze, iDrive, or Synology NAS offer continuous, encrypted backup with version history.
Best Practices for Long-Term Photo Management
Once your photos are decluttered, maintain order with consistent habits. The goal is sustainability—not perfection.
- Review monthly: Spend 20 minutes each month sorting new photos into your system. Delaying leads to backlog.
- Limit shooting volume: Be intentional. Instead of taking 50 similar shots, capture 3–5 high-quality ones.
- Use consistent naming: Adopt a format like YYYY-MM-DD_EventName (e.g., 2023-08-15_BirthdayParty). This ensures chronological sorting across devices.
- Archive annually: At year-end, finalize that year’s folder, back it up, and close it. This creates natural milestones.
Do’s and Don’ts of Digital Photo Organization
| Do | Don’t |
|---|---|
| Back up photos to at least two locations | Rely solely on one device or cloud service |
| Use standardized folder structures | Create random folders like “Stuff” or “Photos_old” |
| Add keywords and descriptions to key photos | Assume you’ll remember context years later |
| Delete duplicates and low-quality images early | Keep every photo “just in case” |
| Use cloud sync tools with version history | Manually drag and drop without verification |
Real Example: How Maria Reclaimed Her Photo Library
Maria, a freelance photographer and mother of two, had over 18,000 photos scattered across her iPhone, an old MacBook, and a Google account she hadn’t accessed in three years. She wanted to create a digital scrapbook for her daughter’s fifth birthday but couldn’t find usable images from the past year. Frustrated, she dedicated a weekend to decluttering using the method above.
She began by downloading all photos to a 2TB external drive. After eliminating 7,200 duplicates and test shots, she sorted the remaining 10,800 by year. She created themed albums—“Family Weekends,” “School Events,” “Travel”—and tagged each with names and locations. She then set up automatic backups to Backblaze and shared a curated gallery with relatives via Google Photos.
Three months later, when her son needed a photo for a school project, she found the exact image in under 30 seconds. “I used to dread looking for photos,” she said. “Now it’s easy. I even go back and enjoy them sometimes.”
Essential Tools for Photo Organization
You don’t need expensive software to manage your photos. Here are reliable, accessible tools based on your platform:
- Google Photos: Free tier offers AI-powered search, facial grouping, and auto-backup. Best for Android users or those already in the Google ecosystem.
- Apple Photos: Seamless integration with iOS/Mac, strong facial recognition, and smart albums. Ideal for iPhone users.
- XnView MP: Free desktop app for Windows, Mac, and Linux. Supports batch renaming, metadata editing, and format conversion.
- Adobe Bridge: Lightweight organizer from Adobe. Excellent for metadata tagging and previewing RAW files.
- FreeFileSync: Open-source tool to synchronize folders across devices and backups.
Avoid relying solely on social media platforms like Facebook or Instagram for storage. These services compress images, strip metadata, and may remove content without notice.
Photo Decluttering Checklist
Use this checklist to stay on track during your cleanup process:
- ✅ Identify all sources of photos (phone, laptop, cloud, drives)
- ✅ Transfer everything to a master folder on your main computer
- ✅ Back up the master folder to two separate locations
- ✅ Delete obvious junk: duplicates, blurry shots, screenshots
- ✅ Sort remaining photos into yearly folders
- ✅ Create meaningful subfolders by event or theme
- ✅ Add keywords and descriptions to important photos
- ✅ Set up automated backup system
- ✅ Schedule monthly review sessions
- ✅ Share curated albums with family if desired
Frequently Asked Questions
How do I handle photos stored in multiple cloud services?
Consolidate them into one master location first. Choose a primary service (e.g., Google Photos) and migrate others into it. Disable auto-upload on secondary accounts to prevent future fragmentation. Keep the originals backed up locally in case of migration errors.
Should I keep RAW files and edited versions?
Only if you actively edit or print professionally. For most users, the final JPEG or HEIC version is sufficient. If you do keep RAW files, store them in a parallel “RAW” folder within the same event directory to avoid confusion.
What if I don’t have time to do this all at once?
Break it into weekly sprints. Dedicate 60–90 minutes per week to one phase. For example, Week 1: gather sources. Week 2: transfer files. Progress compounds quickly, and even partial organization improves searchability.
Final Thoughts: Make Your Memories Accessible Again
Decluttering your digital photos isn’t a one-time chore—it’s an investment in your personal history. Every photo you organize is a memory preserved, not just stored. The effort pays off the next time you want to laugh at your dog’s goofy face, show your child their first steps, or prove you were there at that pivotal moment. Technology should serve memory, not bury it.
Start small. Pick one year. Delete ten bad photos. Create one clear folder. Build momentum through action, not perfection. In a few weeks, you’ll have a system that works—one where finding a photo isn’t a struggle, but a simple act of recall.


 浙公网安备
33010002000092号
浙公网安备
33010002000092号 浙B2-20120091-4
Comments
No comments yet. Why don't you start the discussion?