
Digital photos are both a blessing and a burden. We capture more moments than ever before, but over time, our devices fill up with duplicates, blurry shots, screenshots, and forgotten folders. The result? A chaotic digital archive where finding that one special photo feels like searching for a needle in a haystack. The good news is you can reclaim control—without risking the loss of meaningful memories. This guide offers a clear, practical, and emotionally intelligent approach to organizing your digital photo collection. You’ll learn how to sort, preserve, and streamline thousands of images with confidence.
Why Digital Photo Clutter Matters
Unlike physical clutter, digital disorganization is invisible—until it isn’t. Slow phone performance, full storage warnings, and difficulty retrieving photos during important moments reveal the cost of unchecked accumulation. Beyond technical strain, emotional fatigue sets in when every scroll through your camera roll becomes overwhelming. Psychologists note that digital clutter can trigger mild anxiety and decision fatigue, especially when we feel pressure to “keep everything just in case.”
The key is not deletion, but intentionality. Decluttering digital photos isn’t about erasing the past—it’s about honoring your memories by making them accessible, organized, and safe.
“Organizing your digital memories isn’t just about storage—it’s an act of self-care. When you can find your favorite moments easily, you’re more likely to relive and share them.” — Dr. Lena Torres, Digital Wellness Researcher
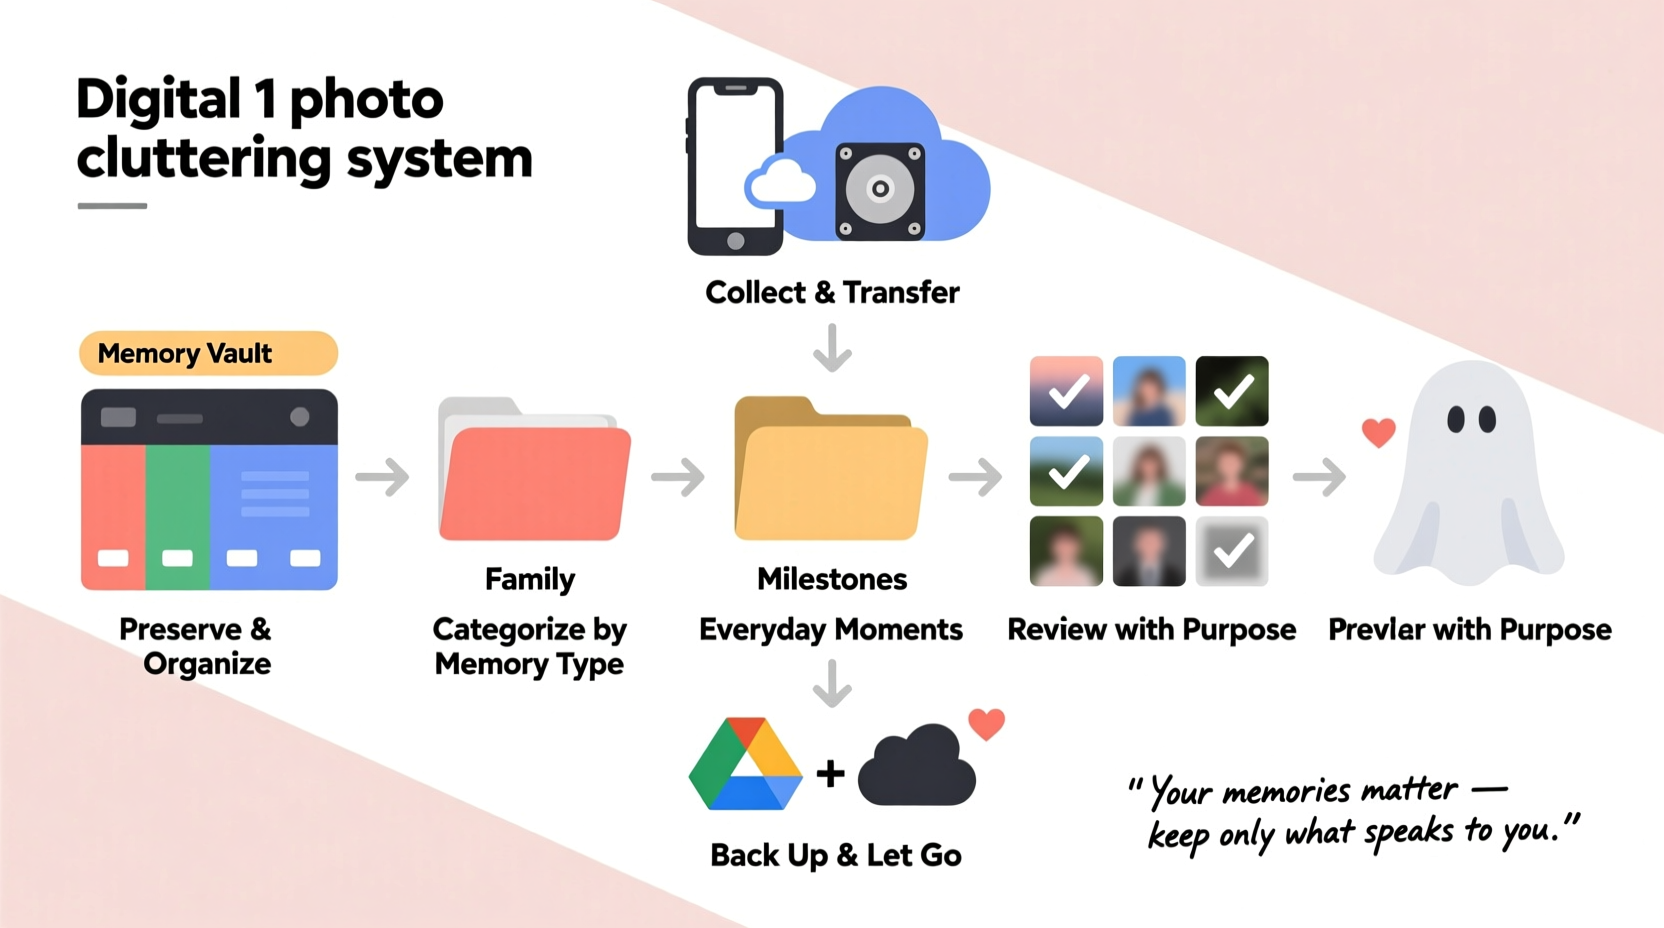
A 6-Step System to Declutter Without Regret
This method balances efficiency with emotional awareness. It avoids rash deletions and builds in safeguards so no critical memory slips through the cracks. Follow each phase deliberately, allowing time between steps if needed.
Step 1: Secure Your Foundation (Backup Everything First)
Before touching a single photo, ensure all your data is safely backed up. This is non-negotiable. Use the 3-2-1 rule: three copies of your data, on two different media types, with one stored offsite.
- Copy 1: Original files on your primary device (phone, computer).
- Copy 2: External hard drive or NAS (Network Attached Storage).
- Copy 3: Cloud service (Google Photos, iCloud, Dropbox, or Backblaze).
Verify the backup by opening a few random folders from each source. Confirm timestamps and file counts match across locations. Only proceed once you're certain everything is preserved.
Step 2: Gather All Photos in One Place
Photos often live across multiple devices and platforms: iPhone, Android, old laptops, SD cards, social media, cloud albums. Begin by consolidating them into a single folder on your computer. Name this master folder clearly, such as “All_Photos_Master_2024.”
Create subfolders by year (e.g., “2020,” “2021”) as you import. Use consistent naming to avoid confusion later. Tools like Adobe Bridge, Google Takeout, or even simple drag-and-drop file transfers can help centralize your collection.
Step 3: Sort by Category and Quality
Now begin sorting—not by emotion, but by objective criteria. Work in focused sessions of 60–90 minutes to avoid burnout. Use these filters:
- Duplicates: Remove exact or near-duplicate images (e.g., five nearly identical shots of the same birthday cake).
- Blurred or unusable shots: Delete photos that are out of focus, cut-off, or too dark to recover.
- Screenshots and receipts: Move non-memory items to a separate folder called “Utilities” or “Documents.”
- Spam or failed downloads: Clear corrupted files or partial uploads.
Use software tools to speed this process:
- Google Photos: Has built-in duplicate detection.
- Adobe Lightroom: Offers visual comparison for similar images.
- Duplicate Photo Cleaner (Windows/Mac): Scans for redundant files across folders.
Step 4: Organize by Meaningful Themes
Once low-value files are removed, structure what remains around people, events, and places that matter. Avoid generic labels like “Vacation” or “Family.” Be specific:
- “Italy Trip – June 2019”
- “Emma’s Graduation – May 2023”
- “Weekend at Lake House – Summer 2022”
- “Baby’s First Year – Monthly Collages”
Within each folder, consider sub-organizing by date or day. For example, under “Italy Trip,” create “Day 1 – Rome,” “Day 2 – Florence,” etc. This makes retrieval intuitive and narrative-driven.
Step 5: Preserve the Emotional Core
This is where many people hesitate. What if you delete something important? Instead of deleting immediately, create a “Review_Later” folder. Move borderline photos here—images you’re unsure about, slightly blurry but emotionally significant, or group shots where someone’s eyes are closed.
Set a calendar reminder for 30 days. Revisit the folder with fresh eyes. Chances are, most will no longer feel essential. If a photo still tugs at your heart, keep it. If not, let it go. This delay reduces regret and builds confidence in your decisions.
Step 6: Automate Maintenance Going Forward
Prevent future clutter by building habits now. Set monthly or quarterly times to review new photos. During these sessions:
- Delete junk immediately (screenshots, failed attempts).
- Back up new additions to your cloud and external drive.
- Move current-month photos into dated or themed folders.
Enable automatic syncing from your phone to your preferred cloud service. Turn on features like Google Photos’ “Memories” or Apple’s “Recap” to stay connected to highlights without manual effort.
Do’s and Don’ts of Digital Photo Management
| Do’s | Don’ts |
|---|---|
| Do back up before deleting anything. | Don’t rely solely on your phone or laptop as the only copy. |
| Do use descriptive folder names. | Don’t use vague terms like “Stuff” or “Photos(1).” |
| Do review and delete regularly. | Don’t wait years to organize—small efforts prevent big headaches. |
| Do involve family in decisions about shared memories. | Don’t delete group photos without checking with others. |
| Do protect privacy—avoid storing sensitive images in unsecured clouds. | Don’t upload medical, financial, or private content to public platforms. |
Real Example: How Sarah Reclaimed Her Photo Library
Sarah, a mother of two, had over 18,000 photos scattered across her old iPhone, a failing MacBook, and a Google account she hadn’t checked in two years. She dreaded looking at her camera roll because it was filled with toy ads, app notifications, and dozens of nearly identical playground snapshots.
She followed the six-step system over four weekends. First, she used Google Takeout to pull everything into one folder on her desktop. Then, she deleted 7,200 files—mostly duplicates and screenshots. She created themed folders for each child’s milestones and annual vacations. The remaining 10,800 photos were backed up to an encrypted external drive and Google One.
Most importantly, Sarah printed a 20-page photo book of her daughter’s first year using the curated images. “I finally feel proud of my collection,” she said. “It’s not perfect, but I can actually enjoy it now.”
Essential Checklist for Digital Photo Decluttering
Print or save this checklist to track your progress:
- ✅ Back up all devices to cloud and external drive
- ✅ Create a master folder named “All_Photos_Master_[Year]”
- ✅ Import photos from phones, tablets, old computers, and SD cards
- ✅ Delete obvious junk: duplicates, blurry shots, screenshots
- ✅ Sort remaining photos into yearly folders
- ✅ Rename folders with specific themes (events, trips, people)
- ✅ Move uncertain photos to a “Review_Later” folder
- ✅ Schedule a 30-day review for the “Review_Later” folder
- ✅ Set up automatic cloud sync on all devices
- ✅ Plan a quarterly 30-minute maintenance session
Frequently Asked Questions
What if I accidentally delete a photo I wanted to keep?
If you’ve followed the backup protocol, restoration is simple. Most cloud services keep deleted files in a trash or bin for 30–60 days. External drives allow direct recovery from the backup folder. Always double-check your backups before permanent deletion.
Should I keep RAW files from my DSLR camera?
Only if you actively edit or may reprint professionally. RAW files are large and rarely viewed casually. Keep the final edited JPEG or TIFF for daily access, and archive RAW files separately on a labeled drive marked “Archival – Do Not Delete.”
How do I handle photos of people who have passed away?
Treat these with extra care. Create a dedicated memorial folder. Consider making a slideshow or printed album as a tribute. Never rush deletions in this category. If uncertain, leave the files in a “Legacy_Memories” folder and revisit them after several months.
Conclusion: Your Memories Deserve Better Than Chaos
Decluttering your digital photos isn’t a one-time cleanup—it’s the beginning of a healthier relationship with your memories. By following this step-by-step system, you transform chaos into clarity, ensuring your most cherished moments are not just saved, but seen and savored. You don’t need to keep every pixel; you just need to protect what matters.


 浙公网安备
33010002000092号
浙公网安备
33010002000092号 浙B2-20120091-4
Comments
No comments yet. Why don't you start the discussion?