
In compact urban living spaces, the holiday season can present a unique challenge: how to bring festive cheer without overwhelming limited square footage. A traditional floor-to-ceiling Christmas tree may dominate a studio or one-bedroom apartment, making rooms feel cramped and cluttered. Yet the spirit of the holidays doesn’t have to be sacrificed for the sake of space. By reimagining where and how a Christmas tree occupies your home, you can celebrate with creativity and flair. The key lies in leveraging vertical space—often underutilized—to create a striking, joyful centerpiece that enhances rather than obstructs your environment.
Vertical decorating isn't just about saving floor area; it's about transforming walls, corners, and high ceilings into dynamic displays. From wall-mounted silhouettes to suspended treetop installations, these strategies allow even the tiniest apartments to host a memorable holiday aesthetic. With thoughtful planning, clever design choices, and a few DIY tricks, you can craft a tree that feels full, festive, and perfectly proportioned to your space.
Rethink the Tree: Beyond the Floor Stand
The classic potted or stand-mounted evergreen is deeply ingrained in holiday tradition, but it’s not the only way to enjoy a Christmas tree—especially when floor space is at a premium. In small apartments, moving the tree off the ground and onto the wall or ceiling opens up new possibilities. Vertical trees take many forms: flat plywood cutouts shaped like conifers, string-light triangles mounted on walls, or even ladder-style shelves dressed as tiered evergreens.
One of the most effective alternatives is the **wall-mounted silhouette tree**. These are typically made from wood, metal, or thick cardboard cut into a triangular tree shape and affixed to a wall. They occupy zero floor space and can be painted, wrapped in garland, or adorned with ornaments along the edges. Because they’re two-dimensional, they work especially well in narrow hallways, above sofas, or in kitchens where counter space is valuable.
Another innovative approach is the **ladder tree**. Lean a tall wooden ladder against a wall and drape green garlands down each side, securing them at intervals. Hang ornaments, lights, and mini stockings from the rungs to create a cascading effect. This method turns an ordinary household item into a festive focal point while drawing the eye upward, enhancing the perception of height in low-ceilinged rooms.
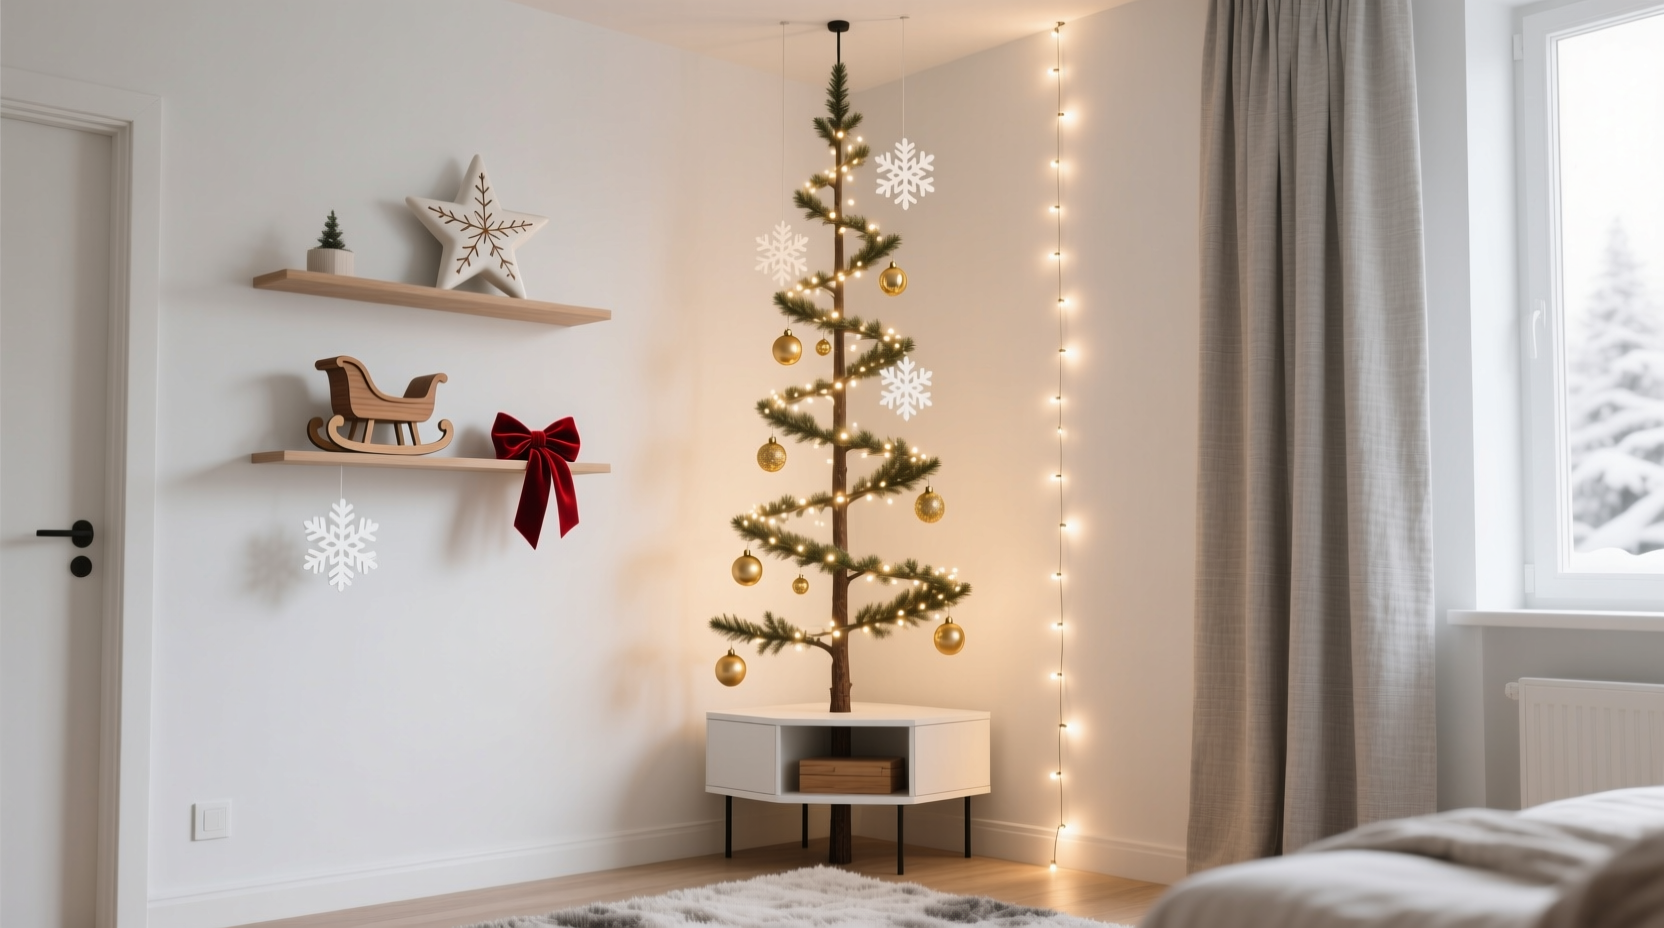
Maximizing Height: Ceiling and High-Wall Installations
In studios or open-concept apartments, vertical space often goes underused. Ceilings, crown molding, and high walls offer untapped potential for holiday displays. One bold strategy is to suspend a **miniature tree from the ceiling** using clear fishing line or decorative rope. This creates a floating effect, especially when paired with twinkling fairy lights. The tree itself can be a small pre-lit model (12–24 inches), hung upside-down so its branches flare outward like a chandelier.
For those seeking a more dramatic look, consider a **floor-to-ceiling tension rod tree**. Install a sturdy tension rod from floor to ceiling in a corner, wrap it with garland or artificial pine branches, and spiral lights around it from top to bottom. Attach lightweight ornaments at varying heights to mimic the layered look of a real tree. This installation takes up less than a square foot of floor space and draws attention upward, making the room feel taller and more spacious.
“Small-space holiday decorating is all about illusion. Drawing the eye up creates a sense of volume and grandeur, even in a 300-square-foot studio.” — Lena Torres, Interior Stylist & Urban Living Consultant
High shelves and bookcases can also double as vertical trees. Stack greenery—real or faux—in a tapered pyramid formation across multiple shelves. Add string lights, pinecones, and miniature ornaments to complete the look. This method integrates seamlessly with existing furniture and avoids the need for additional structures.
Step-by-Step: Building a Wall-Mounted Tree Display
Creating a custom vertical tree doesn’t require advanced carpentry skills. Follow this step-by-step guide to build a stylish, space-saving wall tree in under three hours.
- Choose your location: Pick a blank wall with good visibility—above a console table, beside a doorway, or behind a sofa. Ensure it’s near a power outlet if using lights.
- Silhouette design: Sketch a classic tree shape (approximately 6–7 feet tall) on paper. Cut it out and tape it to the wall to test scale. Adjust as needed.
- Trace and cut: Transfer the outline to a large sheet of plywood, foam board, or corrugated plastic. Use a jigsaw or utility knife to cut along the lines.
- Mount the frame: Secure the base with L-brackets or heavy-duty wall anchors. For renters, use strong adhesive mounting strips designed for heavy objects.
- Add texture: Wrap the edges with garland, burlap ribbon, or yarn. Alternatively, paint the surface in metallic silver, deep green, or chalkboard paint for a customizable look.
- Decorate vertically: Hang ornaments from small nails, hooks, or adhesive clips. Arrange them in diagonal rows to mimic natural branch growth. Use lightweight items to prevent sagging.
- Illuminate: String battery-operated fairy lights along the outer edge or embed LED strip lights behind the frame for a halo effect.
Space-Smart Ornament and Lighting Strategies
Even the smallest tree can feel abundant with the right decorative choices. In tight spaces, overloading with bulky ornaments can create visual clutter. Instead, opt for a curated, minimalist approach that emphasizes quality over quantity.
Use **lightweight, flat ornaments** such as felt cutouts, pressed botanicals in resin, or photo frames shaped like stars and snowflakes. These add personality without weight or depth. Cluster smaller decorations in groups of three for visual impact, leaving breathing room between clusters to avoid overcrowding.
Lighting plays a crucial role in amplifying the sense of space. Choose **warm-white fairy lights** over cool blue tones—they create a cozier, more inviting atmosphere. Battery-powered string lights eliminate the need for extension cords, reducing tripping hazards and outlet congestion. Consider lights with timers to automate on/off cycles and conserve energy.
| Decoration Type | Best For Small Spaces? | Why It Works |
|---|---|---|
| Foam cone trees with mini ornaments | Yes | Takes up under 1 sq ft; portable and easy to store |
| Wall decals shaped like trees | Yes | No assembly; instantly removable |
| Full 6-foot floor tree | No | Consumes too much floor space; limits furniture placement |
| Hanging macramé tree with lights | Yes | Airy design; adds texture without bulk |
| Garland-draped bookshelf \"tree\" | Yes | Uses existing furniture; doubles as storage |
For a personal touch, incorporate **memory-based decor**, such as tiny framed photos, handwritten notes, or handmade crafts from previous years. These elements add emotional richness without physical heft. Rotate a few each year to keep the display fresh and meaningful.
Real Example: A Studio Apartment Holiday Makeover
Maria, a graphic designer in Brooklyn, lives in a 450-square-foot studio where every inch counts. Last year, she wanted a Christmas tree but couldn’t spare space for even a 4-foot model. Her solution? A 7-foot wall tree painted directly onto her largest wall using washable green chalkboard paint. She outlined the shape with painter’s tape, filled it in, then removed the tape for clean edges.
Using adhesive hooks, she hung 15 vintage-inspired glass ornaments and strung 200 warm-white fairy lights along the perimeter. Below, she placed a narrow console table with a matching green runner and a single pillar candle. The result was a dramatic, Instagram-worthy centerpiece that didn’t block her workspace or sleeping area. After the holidays, she wiped the paint away with a damp cloth—no residue, no damage.
“It looked more intentional than a real tree,” Maria said. “People thought I hired a muralist.” Her setup cost under $60 and stored flat in a closet post-season.
Essential Checklist: Decorating Your Vertical Tree
- ☐ Measure wall or ceiling space to determine maximum tree dimensions
- ☐ Choose a mounting method suitable for your living situation (rental-safe vs. permanent)
- ☐ Select lightweight, flat, or flexible materials for ornaments and greenery
- ☐ Use battery-powered or USB-rechargeable lights to reduce cord clutter
- ☐ Plan a color scheme (e.g., gold + white, red + black, rustic wood tones) for cohesion
- ☐ Test lighting brightness and timer function before final installation
- ☐ Include at least one personal or sentimental decoration for warmth
- ☐ Take a photo from multiple angles to ensure balanced visual appeal
Frequently Asked Questions
Can I use a real tree in a small apartment?
Yes, but with limitations. A tabletop tree (under 3 feet) is ideal. Place it on a waterproof tray to protect surfaces, and water it daily to minimize needle drop. Avoid flocked or heavily scented trees, which can trigger allergies in enclosed spaces.
How do I prevent my wall tree from looking flat or uninteresting?
Add depth with layered materials—wrap part of the frame in garland, use 3D ornaments that project outward, or backlight the tree with LED strips. Vary ornament sizes and include reflective elements like mirrored balls or metallic stars to catch light.
Are there fire safety concerns with vertical or hanging trees?
Absolutely. Always use UL-certified lights and never leave them unattended. Avoid placing flammable materials (like dry moss or paper ornaments) near bulbs. If using candles, opt for flameless LED versions. Keep all decorations at least three feet from heaters or radiators.
Final Thoughts: Celebrate Smart, Not Big
Living in a small apartment doesn’t mean scaling back on holiday joy—it means celebrating with more intention. By embracing vertical space, you transform constraints into creative opportunities. Whether you install a towering wall silhouette, suspend a glittering mini tree from the ceiling, or reinvent a bookshelf as a festive column, the goal is to design a tree that reflects your style and fits your life.
The most memorable holiday displays aren’t defined by size, but by thoughtfulness. A few well-placed lights, a handful of cherished ornaments, and a clever use of height can evoke more warmth than a sprawling forest of tinsel ever could. In compact homes, the magic isn’t in how much space you use—but how beautifully you use what you have.


 浙公网安备
33010002000092号
浙公网安备
33010002000092号 浙B2-20120091-4
Comments
No comments yet. Why don't you start the discussion?