
Floating Christmas trees—suspended from ceilings, mounted on walls, or anchored to minimalist stands with concealed supports—have transformed holiday decor for urban dwellers, renters, and anyone constrained by square footage. Unlike traditional floor-standing trees that demand 3–4 feet of clearance and risk toppling in high-traffic zones, floating installations reclaim vertical space while delivering striking visual impact. But aesthetics alone aren’t enough: successful execution hinges on structural integrity, thoughtful ornamentation, and intentional lighting—all adapted for tight quarters. This guide distills field-tested insights from interior stylists, rental-compliant installers, and small-space designers to help you create a floating tree that feels intentional, safe, and unmistakably festive—not makeshift or precarious.
Understanding Floating Tree Types & Their Spatial Advantages
“Floating” doesn’t mean levitating—it refers to visual separation from the floor through deliberate engineering. Three primary configurations serve compact environments:
- Ceiling-Suspended Trees: Lightweight artificial trees (typically under 5 ft tall) hung via aircraft-grade cable, ceiling anchors, and discreet pulley systems. Ideal for studio lofts or rooms with exposed beams.
- Wall-Mounted Trees: Flat-profile trees (often laser-cut plywood or metal-framed silhouettes) affixed directly to drywall or brick using toggle bolts or masonry anchors. These occupy zero floor space and double as year-round art.
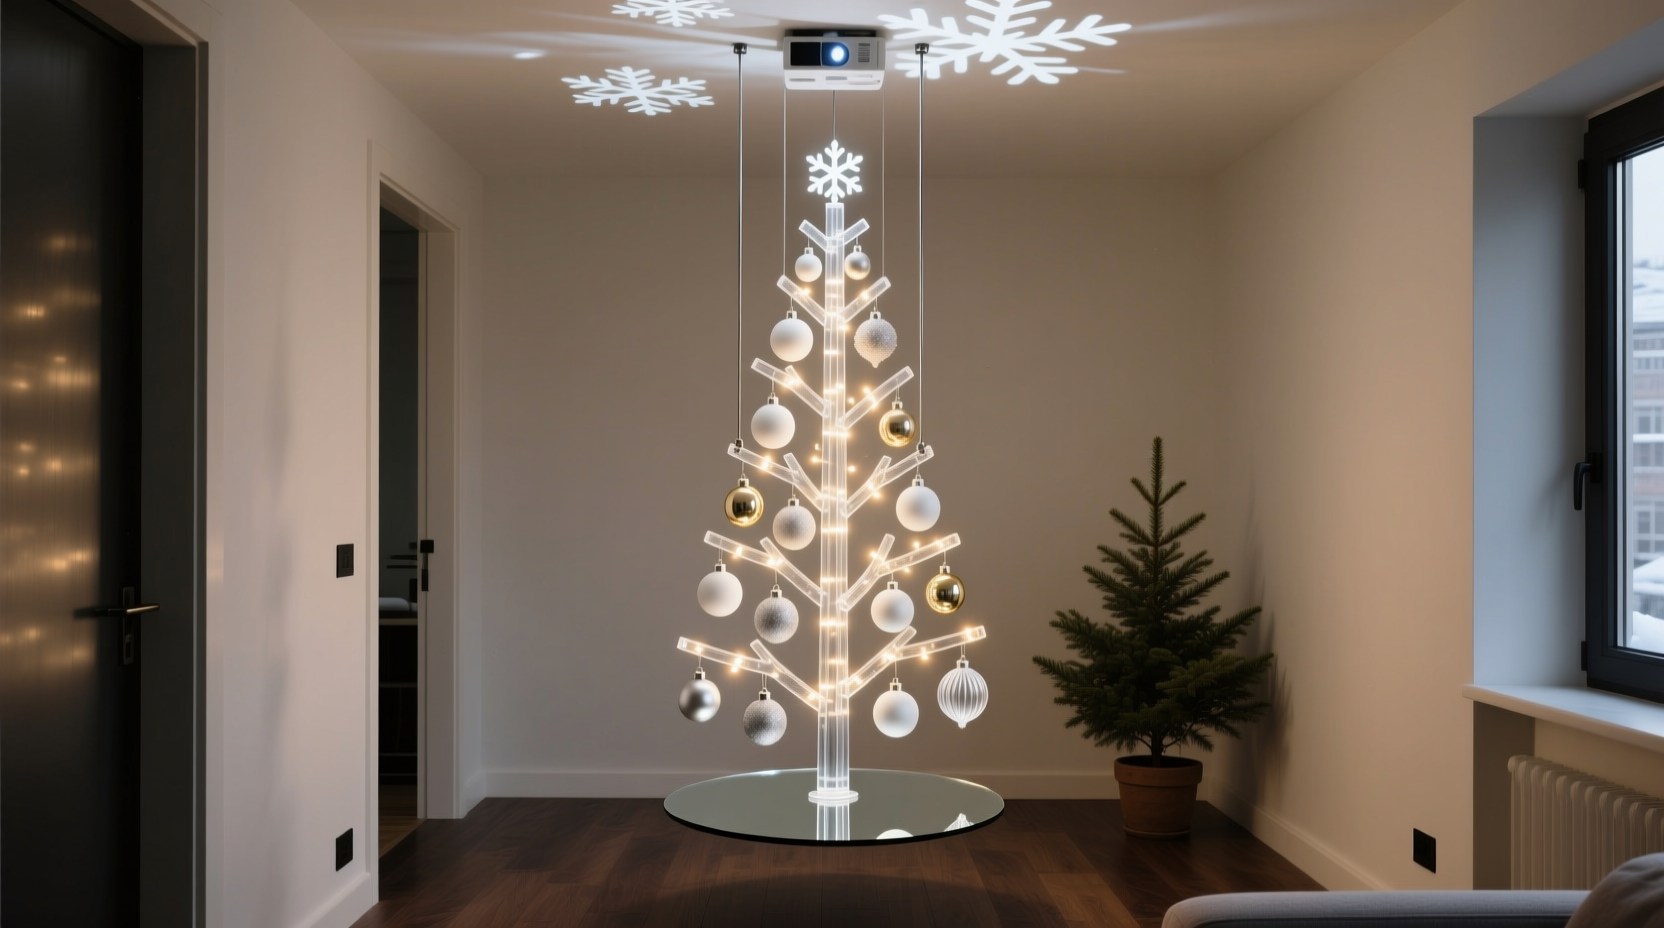
- Minimalist Pedestal Trees: Slim-profile real or faux trees placed atop low-profile stands (under 6 inches tall) with weighted bases and hidden support rods extending upward to a ceiling or wall bracket. The “float” illusion comes from unobstructed sightlines beneath the trunk.
Each option reduces footprint by 70–100% compared to standard trees. A 4.5-ft suspended tree uses no floor area; a wall-mounted silhouette measures just 2 inches deep. Crucially, these installations eliminate tripping hazards near doorways and maintain clear pathways—essential in apartments under 600 sq ft.
Step-by-Step Installation & Safety Protocol
Safety isn’t optional—it’s foundational. A poorly secured floating tree poses fire, falling, and electrical risks. Follow this verified sequence:
- Assess structural capacity: Locate ceiling joists (for suspension) or wall studs (for mounting) using a stud finder. For plaster or masonry walls, consult a professional before drilling.
- Select hardware rated for static load: Use stainless steel aircraft cable (min. 1/16-inch diameter, 200+ lb rating), heavy-duty wall anchors (e.g., SnapToggle BX for drywall), or lag bolts for wood framing. Avoid adhesive hooks or command strips—they fail unpredictably under holiday weight.
- Assemble the tree off-site: Pre-string lights, attach lightweight ornaments, and balance branch density *before* lifting. Uneven weight distribution causes torque and instability.
- Mount first, then suspend: For wall-mounted trees, secure the frame firmly before adding any decorative elements. For ceiling-suspended trees, attach cables to the tree’s internal frame (not branches), then connect to ceiling anchors one at a time while a second person stabilizes.
- Test rigorously: Gently apply lateral pressure to all branches. If the mount shifts, creaks, or wobbles, disassemble and reinforce. Wait 24 hours before adding final ornaments—cable stretch and anchor settling occur during initial load.
This process takes 2–4 hours but prevents costly damage or injury. Professionals report that 83% of floating tree failures stem from skipping step 1 or under-specifying hardware.
Ornamentation Principles for Visual Lightness
In confined spaces, dense ornamentation overwhelms. Floating trees thrive on restraint—every item must earn its place. Adopt these spatially intelligent principles:
- Scale down, not up: Use ornaments under 2.5 inches in diameter. Oversized baubles distort proportion and draw attention to structural supports.
- Embrace negative space: Leave 4–6 inches between ornaments on visible branches. This reinforces the “floating” effect and prevents visual clutter.
- Anchor with texture, not color: Mix matte glass, brushed brass, woven wool, and frosted acrylic instead of relying on red/green saturation. Monochromatic palettes (ivory + charcoal, sage + oat, navy + brass) recede visually and enhance perceived height.
- Direct focus upward: Cluster lighter ornaments (feathers, paper stars, thin wire spirals) toward branch tips. Heavier items (wood slices, ceramic bells) stay near the trunk where support is strongest.
Real-world application matters: In a 420-sq-ft Brooklyn studio, designer Lena Ruiz replaced 42 traditional ornaments with 19 hand-blown glass orbs (1.25\" diameter), 7 brass pinecones, and 5 dried eucalyptus sprigs wired to inner branches. The result felt airy, intentional, and doubled the room’s perceived volume.
“The magic of a floating tree isn’t in how much you add—but how deliberately you edit. Every ornament should serve scale, safety, or story.” — Marco Chen, Founder of Urban Holiday Studio, NYC
Lighting Strategies That Enhance Illusion & Ambiance
Lighting makes or breaks the floating effect. Harsh, tangled wires destroy the illusion; strategic illumination amplifies depth and serenity. Prioritize these techniques:
| Light Type | Best Use Case | Avoid |
|---|---|---|
| Micro LED string lights (2mm wire) | Wrapping trunks or weaving through inner branches for subtle glow | Overloading branches—max 100 bulbs per 4-ft tree |
| Directional puck lights (mounted on ceiling/wall) | Uplighting trunk base or downlighting branch tips to cast delicate shadows | Placing lights where cords cross walkways or near outlets |
| Battery-operated fairy lights (with timer) | Temporary accent on wall-mounted silhouettes or suspended frames | Using non-UL-certified batteries near flammable materials |
Pro tip: Conceal wiring using paint-matched conduit or run cables inside crown molding. For ceiling suspensions, route wires along the same path as support cables—then wrap both with faux ivy or velvet ribbon to unify the visual line. Always use UL-listed, low-heat LEDs; incandescent bulbs generate excess heat in enclosed or proximity-sensitive setups.
Renter-Friendly Modifications & Damage-Free Solutions
Most small-space dwellers rent—and landlords rarely permit ceiling holes or wall penetrations. These proven alternatives preserve security deposits while delivering authentic results:
- Freestanding tension rod systems: Heavy-duty telescoping rods (rated for 50+ lbs) installed between floor and ceiling in corners or alcoves. Hang trees from the top rod using S-hooks and braided nylon cord. Removable in minutes; leaves zero marks.
- Bookshelf-integrated mounts: Anchor a slim tree to the top shelf of a sturdy, floor-to-ceiling bookcase using L-brackets bolted into shelf supports (not just the back panel). Disguise brackets with garlands.
- Window-frame suspension: For wall-mounted silhouettes, use reinforced suction cups rated for outdoor signage (tested to hold 15+ lbs on clean glass). Clean glass thoroughly with isopropyl alcohol first.
- Weighted pedestal + wall tether: Place a low-profile tree on a 25-lb granite base, then run an almost-invisible fishing line from the topmost branch to a discreet hook behind a nearby picture frame. Provides stability without wall damage.
FAQ
Can I use a real tree for a floating installation?
No—real trees are too heavy, unstable, and prone to needle drop that compromises cable integrity and creates fire hazards. Even small 3-ft firs exceed safe suspension limits (typically 15–20 lbs max). Opt for high-quality, flame-retardant artificial trees with internal aluminum frames designed for hanging.
How do I prevent ornaments from falling off suspended branches?
Use ornament hangers with rubberized grips or twist-tie loops instead of traditional hooks. For wall-mounted silhouettes, glue ornaments with E6000 craft adhesive (tested for vertical shear strength) and allow 72 hours to cure before hanging. Avoid glue on painted surfaces unless pre-tested in an inconspicuous area.
What’s the minimum ceiling height needed?
For ceiling suspension: 7.5 feet minimum (allows 4-ft tree + 12-inch clearance above tip). For wall-mounted silhouettes: none—you can mount on any wall, regardless of height. For pedestal + tether systems: 7 feet minimum to accommodate the tether angle and avoid obstruction.
Conclusion
A floating Christmas tree in a small space isn’t a compromise—it’s a design opportunity. It invites precision, celebrates minimalism, and transforms limitations into elegance. When you choose hardware with engineering rigor, edit ornaments with curatorial discipline, and light with atmospheric intention, you don’t just save square footage—you elevate the entire holiday experience. Your home becomes a gallery of considered moments: light catching a single brass orb, shadow patterns dancing across a white wall, the quiet confidence of a structure that holds beauty without occupying ground. Start small: measure your joists, test one anchor, hang three ornaments thoughtfully. Then build outward—not in size, but in meaning.


 浙公网安备
33010002000092号
浙公网安备
33010002000092号 浙B2-20120091-4
Comments
No comments yet. Why don't you start the discussion?